
Discover how to body lift a SUV to increase ground clearance, improve off-road performance, and enhance your vehicle’s look. This guide walks you through the entire process—from planning and parts selection to installation and safety checks—so you can tackle the project with confidence.
Key Takeaways
- Understand the difference between a body lift and a suspension lift: A body lift raises only the body off the frame, while a suspension lift modifies the entire suspension system for greater height and performance.
- Choose the right lift kit for your SUV: Select a quality 2-inch to 3-inch body lift kit designed specifically for your make and model to ensure proper fit and safety.
- Gather the right tools and workspace: You’ll need a jack, jack stands, wrenches, torque wrench, and a clean, level workspace to complete the job safely.
- Follow the manufacturer’s instructions carefully: Each kit is different, so always refer to the included manual and double-check bolt torque specifications.
- Inspect and maintain after installation: After lifting, regularly check bolts, brackets, and drivetrain components to ensure everything remains secure.
- Consider professional help if unsure: If you’re not confident in your mechanical skills, consult a mechanic to avoid costly mistakes or safety risks.
- Check local laws and regulations: Some areas have height restrictions or require modifications to be inspected, so verify compliance before driving.
How to Body Lift a SUV: A Complete Step-by-Step Guide
So, you’ve decided to give your SUV a little extra height. Maybe you want better ground clearance for off-roading, a more aggressive stance, or just the satisfaction of a DIY upgrade. A body lift is a popular and relatively affordable way to achieve that lifted look without the complexity of a full suspension overhaul. But before you grab your wrench set, it’s important to understand what a body lift really does—and how to do it right.
In this comprehensive guide, we’ll walk you through everything you need to know about how to body lift a SUV. From choosing the right kit to safely installing it and maintaining your vehicle afterward, we’ve got you covered. Whether you’re a weekend warrior or a first-time modifier, this guide will help you complete the job with confidence.
By the end, you’ll have a taller, more capable SUV—and the know-how to keep it running smoothly for miles to come.
What Is a Body Lift?
A body lift is a modification that raises the body of your SUV away from the frame using spacers or blocks. Unlike a suspension lift—which alters the suspension components like shocks, springs, and control arms—a body lift only lifts the cabin, bed (if applicable), and body panels. This creates additional space between the body and the frame, giving you more ground clearance and a bolder appearance.
Most body lifts range from 1 to 3 inches, with 2 inches being the most common. This height increase allows for slightly larger tires and improved approach and departure angles, which can be helpful on rough terrain. However, it’s important to note that a body lift doesn’t improve suspension travel or handling. It’s purely a cosmetic and clearance upgrade.
Body lifts are popular because they’re less expensive and easier to install than suspension lifts. They also don’t require recalibrating the speedometer or modifying the drivetrain. But they do come with some trade-offs, such as potential stress on body mounts and the need to extend certain cables and lines.
Body Lift vs. Suspension Lift: Which Is Right for You?
Before you commit to a body lift, it’s smart to compare it with a suspension lift. Both can increase your SUV’s height, but they do so in very different ways.
A suspension lift modifies the entire suspension system. It replaces or extends components like coil springs, shocks, control arms, and track bars. This type of lift provides real performance benefits—better off-road capability, improved articulation, and the ability to fit much larger tires. However, it’s more complex, expensive, and often requires professional installation.
A body lift, on the other hand, is simpler and cheaper. It uses polyurethane or steel spacers placed between the body and frame at each body mount location. The process typically takes a weekend and can be done by a skilled DIYer. But because it doesn’t change the suspension, you won’t gain significant performance improvements. Also, larger tires may still rub without additional modifications.
So, which should you choose?
If you’re mainly looking for a visual upgrade and a bit more clearance for light off-roading, a body lift is a great option. But if you plan to tackle serious trails, rock crawl, or need maximum tire size, a suspension lift (or a combination of both) might be better.
For most casual SUV owners, a 2- or 3-inch body lift strikes a good balance between cost, ease, and function.
Choosing the Right Body Lift Kit
Not all body lift kits are created equal. To ensure a safe and successful installation, you need to choose a high-quality kit designed specifically for your SUV’s make, model, and year.
Here’s what to look for:
Compatibility
Always check that the kit is made for your exact vehicle. A kit for a 2020 Jeep Grand Cherokee won’t fit a 2018 Toyota 4Runner, even if they look similar. Manufacturers like Performance Accessories, Daystar, and Rugged Ridge offer kits tailored to popular SUV models.
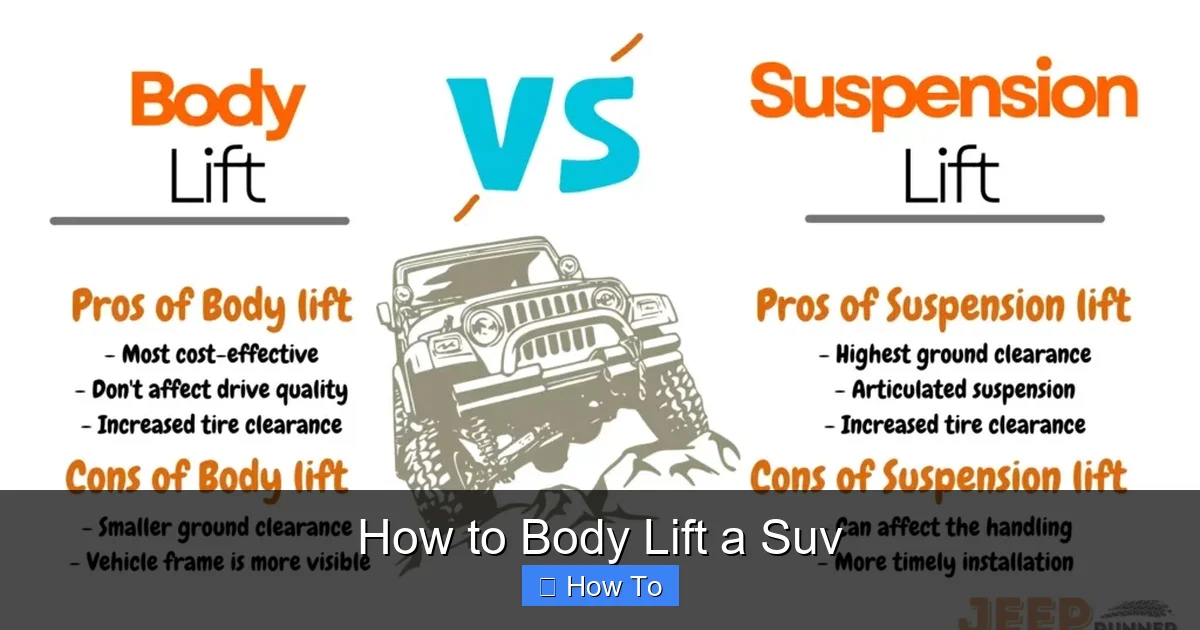
Visual guide about How to Body Lift a Suv
Image source: jeeprunner.com
Visual guide about How to Body Lift a Suv
Image source: thumbs.dreamstime.com
Lift Height
Most kits offer 2-inch or 3-inch lifts. A 2-inch lift is ideal for mild upgrades and maintains good drivability. A 3-inch lift gives a more dramatic look but may require additional modifications, like extending the steering shaft or brake lines.
Material Quality
Look for kits made from high-density polyurethane or CNC-machined steel. Polyurethane is durable, resistant to cracking, and provides a slight cushion. Steel is stronger but can rust if not properly coated. Avoid cheap plastic or rubber spacers—they can compress over time and fail.
Included Components
A complete kit should include:
- Spacers for each body mount (usually 6–10 per side)
- Longer bolts and washers
- Brackets for the radiator shroud (if needed)
- Instructions and torque specs
- Optional: extended brake lines, steering shaft extensions, or transfer case drop kits
Brand Reputation
Stick with reputable brands. Read customer reviews, check forums, and ask for recommendations. A well-reviewed kit from a trusted manufacturer is worth the extra cost for peace of mind.
Warranty and Support
Some companies offer warranties on their kits and provide installation support. This can be helpful if you run into issues during the process.
Tools and Materials You’ll Need
Before you start, make sure you have all the necessary tools and a safe workspace. Rushing this step can lead to mistakes or accidents.
Essential Tools
- Floor jack (3-ton capacity recommended)
- Jack stands (at least four, rated for your SUV’s weight)
- Socket wrench set (metric and standard)
- Torque wrench
- Impact wrench (optional but helpful)
- Breaker bar
- Penetrating oil (like WD-40 or PB Blaster)
- Rubber mallet
- Safety glasses and gloves
Workspace Requirements
You’ll need a flat, level surface—like a garage floor or driveway. Make sure there’s enough room to walk around the vehicle and lift it safely. Avoid working on grass, gravel, or uneven ground.
Safety Gear
Always wear safety glasses and gloves. SUVs are heavy, and parts can shift unexpectedly. Never rely solely on a jack—always use jack stands to support the vehicle.
Additional Supplies
- Drip pan (for any fluid spills)
- Shop rags
- Marker or paint pen (for labeling parts)
- Zip ties or wire (for securing loose lines)
Pre-Installation Preparation
Taking time to prepare will make the installation smoother and safer.
Read the Instructions
Before touching a single bolt, read the entire instruction manual that comes with your kit. Each kit is slightly different, and the manufacturer’s steps are your best guide.
Inspect Your SUV
Check the condition of your body mounts. If they’re cracked, dry-rotted, or damaged, replace them before installing the lift. Old mounts can fail under stress, especially with added height.
Clean the Work Area
Remove dirt, grease, and debris from the body mounts and surrounding areas. This ensures a clean fit and prevents contamination.
Plan Your Time
A body lift typically takes 6–10 hours for a first-timer. If you’re working alone, allow extra time. Don’t rush—safety and precision are more important than speed.
Enlist Help (Optional)
Having a friend assist can make lifting and aligning parts much easier. It’s also safer in case something goes wrong.
Step-by-Step Installation Process
Now for the main event. Follow these steps carefully to install your body lift.
Step 1: Lift and Support the Vehicle
Use the floor jack to lift your SUV at the manufacturer-recommended jacking points. Place jack stands under the frame rails, not the body. Lower the vehicle onto the stands and double-check that it’s stable. Never work under a vehicle supported only by a jack.
Step 2: Remove the Front Body Mounts
Start at the front of the vehicle. Locate the body mounts—usually near the radiator support or fender wells. Spray penetrating oil on the bolts and let it sit for 10–15 minutes to loosen rust.
Use a socket wrench to remove the bolts. Some may be tight—use a breaker bar if needed. Once removed, carefully lift the body slightly to access the mount. Remove the old mount and inspect it.
Install the new spacer on top of the frame mount. Place the longer bolt through the spacer and into the frame. Hand-tighten for now. Repeat for all front mounts.
Step 3: Remove the Rear Body Mounts
Move to the rear of the SUV. The rear mounts are often near the rear axle or under the trunk area. Follow the same process: spray, remove, inspect, and install spacers with longer bolts.
Some SUVs have additional mounts under the doors or near the firewall. Check your kit instructions to ensure you don’t miss any.
Step 4: Install the Radiator Shroud Bracket (If Needed)
On some models, lifting the body can cause the radiator shroud to sag or rub. Your kit may include a bracket to relocate the shroud. Follow the instructions to install it securely.
Step 5: Reconnect Components
As you lift the body, some components may become tight or disconnected. These can include:
- Brake lines
- Fuel lines
- Electrical connectors
- Steering shaft
- Transfer case linkage (4WD models)
Inspect each one. If a line is too short, you may need an extension kit (often sold separately). Never force a connection—this can damage lines or cause leaks.
Step 6: Torque All Bolts
Once all spacers are in place and components are reconnected, use a torque wrench to tighten all bolts to the manufacturer’s specifications. Over-tightening can strip threads; under-tightening can lead to loosening over time.
Typical torque specs range from 40 to 80 ft-lbs, but always refer to your kit’s manual.
Step 7: Lower the Vehicle
Carefully remove the jack stands and lower the SUV using the floor jack. Let it settle naturally. Do not bounce or rock the vehicle.
Step 8: Test and Inspect
Start the engine and let it idle. Listen for unusual noises. Check under the vehicle for loose bolts, rubbing parts, or leaks.
Take a short test drive on a quiet road. Pay attention to steering, braking, and any vibrations. If something feels off, stop and inspect immediately.
Post-Installation Tips and Maintenance
Your body lift is installed—great job! But the work isn’t quite done.
Recheck Bolts After 50–100 Miles
Vibration and settling can loosen bolts. After your first few drives, re-torque all body mount bolts to ensure they’re secure.
Inspect Regularly
Make it a habit to check the body mounts, spacers, and related components during oil changes or tire rotations. Look for cracks, rust, or movement.
Watch for Rubbing
Even with a lift, larger tires may rub on the fenders or suspension during full turns or off-road flex. If you notice rubbing, consider trimming the fender or adding wheel spacers.
Maintain Proper Alignment
A body lift doesn’t affect alignment, but if you’ve added larger tires or made other modifications, get a professional alignment to prevent uneven tire wear.
Keep Records
Document your installation, including photos and torque specs. This helps if you sell the vehicle or need to troubleshoot later.
Troubleshooting Common Issues
Even with careful installation, problems can arise. Here’s how to handle the most common ones.
Loose or Squeaky Body Mounts
If you hear squeaking or feel movement, the bolts may be loose. Re-torque them. If the noise persists, check for worn mounts or missing washers.
Steering Feels Off
A body lift shouldn’t affect steering, but if the steering shaft is too tight, it can cause binding. Ensure the shaft has enough slack. If not, consider a steering extension.
Brake or Fuel Line Stress
If lines are stretched or rubbing, install extension kits or reroute them with zip ties. Never allow lines to kink or bend sharply.
Transfer Case Issues (4WD Models)
Lifting the body can angle the transfer case. If you experience vibrations or difficulty shifting, a transfer case drop kit may be needed to realign it.
Uneven Lift Height
If one side sits higher than the other, double-check spacer placement and bolt tightness. Some kits include shims to fine-tune height.
Safety and Legal Considerations
Modifying your SUV isn’t just about mechanics—it’s also about safety and legality.
Height Restrictions
Some states and countries have laws limiting how high a vehicle can be. Check local regulations before installing a lift. In some areas, lifts over 2 inches require additional lighting or signage.
Insurance and Resale
Notify your insurance company about the modification. Some insurers may adjust your premium or require documentation. When selling, disclose the lift—it can affect value and buyer interest.
Airbag and Safety Systems
Ensure that sensors and wiring for airbags, ABS, and stability control are not damaged or disconnected during installation. Tampering with these systems can be dangerous and illegal.
Professional Inspection
In some regions, lifted vehicles must pass a safety inspection. Even if not required, consider having a mechanic review your work for peace of mind.
Conclusion
Learning how to body lift a SUV is a rewarding project that can enhance your vehicle’s look and capability. With the right kit, tools, and preparation, you can complete the job safely and effectively in a weekend.
Remember, a body lift is not a performance upgrade—it’s a clearance and cosmetic improvement. For serious off-roading, consider a suspension lift or a combination of both. But for most drivers, a 2- or 3-inch body lift offers the perfect balance of cost, ease, and style.
Always prioritize safety, follow the manufacturer’s instructions, and don’t hesitate to seek help if you’re unsure. With proper installation and maintenance, your lifted SUV will turn heads and handle the trails with confidence.
Now grab your tools, lift with care, and enjoy the view from up high.