

Building a sleeping platform for your SUV is a smart, affordable way to create a comfortable bed for camping or travel. This guide walks you through every step, from measuring your vehicle to installing a sturdy, foldable platform that maximizes space and comfort.
Key Takeaways
- Measure your SUV’s interior carefully to ensure a perfect fit and avoid wasted materials.
- Use lightweight, durable materials like plywood, MDF, or composite boards for easy handling and long-term use.
- Design for versatility—include hinges or removable sections to access storage underneath.
- Prioritize safety and stability by securing the platform with straps, brackets, or custom supports.
- Add comfort with padding such as foam mattresses, sleeping pads, or memory foam toppers.
- Customize for your needs—include cup holders, USB ports, or fold-out tables for added convenience.
- Test before you sleep—always do a trial run to check for stability, noise, and comfort.
How to Build a Sleeping Platform for SUV
If you love road trips, weekend camping, or just need a cozy place to crash in your vehicle, building a sleeping platform for your SUV is one of the best DIY upgrades you can make. It’s affordable, customizable, and turns your SUV into a mini camper in just a few hours. Whether you’re a weekend warrior or a full-time van lifer, a well-built sleeping platform gives you a flat, stable surface to sleep on—no more curling up on the seats or dealing with uneven floors.
In this guide, we’ll walk you through the entire process of building a sleeping platform for your SUV. You’ll learn how to measure your vehicle, choose the right materials, design a functional layout, and assemble everything safely. We’ll also share tips for adding comfort, maximizing storage, and making your platform easy to set up and take down. By the end, you’ll have a comfortable, reliable bed that fits perfectly in your SUV—no professional tools or experience required.
Why Build a Sleeping Platform for Your SUV?
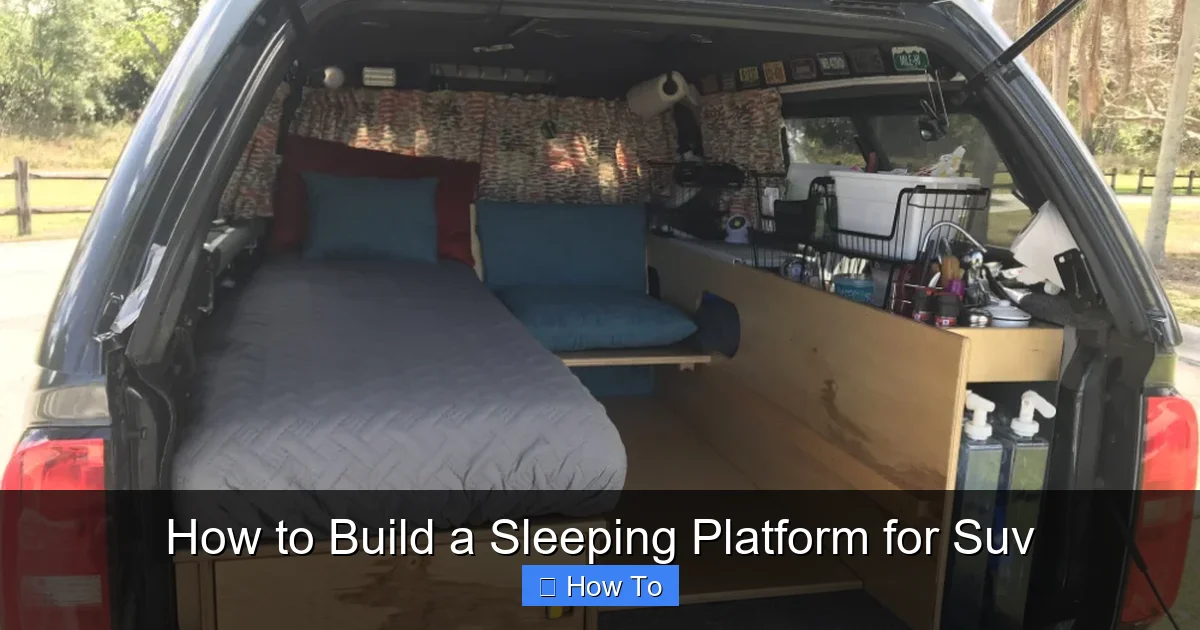
Visual guide about How to Build a Sleeping Platform for Suv
Image source: i.pinimg.com
Before we dive into the how-to, let’s talk about why this project is worth your time. SUVs are great for adventure, but their interiors aren’t designed for sleeping. The seats don’t lie flat, the floor is uneven, and there’s often wasted space underneath. A sleeping platform solves all these problems.
First, it gives you a flat, level surface to sleep on. This is crucial for comfort—especially on longer trips. Second, it frees up space. By lifting the sleeping area, you can store gear, coolers, or clothes underneath. Third, it’s cost-effective. A DIY platform costs a fraction of a pre-made camper shell or roof tent. And finally, it’s customizable. You can design it to match your SUV’s layout, your sleeping preferences, and your storage needs.
Whether you’re camping in the mountains, road-tripping across the country, or just need a quiet place to nap during a long drive, a sleeping platform makes your SUV more functional and comfortable.
Step 1: Measure Your SUV’s Interior

Visual guide about How to Build a Sleeping Platform for Suv
Image source: images.squarespace-cdn.com
The first and most important step is measuring your SUV’s interior. A well-fitting platform starts with accurate dimensions. Grab a tape measure, a notebook, and a pen—let’s get started.
Measure the Floor Area
Open the rear doors and remove any seats if possible (some SUVs have foldable or removable rear seats). Measure the length and width of the floor area where the platform will go. Start from the back of the front seats to the rear doors, and from one side panel to the other. Write down these measurements.
Check for Obstacles
Look for things that might interfere with your platform, like wheel wells, seat brackets, or built-in storage compartments. Measure the height and width of these obstacles so you can design around them. For example, if there’s a wheel well on each side, your platform will need cutouts or raised edges to accommodate them.
Determine the Height
Decide how high you want your platform to be. A good starting point is 6 to 8 inches off the floor—this gives you enough space for storage underneath while keeping the bed low enough to get in and out easily. Measure from the floor to your desired height and note it down.
Account for Seat Recline
If you’re not removing the rear seats, measure how far they recline when folded down. You may need to build the platform around them or design it to sit on top. Some people prefer to remove the seats entirely for a flat floor—check your vehicle’s manual to see if this is possible.
Sketch a Simple Layout
Draw a rough sketch of your SUV’s interior, including the floor dimensions, obstacles, and platform height. This will help you visualize the design and make adjustments before cutting any materials.
Step 2: Choose the Right Materials
Now that you have your measurements, it’s time to pick materials. The goal is to find something strong, lightweight, and easy to work with. Here are the best options:
Plywood
Plywood is the most popular choice for DIY sleeping platforms. It’s strong, affordable, and comes in various thicknesses. For a platform, ½-inch or ¾-inch plywood works well. ¾-inch is sturdier but heavier—ideal if you want a permanent setup. ½-inch is lighter and easier to move, perfect for a foldable or removable design.
MDF (Medium-Density Fiberboard)
MDF is smooth and easy to cut, but it’s heavier and less water-resistant than plywood. It’s a good option if you’re painting the platform or want a very flat surface. Just make sure to seal it with paint or varnish to prevent swelling from moisture.
Composite or Marine Plywood
If you’re camping in wet conditions or want extra durability, consider marine-grade plywood or composite boards. These are more expensive but resist water, rot, and warping. Great for long-term use.
Foam Board or Insulation Panels
For a lighter, insulated option, some people use foam board covered with plywood. This adds insulation and reduces weight, but it’s not as strong—best for occasional use.
Hardware and Fasteners
You’ll also need screws, hinges, brackets, and straps. Use wood screws for assembly, heavy-duty hinges if you’re making a foldable platform, and ratchet straps or L-brackets to secure it in place.
Step 3: Design Your Platform
With your measurements and materials ready, it’s time to design your platform. Think about how you’ll use it and what features you want.
Single-Piece vs. Multi-Panel Design
A single-piece platform is simple and sturdy but hard to move. A multi-panel design (like two or three connected pieces) is easier to store and set up. Use hinges to connect the panels so they fold like a suitcase.
Include Storage Access
Design the platform with access points—like a hinged lid or removable panel—so you can reach storage underneath. This is great for stashing clothes, tools, or food.
Add Support Legs or Brackets
If your platform spans a large area, add support legs or wall brackets to prevent sagging. You can use adjustable table legs, wooden blocks, or custom-cut supports that attach to the SUV’s floor or side panels.
Consider a Ramp or Step
If your platform is high off the ground, build a small ramp or step to make it easier to climb in and out. This is especially helpful if you’re tall or have mobility issues.
Plan for Comfort
Think about how you’ll add padding. Will you use a foam mattress, a sleeping pad, or a custom-cut cushion? Make sure your platform is wide and long enough for your preferred bedding.
Step 4: Cut and Assemble the Platform
Now for the fun part—building! Follow these steps to cut and assemble your platform.
Cut the Wood
Using your measurements and design, cut the plywood or other material to size. Use a circular saw, jigsaw, or ask the hardware store to cut it for you. Sand the edges to prevent splinters.
Assemble the Frame (If Needed)
For extra strength, build a simple frame underneath the platform using 2×2 or 1×3 wood strips. Attach the frame to the plywood with screws. This adds rigidity and helps distribute weight.
Attach Hinges (For Foldable Designs)
If you’re making a foldable platform, attach heavy-duty hinges between the panels. Make sure they’re aligned properly so the platform folds flat. Test the movement before finalizing.
Add Support Legs or Brackets
Install support legs at the center or ends of the platform. Use adjustable legs for uneven terrain, or fixed brackets that attach to the SUV’s floor. Secure them with screws or bolts.
Secure the Platform
Once assembled, place the platform in your SUV and secure it. Use ratchet straps hooked to the seat anchors, or install L-brackets to the floor. Make sure it doesn’t shift when driving or sleeping.
Step 5: Add Comfort and Finishing Touches
A platform is only as good as the sleep it provides. Let’s make it cozy.
Install Padding
Add a layer of foam on top of the platform. A 2- to 4-inch high-density foam mattress works well. You can buy a pre-cut mattress or use camping foam pads. Cover it with a fitted sheet or mattress protector.
Use a Mattress Topper
For extra comfort, add a memory foam topper. It conforms to your body and reduces pressure points. Look for one that’s 2 inches thick or more.
Add Bedding
Bring your favorite sheets, blankets, and pillows. Consider a sleeping bag for colder weather. Use a duvet or quilt for versatility.
Include Storage Solutions
Add under-platform storage bins, hanging organizers, or bungee nets to keep gear tidy. Label bins for easy access.
Install Lighting
Clip-on LED lights or battery-powered string lights can make nighttime use easier. Mount them under the platform or on the side panels.
Add Convenience Features
Want to go the extra mile? Install a USB charging port, a small fold-out table, or cup holders. Use adhesive mounts or drill small holes for wiring.
Troubleshooting Common Issues
Even the best plans can run into problems. Here’s how to fix common issues:
Platform Sags in the Middle
Add a center support leg or reinforce the frame with additional wood strips. Make sure the material is thick enough for the span.
Platform Shifts While Driving
Use stronger straps or install permanent brackets. Check that all fasteners are tight and the platform fits snugly.
Too Heavy to Move
Switch to lighter materials like ½-inch plywood or foam board. Or build a two-piece design that’s easier to handle.
Not Comfortable Enough
Add a thicker foam layer or a memory foam topper. Make sure the platform is level and the padding is evenly distributed.
Difficult to Access Storage
Install a hinged lid with a handle or use removable panels. Keep frequently used items in easy-to-reach bins.
Conclusion
Building a sleeping platform for your SUV is a rewarding DIY project that enhances your travel experience. It’s affordable, practical, and totally customizable. With the right measurements, materials, and design, you can create a comfortable, stable bed that fits perfectly in your vehicle.
Remember to measure carefully, choose durable materials, and prioritize safety and comfort. Add features like storage, lighting, and padding to make your platform feel like a real bed. And don’t forget to test it before your first night out.
Whether you’re camping in the wilderness or just need a quiet place to rest on a long drive, your DIY sleeping platform will make every trip more enjoyable. So grab your tools, follow this guide, and get ready to sleep soundly in your SUV.