
Building a tool cabinet for your SUV is a smart way to keep tools secure, organized, and accessible on the go. This guide walks you through planning, materials, construction, and installation—perfect for DIYers who want a custom solution without breaking the bank.
Key Takeaways
- Plan for your SUV’s interior space: Measure carefully and design a cabinet that fits snugly without blocking visibility or passenger comfort.
- Use durable, lightweight materials: Plywood, aluminum, or plastic composites offer strength without adding excessive weight.
- Prioritize safety and security: Anchor the cabinet properly and use locks or latches to prevent movement during driving.
- Customize compartments for efficiency: Design drawers, trays, and dividers to match your tool types and usage habits.
- Ventilation and moisture control matter: Include airflow or moisture-resistant liners to protect tools from rust and damage.
- Test before final installation: Ensure doors open smoothly, drawers glide, and nothing shifts when the vehicle moves.
- Maintain accessibility: Place frequently used tools in easy-to-reach spots and label sections for quick identification.
Introduction: Why Build a Tool Cabinet for Your SUV?
Whether you’re a weekend warrior, a contractor, or an outdoor enthusiast, having tools on hand is essential. But tossing wrenches, sockets, and power tools into the back of your SUV leads to chaos—tools get lost, damaged, or become dangerous projectiles during sudden stops. That’s where a custom-built tool cabinet comes in.
In this guide, we’ll show you how to build a tool cabinet for a SUV that’s sturdy, organized, and tailored to your needs. You’ll learn how to measure your vehicle, choose the right materials, design functional storage, and install your cabinet safely. No fancy workshop? No problem. This project is designed for DIYers of all skill levels, using basic tools and straightforward techniques.
By the end, you’ll have a sleek, secure storage solution that keeps your tools within reach—whether you’re fixing a flat on the highway or setting up camp in the wilderness. Let’s get started!
Step 1: Assess Your Needs and SUV Space
Before picking up a saw, take time to understand what you’re working with. Every SUV is different, and your tool cabinet should reflect both your vehicle’s layout and your personal tool habits.

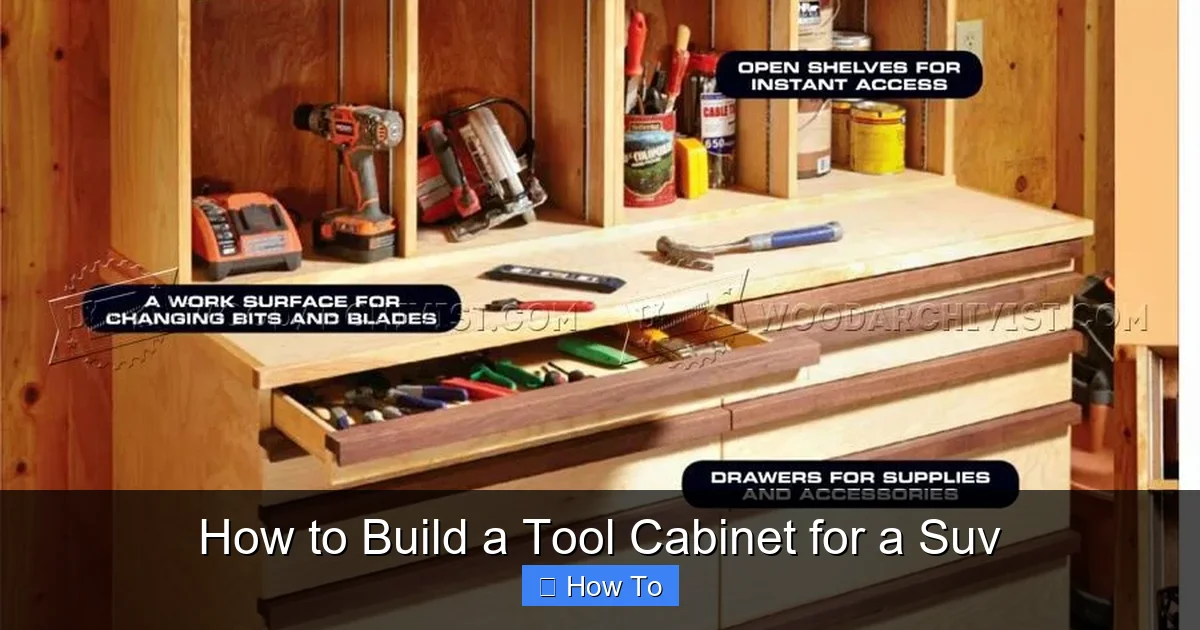
Visual guide about How to Build a Tool Cabinet for a Suv
Image source: cdn2.tmbi.com
Determine Your Tool Inventory
Start by listing the tools you use most. Are you carrying hand tools like screwdrivers and pliers? Heavy-duty gear like impact wrenches and jack stands? Or maybe specialized equipment for camping, fishing, or off-roading? Group them by size, frequency of use, and fragility.
For example:
- Frequently used tools: Keep these in easy-access drawers or open trays.
- Heavy or bulky items: Store these at the bottom or in reinforced compartments.
- Small or delicate tools: Use foam inserts or small bins to prevent damage.
Measure Your SUV’s Cargo Area
Grab a tape measure and head to your vehicle. Measure the width, depth, and height of the cargo space—especially where you plan to install the cabinet. Don’t forget to account for:
- Rear seat configuration (folded or upright)
- Spare tire well or sub-floor storage
- Door clearance when opening
- Headroom if placing the cabinet near the ceiling
Pro tip: Take photos and sketch a rough layout. This helps visualize how the cabinet will fit and whether it interferes with passenger space or visibility.
Consider Weight and Balance
SUVs have weight limits, and adding a heavy cabinet can affect handling and fuel efficiency. Aim for a design that’s strong but not overly bulky. If you’re carrying heavy tools, place the cabinet low and centered to maintain stability.
Step 2: Choose the Right Materials
The materials you choose will impact durability, weight, and cost. Here are the best options for a DIY SUV tool cabinet.
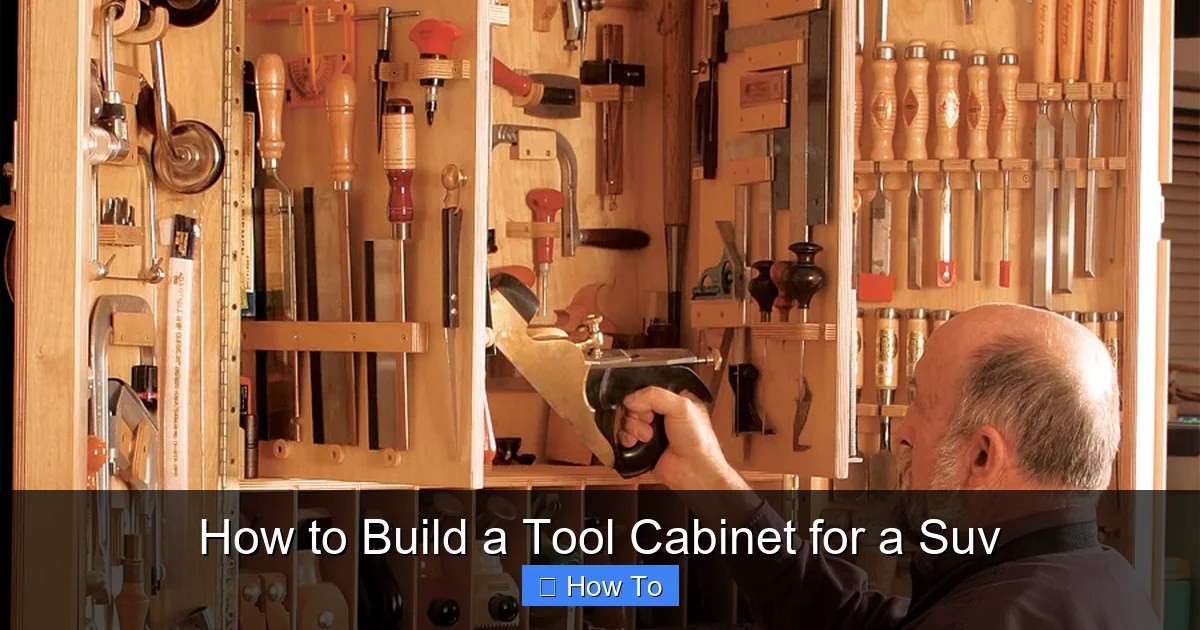
Visual guide about How to Build a Tool Cabinet for a Suv
Image source: s3.amazonaws.com
Wood Options
3/4-inch plywood is a popular choice for its strength and affordability. Baltic birch plywood is especially good—it has fewer voids and a smooth finish. For a lighter build, consider 1/2-inch plywood for non-load-bearing parts like drawer faces.
Avoid particleboard or MDF—they absorb moisture and can swell or weaken over time, especially in humid or rainy conditions.
Metal and Composite Alternatives
If you want something more rugged, aluminum sheets or corrugated plastic (like Coroplast) are excellent lightweight options. Aluminum is rust-resistant and strong, but requires more skill to cut and join. Corrugated plastic is easy to work with and waterproof, though less durable for heavy tools.
Hardware and Fasteners
Use wood screws (1 1/4” to 2”) for assembling plywood. For metal, opt for self-tapping screws or rivets. Don’t forget:
- Hinges (heavy-duty for doors)
- Drawer slides (ball-bearing for smooth operation)
- Latches or locks (to secure cabinets while driving)
- Rubber gaskets or weather stripping (to reduce noise and moisture)
Finishing Touches
Seal wood with a water-resistant polyurethane or outdoor-grade paint to protect against spills and humidity. For metal, consider a rust-inhibiting primer and powder coating for a professional look.
Step 3: Design Your Tool Cabinet
A well-designed cabinet saves time and frustration. Use free software like SketchUp or even graph paper to draft your plan.
Basic Cabinet Layout
Most SUV tool cabinets follow a simple box design with:
- A main body (the base structure)
- One or more drawers
- A hinged door or lift-top lid
- Internal dividers or trays
For example, a typical design might be 36” wide, 18” deep, and 12” tall—fitting neatly behind the rear seats of many SUVs.
Add Functional Features
Think beyond basic storage:
- Pull-out trays: Great for small parts like screws, nuts, and fuses.
- Magnetic strips: Hold metal tools securely and visibly.
- Foam cutouts: Custom-fit foam keeps tools in place and prevents scratches.
- Removable bins: Ideal for organizing hardware or cleaning supplies.
- LED lighting: A small battery-powered light helps you find tools in the dark.
Plan for Ventilation
Moisture buildup can rust tools and damage wood. Add small ventilation holes or use breathable materials. If you live in a humid climate, consider lining the cabinet with moisture-resistant fabric or silica gel packs.
Step 4: Gather Tools and Prepare Your Workspace
You don’t need a full woodshop, but having the right tools makes the job easier and safer.
Essential Tools
- Circular saw or jigsaw (for cutting plywood)
- Drill/driver with bits
- Measuring tape and square
- Clamps (to hold pieces while assembling)
- Sander or sandpaper (for smoothing edges)
- Safety gear (gloves, goggles, dust mask)
Workspace Setup
Work in a garage, driveway, or covered area with good lighting. Lay down a drop cloth to catch sawdust. If using power tools, ensure your extension cords are rated for outdoor use and keep water away.
Step 5: Cut and Assemble the Cabinet Frame
Now it’s time to build! Follow your design plan and take your time—precision now prevents problems later.
Cut the Panels
Using your measurements, mark and cut the following pieces from plywood:
- Top and bottom panels
- Side panels
- Back panel
- Front panel (if not using a door)
- Drawer fronts and sides
- Internal dividers
Pro tip: Use a straightedge or guide to ensure clean, straight cuts. Label each piece as you go to avoid confusion.
Assemble the Box
Start by attaching the sides to the bottom panel using wood screws. Use clamps to hold pieces in place. Then add the top and back panel. Check for squareness—use a carpenter’s square to ensure corners are 90 degrees.
For extra strength, apply wood glue to joints before screwing. This creates a tighter bond and reduces wobble.
Install Drawer Slides
Mount the drawer slides to the cabinet sides and drawer boxes. Most slides come with templates—follow the instructions carefully. Test each drawer to ensure it opens and closes smoothly.
Add Doors and Hinges
If your design includes a door, attach heavy-duty hinges to the cabinet frame and door. Use a drill to create pilot holes to prevent splitting. Install a latch or lock to keep the door closed while driving.
Step 6: Customize Interior Storage
This is where your cabinet becomes truly functional. Tailor the interior to your tools and workflow.
Build Drawers and Trays
Construct drawer boxes using 1/2-inch plywood. Use drawer slides rated for the weight of your tools. For heavy loads, choose full-extension slides that pull out completely.
Line drawers with non-slip matting or foam to protect tools and reduce noise.
Create Dividers and Inserts
Use thin plywood or plastic sheets to divide compartments. For small tools, consider 3D-printed organizers or repurposed kitchen drawer dividers.
Example: A socket organizer with labeled holes keeps sizes visible and prevents mix-ups.
Add Accessories
Mount magnetic strips inside doors or on the back panel. Install hooks for tape measures or flashlights. Use bungee cords or elastic webbing to secure loose items.
Step 7: Finish and Protect the Cabinet
A good finish protects your cabinet and gives it a professional look.
Sand and Smooth
Sand all surfaces with 120-grit sandpaper, then finish with 220-grit for a smooth feel. Wipe away dust with a tack cloth.
Apply Finish
For wood, apply 2–3 coats of polyurethane, sanding lightly between coats. For a natural look, use a clear sealant. For metal, use rust-resistant paint or powder coating.
Let the finish cure completely before installing—usually 24–48 hours.
Step 8: Install the Cabinet in Your SUV
Safety is critical. A loose cabinet can become a hazard in an accident.
Position the Cabinet
Place the cabinet in your SUV’s cargo area. Ensure it doesn’t block airbags, seatbelts, or rearview visibility. Ideally, it should sit low and centered.
Secure with Anchors
Use ratchet straps, L-track systems, or bolt-down brackets to anchor the cabinet. Many SUVs have built-in tie-down points in the floor—use these to loop straps around the cabinet frame.
For a permanent install, drill into the floor (only if safe and allowed by your vehicle’s warranty) and bolt the cabinet down. Use rubber washers to prevent vibration damage.
Test for Stability
Close all drawers and doors. Gently push the cabinet from different angles. It should not shift or tip. Take a short test drive and listen for rattling or movement.
Troubleshooting Common Issues
Even the best plans can hit snags. Here’s how to fix common problems.
Cabinet Doesn’t Fit
If your cabinet is too big, don’t force it. Remove it and recheck your measurements. You may need to trim edges or adjust the design. Always measure twice, cut once.
Drawers Stick or Jam
This usually happens if the slides aren’t aligned. Remove the drawer and check that both sides are level. Adjust the mounting screws slightly until the drawer glides smoothly.
Tools Rattle or Shift
Add foam padding, non-slip mats, or elastic straps to hold tools in place. For small items, use divided bins or magnetic trays.
Moisture Buildup
If you notice condensation, improve ventilation. Drill small holes in the bottom or sides. Use silica gel packs or a small dehumidifier pouch inside the cabinet.
Cabinet Moves While Driving
Reinforce your anchoring system. Use wider straps, add anti-slip pads under the cabinet, or install additional tie-down points. Never rely on friction alone.
Conclusion: Enjoy Your Custom SUV Tool Cabinet
Congratulations! You’ve built a tool cabinet that’s not only functional but also tailored to your lifestyle. Whether you’re heading to a job site, a campsite, or just running weekend errands, your tools are now organized, protected, and ready to use.
Remember, the best tool cabinet is one that fits your needs and your vehicle. Don’t be afraid to tweak the design over time—add a new drawer, upgrade the lighting, or paint it to match your SUV’s interior.
With a little planning and effort, you’ve created a solution that saves time, reduces stress, and keeps your adventures rolling smoothly. Now go put those tools to work!