
Transform your SUV into a cozy sleeping space with this easy-to-follow guide. You’ll learn how to build a sturdy, comfortable sleeping platform using simple tools and affordable materials—perfect for weekend getaways or full-time van life.
Key Takeaways
- Measure your SUV interior carefully: Accurate dimensions ensure a snug, safe fit and maximize usable space.
- Use lightweight, durable materials: Plywood, foam, and aluminum framing offer strength without adding excessive weight.
- Design for modularity: A foldable or removable platform lets you switch between cargo and sleep modes easily.
- Prioritize ventilation and comfort: Add breathable padding and airflow gaps to prevent moisture buildup and improve sleep quality.
- Secure the platform properly: Use straps, bolts, or anchor points to prevent shifting while driving.
- Customize for your needs: Include storage compartments, cup holders, or USB ports to enhance functionality.
- Test before long trips: Spend a night in your setup to identify comfort or safety issues early.
How to Build an SUV Sleeping Platform: A Complete DIY Guide
So you’ve got an SUV, a sense of adventure, and a dream of sleeping under the stars—without giving up comfort. Whether you’re planning a weekend camping trip, a cross-country road trip, or just want a cozy spot for impromptu naps in nature, building a sleeping platform in your SUV is one of the smartest upgrades you can make.
This guide will walk you through every step of creating a custom sleeping platform that fits your vehicle perfectly. You don’t need to be a master carpenter or spend a fortune. With basic tools, some planning, and a little elbow grease, you can build a sturdy, comfortable, and stylish bed platform that turns your SUV into a mobile bedroom.
By the end of this guide, you’ll know exactly how to measure your space, choose the right materials, build a safe and functional platform, and even add clever upgrades like storage or lighting. Let’s get started!
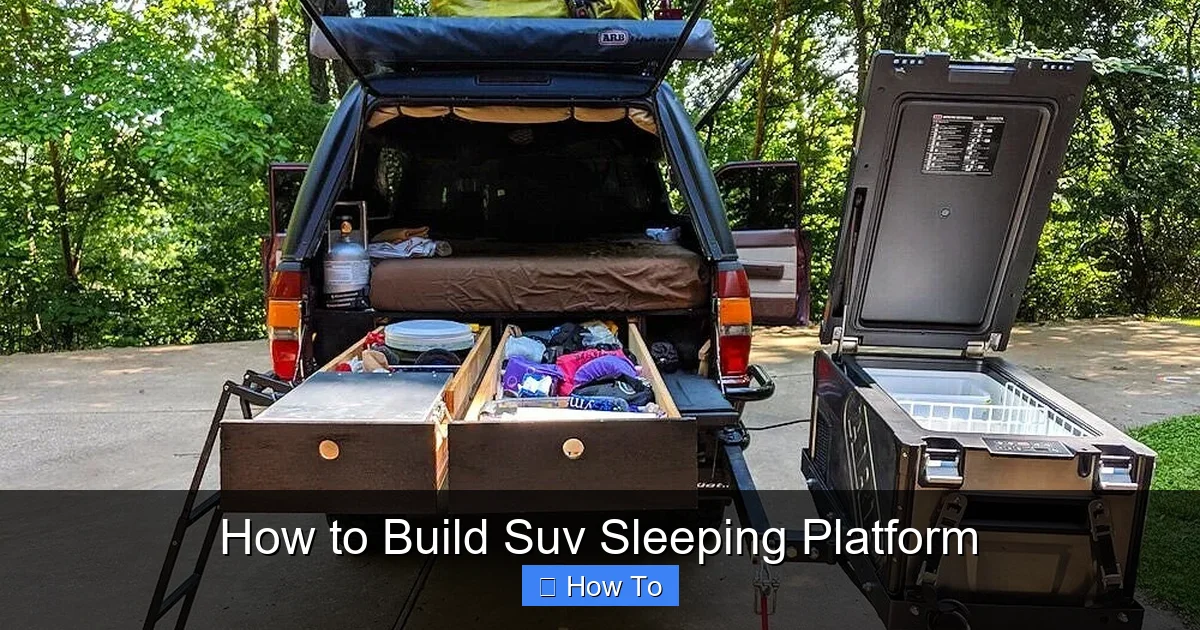
Why Build an SUV Sleeping Platform?
Visual guide about How to Build Suv Sleeping Platform
Image source: getpackup.com
Before we dive into the build, let’s talk about why this project is so worthwhile. Sleeping in your SUV isn’t just for minimalist nomads—it’s a practical solution for travelers, campers, photographers, and anyone who values flexibility.
First, it saves money. Hotels and campgrounds can get expensive, especially on long trips. A DIY sleeping platform lets you sleep comfortably for free (or nearly free) almost anywhere.
Second, it’s convenient. You don’t have to pitch a tent in the rain or worry about finding level ground. Just park, unfold your platform, and you’re ready to sleep.
Third, it’s customizable. Unlike pre-made platforms, a DIY build lets you tailor the design to your exact needs—whether that’s extra legroom, under-bed storage, or a fold-out desk.
And finally, it’s a fun project. There’s something deeply satisfying about building something useful with your own hands. Plus, you’ll learn skills you can use for future upgrades.
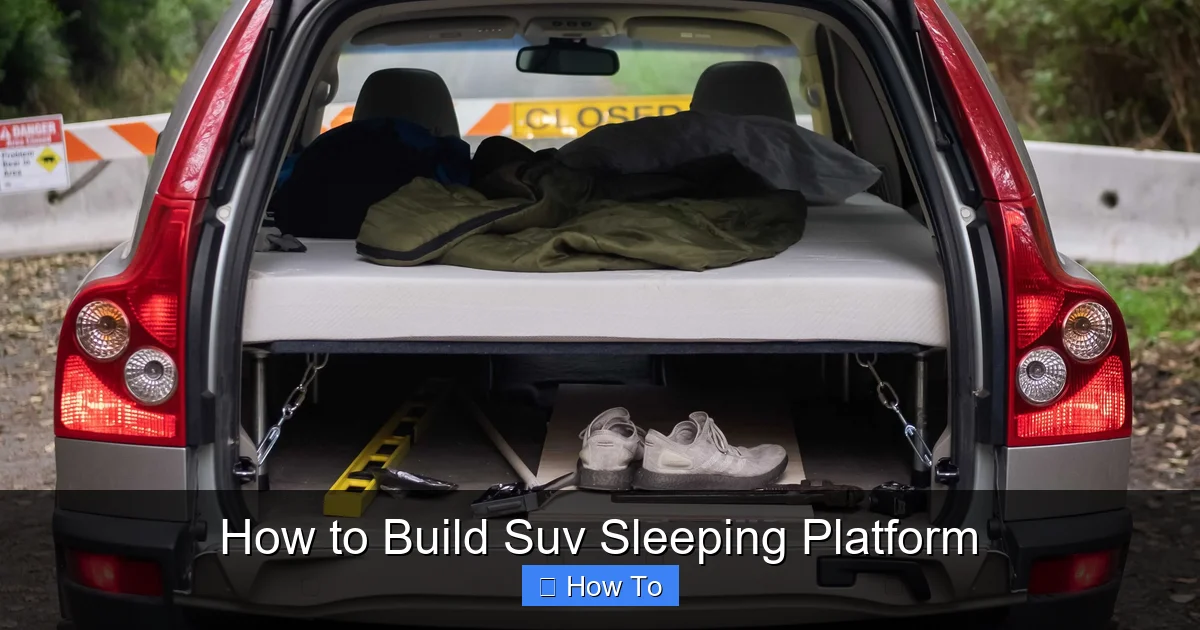
Planning Your SUV Sleeping Platform

Visual guide about How to Build Suv Sleeping Platform
Image source: res.cloudinary.com
The key to a successful build is planning. Rushing into construction without measuring or sketching can lead to wasted materials, poor fit, and frustration. Take your time here—it pays off.
Step 1: Measure Your SUV Interior
Start by clearing out your SUV. Remove seats if possible (some models allow rear seat removal), and vacuum the floor. You want a clean, empty space to work with.
Use a tape measure to record the following dimensions:
– Length from the back of the front seats to the tailgate
– Width at the widest point (usually between the wheel wells)
– Height from the floor to the ceiling (important if you’re adding a raised platform)
– Depth of the wheel wells (they often protrude into the cabin)
Take multiple measurements—dimensions can vary slightly from one side to the other. Note any obstacles like seatbelt anchors, air vents, or storage compartments.
Pro tip: Take photos of your SUV’s interior from different angles. These will help you visualize the build and remember where things are located.
Step 2: Decide on Platform Height and Style
Now that you have your measurements, decide how high you want your platform to be. Most people build it just above the wheel wells, creating a flat surface across the entire cargo area.
Common platform styles include:
– Flat platform: A single-level surface that spans the entire rear area. Simple and effective.
– Raised platform: Elevated to create under-bed storage. Great for gear-heavy travelers.
– Foldable platform: Hinged or split into sections that fold up when not in use. Ideal if you need cargo space during the day.
– Modular platform: Made of interlocking pieces that can be rearranged or removed. Offers maximum flexibility.
For most beginners, a flat or foldable platform is the best starting point.
Step 3: Sketch Your Design
Grab a notebook or use free design software like SketchUp or Canva to sketch your platform. Include:
– Overall dimensions
– Support structure (legs, frames, brackets)
– Cut lines for plywood
– Storage compartments or access panels
– Ventilation gaps
Label each part clearly. This sketch will be your blueprint during construction.
Gathering Tools and Materials
Now that your design is ready, it’s time to gather supplies. You don’t need fancy tools—just the basics.
Essential Tools
- Tape measure
- Pencil or marker
- Circular saw or jigsaw (for cutting wood)
- Drill with drill bits
- Screwdriver or impact driver
- Sandpaper or orbital sander
- Clamps (helpful for holding pieces in place)
- Level (to ensure your platform is even)
If you don’t own these tools, consider borrowing from a friend or renting from a hardware store. Many stores offer same-day tool rentals at low rates.
Recommended Materials
Here’s a list of materials for a standard flat platform:
– 1/2-inch or 3/4-inch plywood: Baltic birch or exterior-grade plywood works best. It’s strong, lightweight, and resists warping. Buy a 4×8 sheet and cut it to size.
– 2×2 or 2×3 lumber: For framing and support legs. Use pine or poplar—they’re affordable and easy to work with.
– Foam padding: 2- to 4-inch high-density foam for comfort. Look for closed-cell foam if you’re concerned about moisture.
– Fabric or carpet: To cover the foam and give a finished look. Marine vinyl, outdoor carpet, or upholstery fabric are great choices.
– Wood screws: 1.5-inch and 2.5-inch screws for assembly.
– Wood glue: Adds extra strength to joints.
– Sandpaper: 120- and 220-grit for smoothing edges.
– Optional: Hinges, latches, or Velcro straps for foldable designs.
Budget tip: Check local hardware stores for scrap wood or damaged plywood sold at a discount. It’s often perfect for hidden structural parts.
Building the Platform: Step-by-Step Instructions
Now for the fun part—building your platform! Follow these steps carefully, and you’ll have a sturdy, comfortable bed in no time.
Step 1: Cut the Plywood to Size
Using your measurements and sketch, mark the plywood with a pencil and straightedge. Double-check your dimensions before cutting.
If your platform spans the entire cargo area, you may need to cut the plywood into two or three pieces to fit around wheel wells or seat anchors.
Use a circular saw with a fine-tooth blade for clean cuts. Clamp a straightedge guide to ensure straight lines.
Safety tip: Wear safety goggles and a dust mask when cutting. Plywood dust can be harmful if inhaled.
Step 2: Build the Support Frame
The frame gives your platform strength and prevents sagging. A simple rectangular frame made of 2×2 or 2×3 lumber works well.
Cut four pieces:
– Two long side rails (match the length of your platform)
– Two short end rails (match the width, minus the thickness of the side rails)
Assemble the frame using wood glue and screws. Pre-drill holes to prevent splitting.
For extra support, add cross braces every 12 to 18 inches along the length of the frame. These help distribute weight and reduce flex.
If you’re building a raised platform, attach vertical legs to the corners of the frame. Make sure they’re the same height so the platform sits level.
Step 3: Attach the Plywood to the Frame
Place the plywood pieces on top of the frame. Align them carefully, leaving small gaps (about 1/8 inch) between pieces to allow for expansion.
Secure the plywood to the frame using wood screws every 6 to 8 inches. Countersink the screws slightly so they don’t protrude.
If your platform is in multiple sections, attach hinges to connect them. Use heavy-duty piano hinges for durability.
Step 4: Add Foam and Fabric
Now it’s time to make your platform comfortable.
Cut the foam padding to match the size of your platform. Use a serrated knife or electric knife for clean cuts.
Glue the foam to the plywood using spray adhesive. Apply glue to both surfaces and press firmly. Let it dry completely.
Next, cut your fabric or carpet to size, leaving a 2- to 3-inch overhang on all sides.
Lay the fabric face-down, place the platform on top, and wrap the edges over the sides. Secure with staples, glue, or Velcro.
For a professional look, fold the corners neatly like wrapping a present.
Step 5: Install Support Legs or Brackets
If your platform is raised or foldable, you’ll need support legs or brackets.
For a raised platform, attach adjustable legs to the corners. Furniture-style leveling feet work well—they let you fine-tune the height and compensate for uneven ground.
For a foldable platform, install hinges on one side and add support legs that swing out when in use. Use locking hinges or gas struts for extra stability.
Test the platform by placing it in your SUV and sitting on it. It should feel solid and level.
Step 6: Secure the Platform in Your SUV
A loose platform can shift while driving, which is dangerous. Secure it using one of these methods:
– Ratchet straps: Loop straps around the platform and anchor them to seatbelt anchors or cargo hooks.
– Bolts: Drill through the platform frame and into the SUV’s floor (use rubber gaskets to prevent damage).
– Non-slip mat: Place a rubber mat underneath to reduce sliding.
Never rely solely on friction. Always use straps or bolts for safety.
Customizing Your SUV Sleeping Platform
Once the basic platform is built, you can add features to make it even more functional.
Add Storage Compartments
Use the space under a raised platform for gear storage. Build drawers or bins from plywood and install them with drawer slides.
Label each compartment for easy access. Store clothes, tools, or cooking supplies out of sight.
Install Lighting
Add LED strip lights under the platform or along the edges. Use USB-powered lights for easy charging from your car’s outlet.
Motion-sensor lights are a great option—they turn on when you open the tailgate.
Include Power Access
Mount a USB charging station or 12V outlet near your sleeping area. Run wires through the firewall or use a portable power bank.
This lets you charge phones, laptops, or even run a small fan.
Improve Ventilation
Sleeping in a closed vehicle can get stuffy. Add ventilation by:
– Leaving gaps between platform sections
– Installing a small solar vent fan
– Using breathable fabric covers
Avoid sealing the space completely—airflow prevents condensation and mold.
Add a Privacy Curtain
Mount a curtain rod above the platform and hang a lightweight curtain. This gives you privacy at campgrounds or rest stops.
Use blackout fabric to block light and improve sleep quality.
Troubleshooting Common Issues
Even the best plans can run into problems. Here’s how to fix common issues:
Platform Sags in the Middle
Cause: Insufficient support or weak materials.
Solution: Add more cross braces or upgrade to thicker plywood. Use 3/4-inch plywood for spans longer than 3 feet.
Platform Shifts While Driving
Cause: Poor anchoring.
Solution: Use ratchet straps tied to secure anchor points. Avoid using only non-slip mats.
Foam Compresses Too Much
Cause: Low-density foam or thin padding.
Solution: Use high-density foam (at least 2 inches thick). Layer two pieces if needed.
Difficulty Removing or Folding
Cause: Poor hinge placement or tight fit.
Solution: Re-measure and adjust hinge positions. Sand edges for smoother movement.
Moisture Builds Up Under Platform
Cause: Lack of airflow.
Solution: Add ventilation gaps or use a moisture barrier like a tarp underneath.
Safety Tips for SUV Sleeping Platforms
Your safety is the top priority. Follow these guidelines:
– Never sleep in a running vehicle in an enclosed space (like a garage). Carbon monoxide is deadly.
– Always park on level ground when sleeping.
– Keep windows slightly open for airflow.
– Use a carbon monoxide detector if running a heater or generator.
– Secure all loose items to prevent them from becoming projectiles in a crash.
Conclusion
Building an SUV sleeping platform is a rewarding project that opens up new possibilities for travel and adventure. With careful planning, the right materials, and a little patience, you can create a comfortable, safe, and stylish sleeping space that fits your lifestyle.
Whether you’re a weekend warrior or a full-time road traveler, this DIY upgrade will save you money, increase your comfort, and give you the freedom to sleep wherever the journey takes you.
So grab your tools, measure twice, cut once, and get ready to transform your SUV into the ultimate mobile bedroom. Sweet dreams and happy travels!