
Building a pull out drawer for your SUV is a smart way to maximize cargo space and keep gear organized. This guide walks you through planning, materials, assembly, and installation—no professional skills required.
Key Takeaways
- Measure your SUV cargo area accurately to ensure the drawer fits snugly and doesn’t interfere with seats or other components.
- Choose durable, lightweight materials like plywood or aluminum for the frame and drawer box to balance strength and weight.
- Use heavy-duty drawer slides rated for at least 100 lbs to support gear like coolers, tools, or camping equipment.
- Secure the drawer properly to prevent movement while driving—use bolts, brackets, or anchor points in your SUV’s floor.
- Add a latch or lock mechanism to keep the drawer closed during travel and protect your belongings.
- Customize with dividers or foam inserts to organize smaller items and reduce shifting during transit.
- Test the drawer before final installation to ensure smooth operation and make adjustments if needed.
How to Build a Pull Out Drawer for SUV
If you’ve ever struggled to find your jumper cables, camping stove, or first-aid kit buried under a pile of gear in your SUV, you’re not alone. A pull out drawer for SUV is a game-changer—it turns chaotic cargo space into an organized, accessible storage solution. Whether you’re an outdoor enthusiast, a weekend warrior, or just someone who likes things tidy, building your own drawer is easier than you think.
In this guide, we’ll walk you through every step of creating a custom pull out drawer for your SUV. You’ll learn how to measure your space, choose the right materials, build a sturdy frame, install heavy-duty slides, and secure everything safely. No need for fancy tools or professional experience—just basic DIY skills, patience, and a little creativity.
By the end, you’ll have a functional, durable drawer that fits perfectly in your vehicle and makes loading and unloading a breeze. Let’s get started!
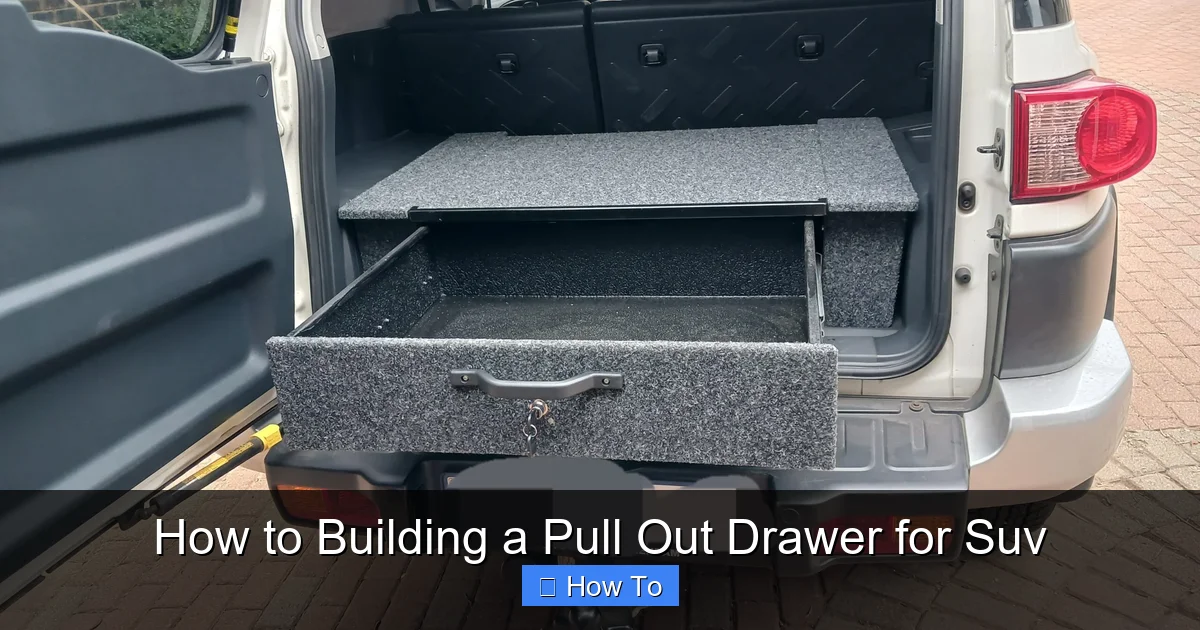
Why Build a Pull Out Drawer for Your SUV?
Visual guide about How to Building a Pull Out Drawer for Suv
Image source: i.pinimg.com
Before diving into the build, it’s worth understanding why a pull out drawer is such a smart upgrade. SUVs are designed for space and versatility, but that doesn’t mean the cargo area is always practical. Items shift during drives, small tools get lost, and heavy gear becomes hard to reach.
A pull out drawer solves these problems by:
- Improving organization: Keep tools, recovery gear, coolers, and emergency supplies in one accessible spot.
- Protecting your gear: Prevent scratches, dents, and damage from loose items bouncing around.
- Maximizing space: Use vertical and under-seat areas efficiently without blocking access to other compartments.
- Enhancing safety: Secure heavy items so they don’t become projectiles in sudden stops.
- Adding resale value: A well-built drawer shows care and can appeal to future buyers.
Whether you use your SUV for overlanding, hauling sports equipment, or just weekend errands, a drawer makes life easier. And building it yourself saves money compared to buying pre-made systems, which can cost $500–$1,500.
Planning Your SUV Drawer Project
Visual guide about How to Building a Pull Out Drawer for Suv
Image source: m.media-amazon.com
The key to a successful build starts with planning. Rushing into construction without measuring or designing can lead to a drawer that doesn’t fit, doesn’t function, or worse—damages your vehicle.
Step 1: Measure Your SUV Cargo Area
Grab a tape measure and head to your SUV. You’ll need to take several measurements:
- Length: From the back of the rear seats (or cargo barrier) to the tailgate.
- Width: Between the wheel wells or interior panels—this is often the narrowest point.
- Height: From the cargo floor to the ceiling or any overhead storage.
Don’t forget to account for:
- Spare tire compartments
- Subwoofers or built-in storage
- Seat mechanisms that fold down
- Floor contours or raised areas
Pro tip: Take photos and sketch a simple diagram. This helps visualize the space and plan drawer dimensions.
Step 2: Decide on Drawer Size and Placement
Your drawer doesn’t have to fill the entire cargo area. Consider:
- Single large drawer: Great for bulky items like coolers or recovery boards.
- Dual drawers: One for tools, one for camping gear—ideal for frequent travelers.
- Under-seat drawer: Fits beneath folded rear seats, perfect for small tools or emergency kits.
Think about how you use your SUV. If you often carry passengers, avoid blocking seat access. If you’re an overlander, prioritize durability and weather resistance.
Step 3: Choose a Design Style
There are two main approaches:
- Fixed-base drawer: The drawer slides in and out of a stationary frame bolted to the floor. Most common and stable.
- Floating drawer: The entire unit moves on casters or slides, allowing full removal. Useful for cleaning or reconfiguring space.
For most SUV owners, a fixed-base design is best—it’s secure, simple, and reliable.
Gathering Tools and Materials
Now that you’ve planned your drawer, it’s time to gather supplies. You don’t need a full workshop, but having the right tools makes the job smoother.
Essential Tools
- Tape measure
- Pencil and notepad
- Circular saw or jigsaw
- Drill with drill bits
- Screwdriver set
- Clamps
- Sandpaper (120–220 grit)
- Level
- Safety gear (gloves, goggles, mask)
Materials List
Here’s what you’ll need to build a basic pull out drawer for SUV:
- Frame material: ¾-inch birch or maple plywood (strong and lightweight)
- Drawer box material: ½-inch plywood or MDF (for lighter weight)
- Drawer slides: Heavy-duty ball-bearing slides, 24–36 inches long, rated for 100+ lbs
- Wood screws: 1¼-inch and 2-inch wood screws
- Wood glue: Waterproof PVA glue
- Sandpaper: For smoothing edges
- Finish: Paint, stain, or polyurethane (optional, for durability)
- Latch or lock: Push-to-close latch or keyed lock
- Foam or dividers: For organizing small items (optional)
- Mounting hardware: Bolts, washers, and anchor points (if bolting to floor)
Pro tip: Buy drawer slides with a soft-close feature—they prevent slamming and add a premium feel.
Building the Drawer Frame
The frame is the foundation of your drawer system. It holds the slides and supports the weight of your gear.
Step 1: Cut the Frame Pieces
Using your measurements, cut the following from ¾-inch plywood:
- Two side panels (length = drawer depth, height = drawer height)
- One back panel (width = drawer width, height = drawer height)
- One base panel (width = drawer width, length = drawer depth)
Example: For a 30-inch deep, 24-inch wide, 8-inch tall drawer:
- Side panels: 30″ x 8″
- Back panel: 24″ x 8″
- Base panel: 24″ x 30″
Use a circular saw with a guide or a jigsaw for clean cuts. Sand all edges to prevent splinters.
Step 2: Assemble the Frame
Lay the base panel flat. Attach the side panels to the sides using wood glue and 2-inch screws. Then attach the back panel to the rear edge.
- Pre-drill holes to avoid splitting the wood.
- Use clamps to hold pieces in place while screwing.
- Check for square with a carpenter’s square—corners should be 90 degrees.
Let the glue dry for at least 2 hours before moving on.
Step 3: Reinforce the Frame (Optional)
For extra strength, add corner braces or L-brackets inside the frame. This is especially helpful if you plan to carry heavy loads.
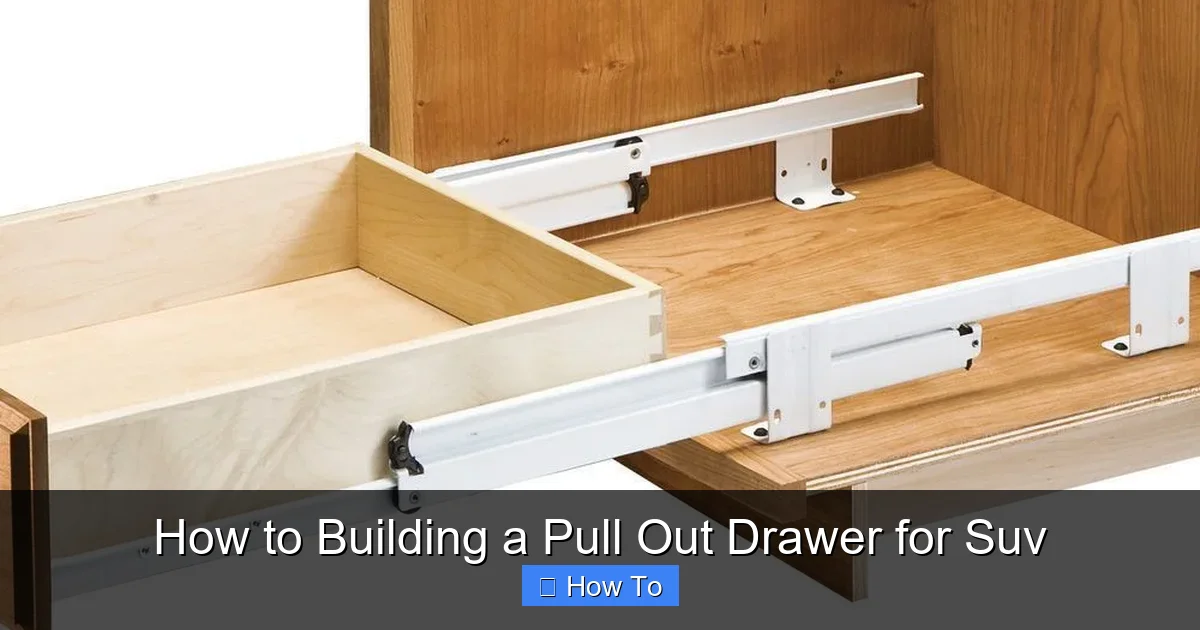
Installing the Drawer Slides
Drawer slides are the heart of your system. They allow smooth, full-extension movement and support weight.
Step 1: Attach Slides to the Frame
Most heavy-duty slides come in two parts: one for the frame, one for the drawer.
- Measure and mark the center of each side panel, about 1 inch from the bottom.
- Align the frame-side slide with the mark and screw it in place using the provided screws.
- Use a level to ensure the slides are straight.
Pro tip: Install both slides at the same height to prevent binding.
Step 2: Attach Slides to the Drawer Box
Now build the drawer box from ½-inch plywood:
- Cut two side panels, one front, one back, and one bottom.
- Assemble using wood glue and 1¼-inch screws.
- Attach the drawer-side slides to the outside of the side panels, aligning with the frame slides.
Test fit the drawer into the frame. It should slide in and out smoothly. If it sticks, sand the edges slightly.
Building the Drawer Box
The drawer box holds your gear. It needs to be sturdy but not overly heavy.
Step 1: Cut and Assemble the Box
Cut the following from ½-inch plywood:
- Two side panels (length = drawer depth – 1 inch, height = drawer height – 1 inch)
- One front panel (width = drawer width – 1 inch, height = drawer height – 1 inch)
- One back panel (same as front)
- One bottom panel (width = drawer width – 1 inch, length = drawer depth – 1 inch)
The 1-inch reduction allows clearance for the slides.
Assemble the box using wood glue and screws. Reinforce corners with brackets if needed.
Step 2: Add a Handle or Pull
Install a recessed handle or surface-mounted pull on the front panel. This makes it easy to grab the drawer, even when wearing gloves.
Step 3: Optional – Add Dividers or Foam
Cut foam sheets or thin plywood to create compartments. This keeps tools, batteries, or first-aid supplies from shifting.
Finishing the Drawer
A good finish protects the wood and gives your drawer a professional look.
Step 1: Sand All Surfaces
Use 120-grit sandpaper to smooth rough edges, then 220-grit for a fine finish. Wipe away dust with a damp cloth.
Step 2: Apply Finish
Choose one of the following:
- Paint: Use exterior-grade paint for durability. Apply 2–3 coats with sanding between layers.
- Stain and polyurethane: Highlights the wood grain. Apply stain, let dry, then 2–3 coats of polyurethane.
- Clear sealant: For a natural look with protection.
Let the finish cure for 24–48 hours before installing.
Installing the Drawer in Your SUV
Now for the fun part—putting your drawer to work!
Step 1: Position the Frame
Place the frame in your SUV cargo area. Slide the drawer in to test fit. Make sure it doesn’t interfere with seat movement or tailgate operation.
Step 2: Secure the Frame
You have several options:
- Bolt to floor: Drill through the frame base and into the SUV floor. Use bolts with washers and lock nuts. Only do this if your SUV has anchor points or you’re comfortable drilling.
- Use brackets: Attach L-brackets to the frame and bolt them to existing cargo tie-downs.
- Non-permanent mount: Use heavy-duty Velcro or rubber pads if you don’t want to drill. Less secure but reversible.
Pro tip: If bolting, use a drill bit slightly smaller than the bolt to create a tight fit.
Step 3: Test the Drawer
Load the drawer with gear (simulate real use). Open and close it several times. Check for:
- Smooth sliding
- No wobbling
- Proper latch engagement
Make adjustments if needed—tighten screws, realign slides, or add shims.
Adding a Latch or Lock
A latch keeps the drawer closed during driving. Options include:
- Push-to-close latch: Simple and reliable—just push the drawer to lock.
- Magnetic latch: Quiet and easy to use.
- Keyed lock: For security, especially if storing valuables.
Install the latch according to the manufacturer’s instructions. Test it with the drawer loaded.
Troubleshooting Common Issues
Even the best builds can have hiccups. Here’s how to fix common problems:
Drawer Won’t Slide Smoothly
- Check slide alignment—both sides must be level.
- Sand rough edges on the drawer box.
- Ensure screws aren’t protruding into the slide path.
Drawer Wobbles or Feels Loose
- Tighten all screws and bolts.
- Add corner braces for extra rigidity.
- Use shims under the frame if the floor is uneven.
Latch Doesn’t Engage
- Adjust the latch position slightly.
- Ensure the drawer is fully closed before latching.
- Replace with a stronger latch if needed.
Drawer Too Heavy to Pull Out
- Reduce load or upgrade to heavier-duty slides.
- Check for binding—realign slides if necessary.
- Use a handle with better grip.
Maintenance Tips
To keep your drawer working like new:
- Clean slides regularly with a dry cloth.
- Lubricate slides with silicone spray every 6 months.
- Check screws and bolts periodically for tightness.
- Reapply finish if wood shows wear.
Conclusion
Building a pull out drawer for your SUV is a rewarding DIY project that pays off every time you load up. It’s not just about storage—it’s about convenience, safety, and making your vehicle work smarter for you.
From measuring your space to installing the final latch, each step brings you closer to a cleaner, more organized cargo area. With the right materials, a little patience, and this guide, you can create a custom solution that fits your needs perfectly.
So grab your tools, measure twice, and start building. Your future self—and your gear—will thank you.