
Properly adjusted headlights are essential for safe night driving and avoiding glare for other drivers. This guide walks you through how to adjust headlights on a 2011 SUV using simple tools and clear steps, ensuring your lights shine where they should—on the road, not into oncoming traffic.
Key Takeaways
- Correct headlight alignment improves safety: Properly adjusted headlights illuminate the road ahead without blinding other drivers, especially important on dark or rural roads.
- You only need basic tools: A measuring tape, Phillips screwdriver, masking tape, and a flat surface are all you need to adjust your 2011 SUV’s headlights.
- Adjust both vertical and horizontal aim: Most 2011 SUVs allow you to fine-tune both the up/down and left/right direction of the headlight beam using adjustment screws.
- Work in a dark, level area: For accurate results, perform the adjustment at night or in a dim garage with the vehicle parked on a flat surface.
- Check alignment after repairs or modifications: Replacing bulbs, suspension work, or installing a roof rack can shift headlight aim—always re-check alignment.
- Follow manufacturer guidelines: While general steps apply to most 2011 SUVs, consult your owner’s manual for model-specific instructions.
- Test drive after adjustment: Always take a short nighttime drive to confirm the lights are aimed correctly and provide adequate visibility.
How to Adjust Head Lights on 2011 SUV
Driving at night can be stressful, especially if your headlights aren’t properly aligned. If your 2011 SUV’s headlights are pointing too high, too low, or off to the side, it can reduce your visibility and create dangerous glare for oncoming drivers. The good news? Adjusting your headlights is easier than you might think—and you don’t need to visit a mechanic to do it.
In this comprehensive guide, we’ll walk you through the entire process of adjusting the headlights on your 2011 SUV. Whether you’ve just replaced a bulb, noticed your lights are misaligned, or simply want to ensure optimal nighttime safety, this step-by-step tutorial will help you get the job done right. We’ll cover everything from gathering the right tools to testing your results on the road.
By the end of this guide, you’ll know exactly how to adjust headlights on a 2011 SUV using simple, at-home methods. You’ll also learn when and why headlight alignment matters, how to troubleshoot common issues, and tips to maintain proper aim over time. Let’s get started.
Why Headlight Alignment Matters
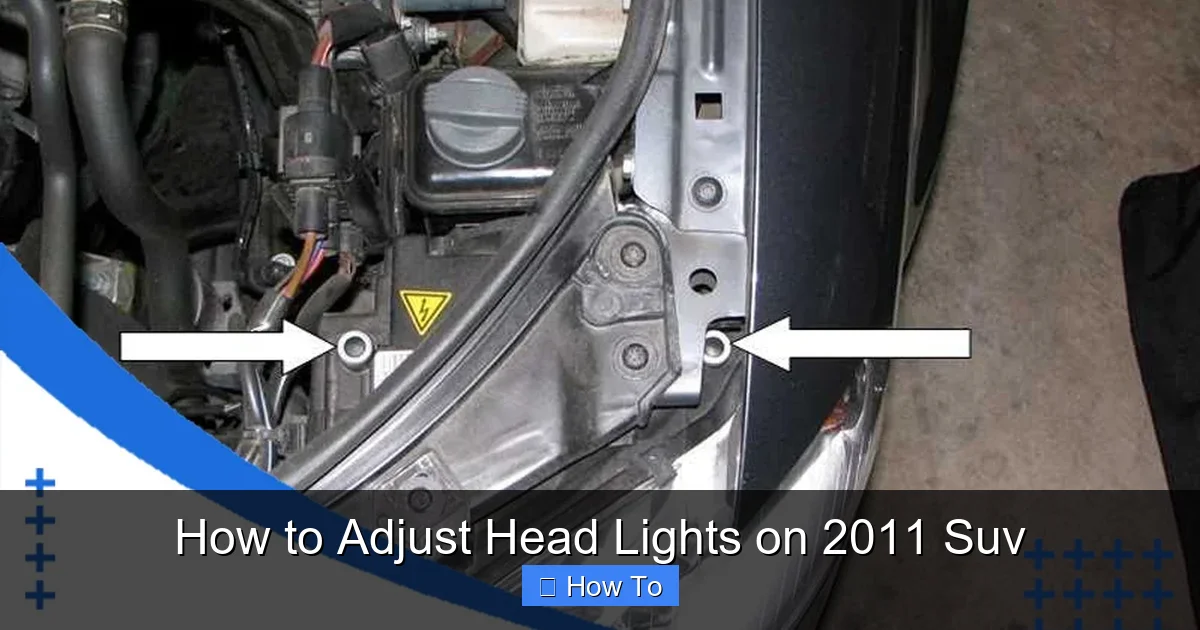
Visual guide about How to Adjust Head Lights on 2011 Suv
Image source: ebaymotorsblog.com
Before diving into the adjustment process, it’s important to understand why headlight alignment is so crucial. Headlights that are too high can blind oncoming drivers, increasing the risk of accidents. Lights that are too low won’t illuminate the road far enough ahead, reducing your reaction time to hazards like potholes, animals, or debris.
On a 2011 SUV, which typically sits higher off the ground than a sedan, proper alignment is even more critical. SUVs have a greater tendency to have headlights aimed too high, especially if the vehicle is carrying extra weight in the back or has been modified with a lift kit. Even small changes—like replacing a worn-out bulb or adjusting the suspension—can throw off the beam pattern.
According to the National Highway Traffic Safety Administration (NHTSA), misaligned headlights contribute to thousands of nighttime crashes each year. Properly adjusted lights not only protect you but also ensure you’re a responsible driver on the road.
Tools and Materials You’ll Need
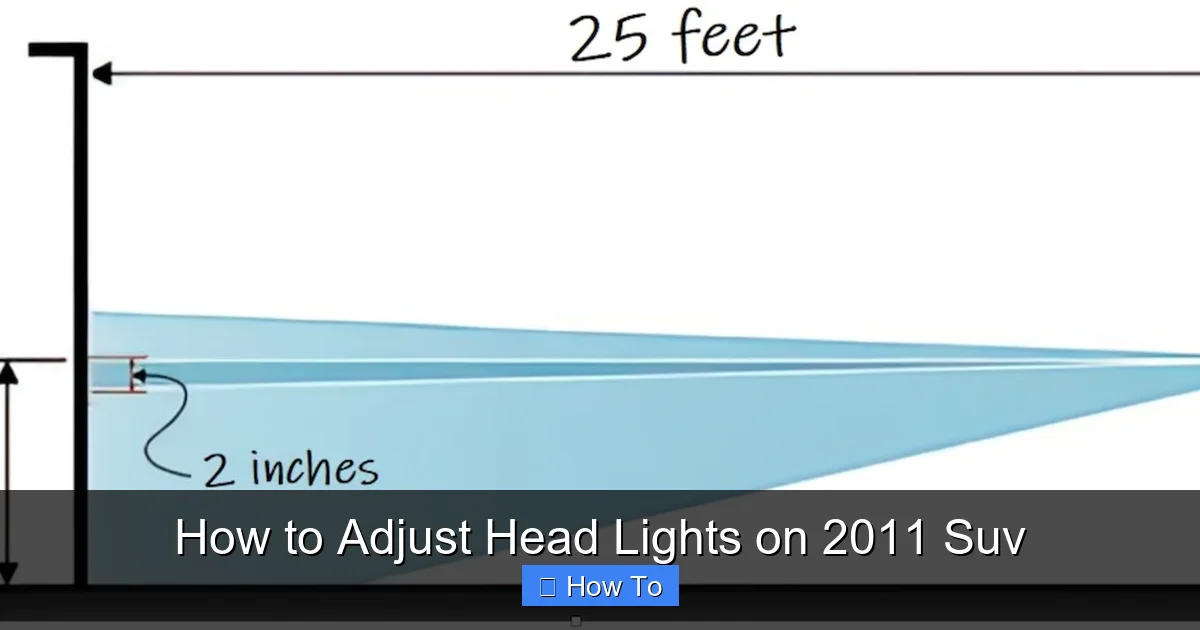
Visual guide about How to Adjust Head Lights on 2011 Suv
Image source: lightenify.com
You don’t need fancy equipment to adjust your 2011 SUV’s headlights. Here’s a list of basic tools and materials:
- Measuring tape or ruler
- Phillips head screwdriver (or flathead, depending on your SUV model)
- Masking tape or painter’s tape
- Level ground (driveway or garage)
- Dark environment (nighttime or dim garage)
- Chalk or marker (optional, for marking reference points)
- Owner’s manual (for model-specific guidance)
Most 2011 SUVs—whether it’s a Toyota Highlander, Ford Explorer, Chevrolet Traverse, or Nissan Pathfinder—use similar headlight adjustment mechanisms. However, the exact location of the adjustment screws may vary slightly. Always refer to your owner’s manual if you’re unsure.
Step 1: Prepare Your Vehicle and Workspace
Proper preparation is key to a successful headlight adjustment. Follow these steps to set up your workspace:
Park on a Level Surface
Make sure your SUV is parked on a completely flat, level surface. A sloped driveway or uneven garage floor can throw off your measurements. Use a bubble level if you’re unsure.
Ensure the Vehicle is Fully Loaded
Headlight alignment should be done with the vehicle in its normal driving condition. That means:
- Fill the gas tank to at least half full.
- Have a typical amount of weight in the vehicle (e.g., one or two passengers or equivalent cargo).
- If you frequently carry heavy loads, simulate that weight during adjustment.
This ensures the suspension is at its normal ride height, which affects headlight aim.
Turn Off the Engine and Let the Lights Cool
Make sure the engine is off and the headlights have been off for at least 15–20 minutes. Hot bulbs can be fragile and dangerous to handle.
Choose the Right Time and Lighting
Perform the adjustment at night or in a very dark garage. Ambient light can interfere with your ability to see the beam pattern clearly. If you’re working indoors, turn off all overhead lights and close any windows or doors that let in daylight.
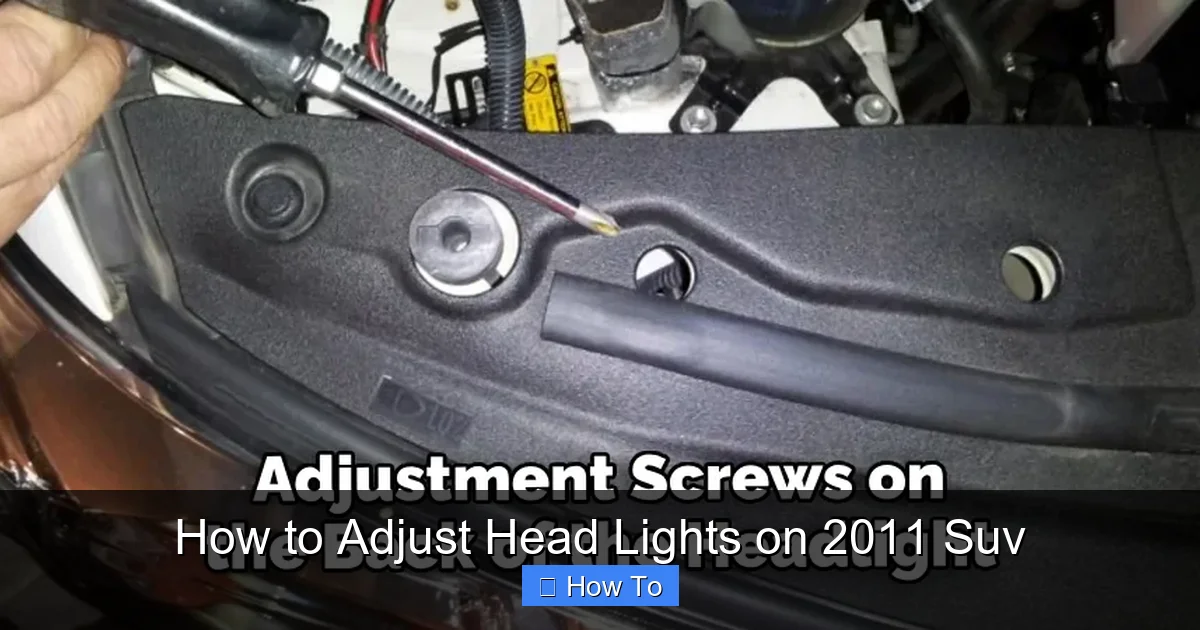
Step 2: Locate the Adjustment Screws
Most 2011 SUVs have two adjustment screws per headlight:
- Vertical adjustment screw: Controls the up-and-down aim of the beam.
- Horizontal adjustment screw: Controls the left-and-right aim.
These screws are typically located on the top or side of the headlight assembly, behind the headlight cover. You may need to remove the headlight cover or access panel to reach them.
Accessing the Headlight Assembly
On many 2011 SUVs, you can access the adjustment screws without removing the entire headlight. Look for small plastic covers or panels near the headlight. Use a screwdriver to gently pry them off.
For example:
- On a 2011 Ford Explorer, the vertical adjustment screw is usually on the top of the headlight, accessible from under the hood.
- On a 2011 Toyota Highlander, you may need to remove the front grille or inner fender liner for better access.
If you’re unsure, consult your owner’s manual or search for a model-specific guide online. Avoid forcing any parts—gentle pressure is usually enough.
Identify the Screws
Once you’ve accessed the headlight assembly, look for small screws with Phillips or flathead heads. One will be labeled or positioned vertically (for up/down), and the other horizontally (for left/right). If they’re not labeled, you can test them by turning them slightly and observing the beam movement.
Step 3: Mark Reference Points on the Wall
To accurately adjust your headlights, you’ll need a reference point. A flat, dark wall—like a garage door or blank wall—works best.
Position the SUV
Park your SUV about 25 feet (7.5 meters) away from the wall. Make sure it’s centered and straight. Use the side mirrors or front grille to align the vehicle perpendicular to the wall.
Measure and Mark the Headlight Height
Use a measuring tape to find the center height of each headlight from the ground. Then, measure the same distance up the wall and mark it with a piece of tape. This is your “reference line.”
For most 2011 SUVs, the correct beam height should be slightly lower than the headlight center—typically 2–4 inches (5–10 cm) below the reference line. This ensures the light illuminates the road without blinding oncoming drivers.
Mark the Centerline
Find the center of your SUV (usually aligned with the grille or emblem). Mark this point on the wall with tape. Then, measure the distance from the center to each headlight and mark those points on the wall as well. This helps you align the beams horizontally.
Create Beam Targets
Using masking tape, draw a “T” shape on the wall at each headlight’s reference point:
- The horizontal line should be at the reference height (slightly below headlight center).
- The vertical line should align with the center of each headlight.
This “T” will serve as your aiming target.
Step 4: Turn On the Headlights
Turn on your low-beam headlights. Do not use high beams, as they have a different beam pattern and are not used for alignment.
Stand back and observe the beam pattern on the wall. You should see a distinct cutoff line—the point where the light stops shining upward. This is especially visible with halogen or HID headlights.
Assess the Current Aim
Compare the beam pattern to your tape targets:
- If the cutoff line is above the horizontal tape line, the lights are too high.
- If it’s below, they’re too low.
- If the beam is shifted left or right of the vertical tape line, horizontal adjustment is needed.
Take note of any issues before making adjustments.
Step 5: Adjust the Vertical Aim
The vertical adjustment controls how high or low the beam shines. This is the most critical adjustment for safety.
Locate the Vertical Adjustment Screw
As mentioned earlier, this screw is usually on the top of the headlight assembly. It may be labeled “V” or “UP/DOWN.”
Turn the Screw
Use a screwdriver to turn the screw:
- Clockwise: Raises the beam.
- Counterclockwise: Lowers the beam.
Turn the screw in small increments—about 1/4 turn at a time.
Check the Beam
After each adjustment, step back and observe the beam on the wall. The cutoff line should align with the horizontal tape line. On most 2011 SUVs, the beam should be 2–4 inches below the headlight center height.
Repeat for the Other Headlight
Adjust the vertical screw on the opposite headlight using the same method. Both beams should be at the same height.
Step 6: Adjust the Horizontal Aim
Horizontal adjustment ensures the beams are pointing straight ahead and not drifting left or right.
Locate the Horizontal Adjustment Screw
This screw is usually on the side of the headlight assembly. It may be labeled “H” or “LEFT/RIGHT.”
Turn the Screw
- Clockwise: Shifts the beam to the right.
- Counterclockwise: Shifts the beam to the left.
Again, make small adjustments and check the results.
Align with the Vertical Tape Line
The center of each beam should align with the vertical tape line on the wall. The beams should also be parallel to each other and not交叉 (crossing).
Fine-Tune as Needed
It’s common for one headlight to need more adjustment than the other. Take your time and make gradual changes.
Step 7: Double-Check and Test
Once both headlights are adjusted, double-check your work.
Recheck the Beam Pattern
Turn the headlights back on and confirm that:
- The cutoff line is at the correct height.
- The beams are centered and parallel.
- There’s no excessive glare or dark spots.
Test Drive at Night
Take your SUV for a short nighttime drive on a quiet road. Pay attention to:
- How far ahead the road is illuminated.
- Whether oncoming drivers flash their lights (a sign your beams are too high).
- Whether you can see road signs and lane markings clearly.
If something feels off, return to the adjustment steps and fine-tune as needed.
Troubleshooting Common Issues
Even with careful adjustment, you might encounter problems. Here’s how to fix them:
Headlights Still Too High or Too Low
- Double-check that the vehicle is on level ground and properly loaded.
- Ensure you’re adjusting the correct screw—some SUVs have multiple screws for different functions.
- If the adjustment range is insufficient, the headlight assembly may be damaged or the suspension may need alignment.
Beams Are Uneven or交叉 (Crossing)
- Recheck horizontal alignment. One headlight may be misaligned due to a bent bracket or impact damage.
- Ensure both headlights are adjusted to the same reference height.
No Adjustment Screws Found
- Some 2011 SUVs use sealed or projector headlights that require professional alignment.
- Check your owner’s manual—some models require special tools or dealer service.
Beam Pattern Looks Distorted
- This could indicate a faulty bulb, cracked lens, or moisture inside the headlight.
- Replace the bulb or have the headlight assembly inspected.
Maintenance Tips for Long-Term Alignment
Proper headlight alignment isn’t a one-time task. Here’s how to keep your headlights aimed correctly:
- Check alignment after any repairs: Suspension work, bumper replacement, or headlight bulb changes can affect aim.
- Inspect after off-roading or heavy loads: Bouncing over rough terrain can shift components.
- Clean headlights regularly: Dirty or foggy lenses can scatter light and reduce effectiveness.
- Replace bulbs in pairs: Mismatched bulbs can create uneven beam patterns.
- Schedule professional alignment if needed: If DIY adjustments don’t work, visit a mechanic with headlight alignment equipment.
Conclusion
Adjusting the headlights on your 2011 SUV is a simple yet essential maintenance task that can significantly improve your safety on the road. With just a few basic tools and a little patience, you can ensure your headlights are aimed correctly—illuminating the road ahead without blinding other drivers.
Remember to work in a dark, level environment, use reference marks on a wall, and make small, incremental adjustments. Always test your results with a nighttime drive. And don’t forget to recheck alignment after any repairs or changes to your vehicle.
By following this guide, you’ll not only save money on mechanic visits but also become a more confident and responsible driver. Properly adjusted headlights are a small change that makes a big difference—especially when the sun goes down.