
This guide walks you through how to attach a bike rack to a SUV with clear, easy-to-follow instructions. Whether you’re using a hitch, trunk, or roof-mounted rack, you’ll learn the best practices for safe and secure bike transport.
Key Takeaways
- Choose the right bike rack type: Hitch, trunk, roof, or spare tire mounts each have pros and cons—pick one that fits your SUV and biking needs.
- Check your SUV’s compatibility: Not all racks fit all vehicles. Always verify weight limits, hitch class, and mounting points before buying.
- Install the rack correctly: Follow manufacturer instructions precisely to avoid damage to your SUV or bikes during transit.
- Secure your bikes properly: Use frame and wheel straps, and double-check tightness to prevent shifting or falling.
- Perform a pre-trip safety check: Test stability, lights, and clearance before hitting the road.
- Maintain your rack regularly: Inspect for wear, rust, or loose parts to ensure long-term safety and performance.
- Follow local laws: Some areas require bike racks to have license plate visibility and brake light access.
How to Attach a Bike Rack to a SUV: A Complete Step-by-Step Guide
So, you’ve got your bikes, your SUV, and a weekend adventure calling. But before you hit the trail, you need to know how to attach a bike rack to a SUV—safely, securely, and without damaging your vehicle or your gear. Whether you’re a weekend warrior or a family heading to the mountains, this guide will walk you through every step, from choosing the right rack to strapping in your bikes and hitting the road with confidence.
In this comprehensive how-to, you’ll learn about the different types of bike racks, how to match them to your SUV, and the exact steps to install and use them. We’ll cover hitch-mounted, trunk-mounted, roof-mounted, and spare tire racks, plus tips for securing your bikes, troubleshooting common issues, and staying compliant with road safety laws.
By the end, you’ll be ready to transport your bikes like a pro—no guesswork, no stress.
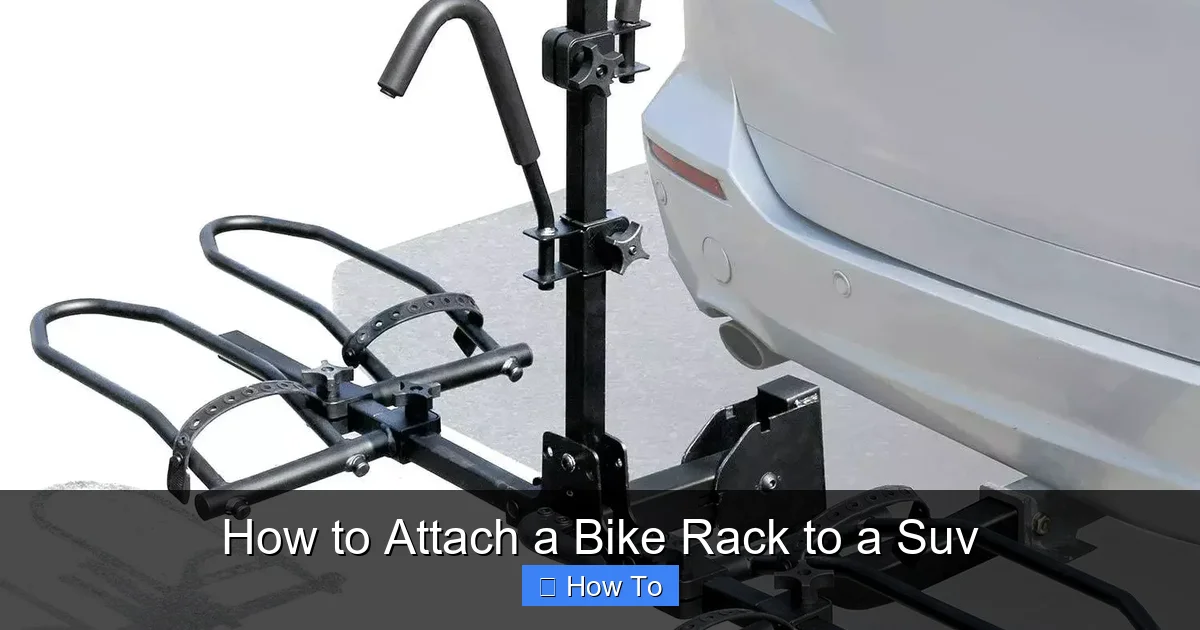
Why You Need a Bike Rack for Your SUV
Visual guide about How to Attach a Bike Rack to a Suv
Image source: rackadvisor.org
SUVs are built for adventure. They’re spacious, powerful, and perfect for hauling gear. But bikes? They don’t exactly fit in the backseat. That’s where a bike rack comes in.
A good bike rack lets you carry one or more bicycles without cramming them inside your vehicle. This keeps your interior clean, protects your bikes from scratches, and frees up space for passengers or other gear. Plus, it’s way safer than trying to tie bikes to the roof with bungee cords (we’ve all seen that go wrong).
Using a bike rack also helps you avoid damage to your SUV’s paint, trim, or hatch. A properly installed rack distributes weight evenly and minimizes contact with sensitive areas. And when you’re driving on bumpy roads or highways, a secure rack keeps your bikes stable—no rattling, no shifting, no worries.
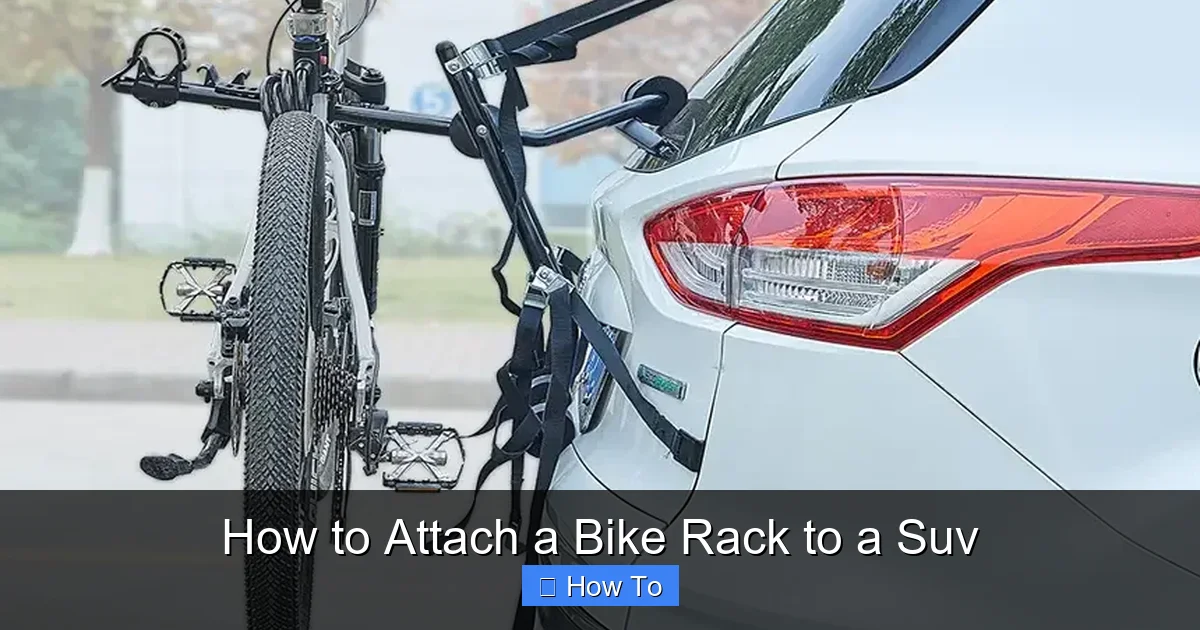
Types of Bike Racks for SUVs
Visual guide about How to Attach a Bike Rack to a Suv
Image source: suvrving.com
Not all bike racks are created equal. The best one for you depends on your SUV model, how many bikes you carry, your budget, and how often you use it. Let’s break down the four main types.
Hitch-Mounted Bike Racks
These are the most popular and reliable options for SUVs. They attach to a trailer hitch receiver—usually 1.25” or 2”—mounted on the rear of your vehicle.
Pros:
– Very stable and secure
– Easy to load and unload bikes
– Can carry 2–5 bikes
– Often fold down for trunk access
– Less likely to damage your SUV
Cons:
– Requires a hitch (not all SUVs come with one)
– Can block rearview camera or license plate
– More expensive than trunk racks
Best for: Frequent riders, families, or anyone carrying multiple bikes.
Trunk-Mounted Bike Racks
These racks strap onto the rear hatch or trunk of your SUV using hooks and straps. They’re lightweight, affordable, and don’t require any installation beyond attaching the straps.
Pros:
– No hitch needed
– Easy to install and remove
– Budget-friendly
– Great for occasional use
Cons:
– Can scratch paint if not padded properly
– Less stable at high speeds
– May block taillights or license plate
– Limited to 2–3 bikes
Best for: Occasional riders, budget-conscious buyers, or SUVs without a hitch.
Roof-Mounted Bike Racks
These attach to roof rails or crossbars on top of your SUV. You lift the bike onto the roof and secure it with clamps or wheel trays.
Pros:
– Keeps rear of vehicle clear
– Great for tall SUVs with high ground clearance
– Can carry multiple bikes
– Doesn’t block license plate or lights
Cons:
– Harder to load bikes (especially heavy ones)
– Increases vehicle height—watch out for low bridges!
– Can reduce fuel efficiency due to wind resistance
– More expensive
Best for: SUVs with roof rails, riders who want full trunk access, or those carrying other roof gear (like kayaks).
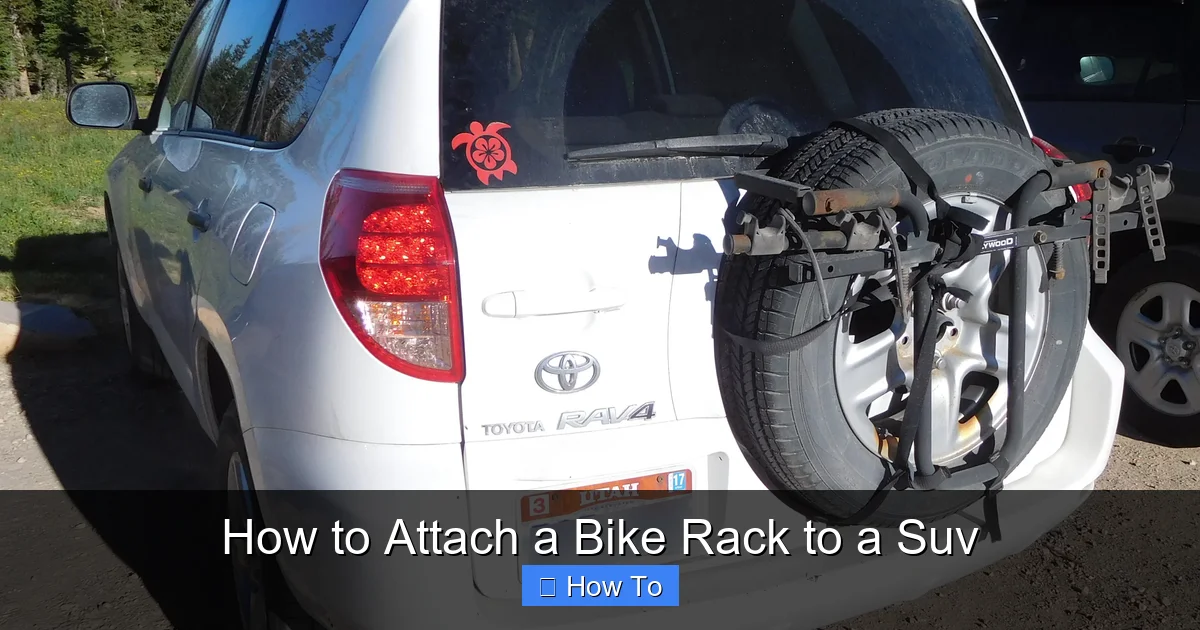
Spare Tire-Mounted Bike Racks
Designed for SUVs with an external spare tire (like Jeeps or older SUVs), these racks clamp onto the spare tire itself.
Pros:
– No hitch or roof rails needed
– Easy to install
– Keeps bikes off the ground
Cons:
– Limited to specific vehicle types
– Can block rear camera or lights
– Less stable than hitch racks
Best for: Jeep Wranglers, Toyota 4Runners, or other SUVs with rear-mounted spare tires.
How to Choose the Right Bike Rack for Your SUV
Before you buy, ask yourself these questions:
1. Do I have a hitch? If yes, a hitch-mounted rack is usually the best choice. If not, consider a trunk or roof rack—or install a hitch.
2. How many bikes do I carry? Most racks hold 2–4 bikes. If you need more, look for expandable models or consider a cargo carrier with bike mounts.
3. How often will I use it? If you ride weekly, invest in a durable hitch or roof rack. For occasional use, a trunk rack may suffice.
4. What’s my budget? Trunk racks start around $50, while hitch and roof racks can cost $200–$600.
5. Does it fit my SUV? Check the manufacturer’s compatibility list. Some racks are designed specifically for SUVs, sedans, or hatchbacks.
6. Will it block my license plate or lights? This is a legal issue in many states. Choose a rack that allows visibility or comes with a light extension.
Step-by-Step: How to Attach a Hitch-Mounted Bike Rack
Hitch-mounted racks are the gold standard for SUVs. Here’s how to install one safely and correctly.
Step 1: Check Your Hitch
First, locate your trailer hitch receiver. It’s usually a square tube on the rear bumper, below the license plate. Check the size—most SUVs use a 2” hitch, but some smaller models use 1.25”.
Make sure the hitch is rated for the weight of the rack plus your bikes. Most SUV hitches can handle 3,500–5,000 lbs, but always check your owner’s manual.
Step 2: Prepare the Rack
Unbox your rack and lay out all parts. Most come with:
– The main rack frame
– Bike arms or cradles
– Hitch pin and clip
– Anti-rattle device (optional but recommended)
– Instruction manual
Attach the bike arms to the frame if they’re not pre-installed. Use the provided bolts and tighten with a wrench or Allen key.
Step 3: Insert the Rack into the Hitch
Slide the rack’s hitch shank into the receiver. Make sure it goes in fully—there should be no gap. If it’s too loose, use a hitch sleeve or adapter.
Once inserted, insert the hitch pin through the hole in the shank and receiver. Secure it with the cotter pin or locking clip.
Step 4: Tighten and Stabilize
Use the anti-rattle device (if included) to reduce wobble. This is usually a bolt or knob that tightens against the hitch. Turn it clockwise until snug—don’t over-tighten.
Give the rack a firm shake. It should not move side-to-side or up-and-down. If it does, recheck the pin and anti-rattle device.
Step 5: Fold and Test
If your rack has a folding feature, test it. Fold it down to access the trunk, then fold it back up. Make sure it locks in place securely.
Step-by-Step: How to Attach a Trunk-Mounted Bike Rack
Trunk racks are quick to install but require careful attention to avoid damage.
Step 1: Position the Rack
Lay the rack on the ground behind your SUV. Open the rear hatch and drape the top hooks over the top edge of the hatch. Make sure the padded hooks are facing inward to protect the paint.
Step 2: Attach the Straps
Connect the upper straps to the top hooks and tighten them. Then attach the lower hooks to the bottom edge of the hatch or the bumper. Some models use straps that wrap around the bumper—follow the instructions.
Tighten all straps evenly. The rack should be snug but not so tight that it bends the hatch.
Step 3: Secure the Bottom
Use the bottom straps to anchor the rack to the bumper or under the vehicle. These prevent the rack from lifting at high speeds.
Double-check that all hooks are padded and not touching bare metal or glass.
Step 4: Test the Fit
Close the hatch gently. It should close fully without interference. If not, adjust the strap length or reposition the rack.
Give the rack a firm shake. It should not move more than an inch in any direction.
Step-by-Step: How to Attach a Roof-Mounted Bike Rack
Roof racks require roof rails or crossbars. If your SUV doesn’t have them, you’ll need to install them first.
Step 1: Install Crossbars (If Needed)
Most SUVs have roof rails, but not crossbars. Buy crossbars that fit your SUV model (e.g., Thule, Yakima, or OEM). Follow the manufacturer’s instructions to attach them securely.
Step 2: Mount the Bike Rack
Place the bike rack on the crossbars. Most use clamps that tighten with a knob or lever. Position the rack so the bike will sit centered on the roof.
Tighten the clamps until the rack doesn’t move. Use a torque wrench if specified.
Step 3: Load the Bike
Lift the bike onto the rack. Most roof racks have wheel trays and frame clamps. Secure the wheels first, then clamp the frame.
Use additional straps to secure the wheels and prevent movement.
Step 4: Check Clearance
Measure the total height of your SUV with the bike. Remember: you’ve added 2–3 feet. Watch for low bridges, parking garages, or tree branches.
How to Secure Your Bikes on the Rack
No matter which rack you use, proper bike security is crucial.
Use Frame and Wheel Straps
Always secure the bike frame to the rack using the provided straps or clamps. Then strap down the wheels to prevent spinning or shifting.
Avoid clamping only the front wheel—this can damage the fork.
Protect Paint and Components
Use foam pads or rubber protectors where the rack touches the bike. This prevents scratches on the frame, handlebars, and wheels.
Check Tightness
After loading, give each bike a gentle shake. If it moves, tighten the straps. Recheck after driving a few miles.
Use Locks (Optional but Recommended)
Invest in a cable or U-lock to secure your bikes to the rack. This deters theft, especially in parking lots or trailheads.
Troubleshooting Common Issues
Even with the best setup, problems can happen. Here’s how to fix them.
Rack Wobbles or Shakes
Cause: Loose hitch pin, missing anti-rattle device, or uneven weight.
Solution: Tighten the hitch pin, install the anti-rattle bolt, and redistribute bike weight.
Bikes Shift During Driving
Cause: Loose straps or improper loading.
Solution: Stop and re-secure all straps. Make sure bikes aren’t touching each other.
Rack Blocks License Plate or Lights
Cause: Poor design or incorrect installation.
Solution: Use a license plate relocation kit or a rack with a built-in light extension. Some states require this by law.
Paint Damage on SUV
Cause: Metal hooks rubbing against paint.
Solution: Add extra padding to hooks. Use a trunk rack with silicone or rubber coatings.
Difficulty Loading Bikes
Cause: Heavy bikes or high roof racks.
Solution: Use a bike lift assist, load lighter bikes first, or consider a hitch rack instead.
Safety Tips for Transporting Bikes
Safety doesn’t end when the rack is installed. Follow these tips every time you drive.
Check Local Laws
Some states require:
– License plate visibility
– Brake light access
– Reflective tape on extended racks
Check your DMV website for rules.
Perform a Pre-Trip Check
Before every trip, inspect:
– Rack attachment points
– Strap tightness
– Bike security
– Light functionality
– Clearance height
Drive Cautiously
Bike racks add weight and change your SUV’s handling. Take turns slowly, allow extra braking distance, and avoid sudden maneuvers.
Monitor Wind Resistance
Roof racks increase drag. You may notice reduced fuel efficiency and more wind noise. Consider removing the rack when not in use.
Maintenance and Care for Your Bike Rack
A well-maintained rack lasts longer and performs better.
Clean Regularly
Wipe down the rack after trips, especially if you’ve been on dirt roads or in the rain. Use mild soap and water.
Inspect for Wear
Check for:
– Rust or corrosion
– Cracked plastic parts
– Loose bolts or straps
– Faded or frayed webbing
Replace worn parts immediately.
Lubricate Moving Parts
Apply a light lubricant to hinges, pins, and clamps to keep them moving smoothly.
Store Properly
When not in use, store the rack in a dry place. If it’s removable, take it off to prevent theft and reduce wear.
Conclusion
Attaching a bike rack to your SUV doesn’t have to be complicated. With the right rack, a few tools, and this guide, you can transport your bikes safely and confidently. Whether you choose a hitch, trunk, roof, or spare tire mount, the key is proper installation, secure loading, and regular maintenance.
Remember: how to attach a bike rack to a SUV is about more than just mechanics—it’s about peace of mind. You’re protecting your investment, your vehicle, and your adventures.
So grab your rack, load up your bikes, and hit the road. The trail is waiting.