
This guide walks you through how to attach a Saris bike rack on a RAV4 SUV with clear, easy-to-follow instructions. You’ll learn about compatibility, installation, safety tips, and troubleshooting to ensure a secure and hassle-free ride.
Key Takeaways
- Check compatibility first: Not all Saris bike racks fit every RAV4 model—verify your vehicle year and rack model before installing.
- Use the right rack type: Saris offers hitch-mounted, trunk-mounted, and platform-style racks—choose based on your RAV4’s setup and needs.
- Follow the manual closely: Always refer to the Saris installation guide for your specific model to avoid mistakes.
- Secure the rack properly: Tighten straps or bolts firmly and double-check stability before driving.
- Test before you go: Give the rack a firm shake after installation to ensure it’s stable and won’t shift during transit.
- Maintain regularly: Inspect straps, bolts, and connections periodically to keep the rack safe and functional.
- Follow weight limits: Never exceed the rack’s or your RAV4’s towing capacity to avoid damage or accidents.
How to Attach Saris Bike Rack on RAV4 SUV
If you’re an outdoor enthusiast with a Toyota RAV4 and a passion for biking, you know how important it is to transport your bikes safely and securely. One of the best ways to do that is by using a Saris bike rack. Known for their durability, ease of use, and innovative designs, Saris bike racks are a top choice for SUV owners. But if you’re new to bike racks or haven’t installed one on your RAV4 before, the process might seem a bit intimidating.
Don’t worry—this comprehensive guide will walk you through how to attach a Saris bike rack on a RAV4 SUV step by step. Whether you have a hitch-mounted, trunk-mounted, or platform-style Saris rack, we’ll cover everything you need to know. From checking compatibility to final safety checks, you’ll be ready to hit the road with your bikes in no time.
By the end of this guide, you’ll understand which Saris rack works best for your RAV4, how to install it correctly, and how to maintain it for long-term use. We’ll also share practical tips, troubleshooting advice, and answers to common questions so you can ride with confidence.
Let’s get started!
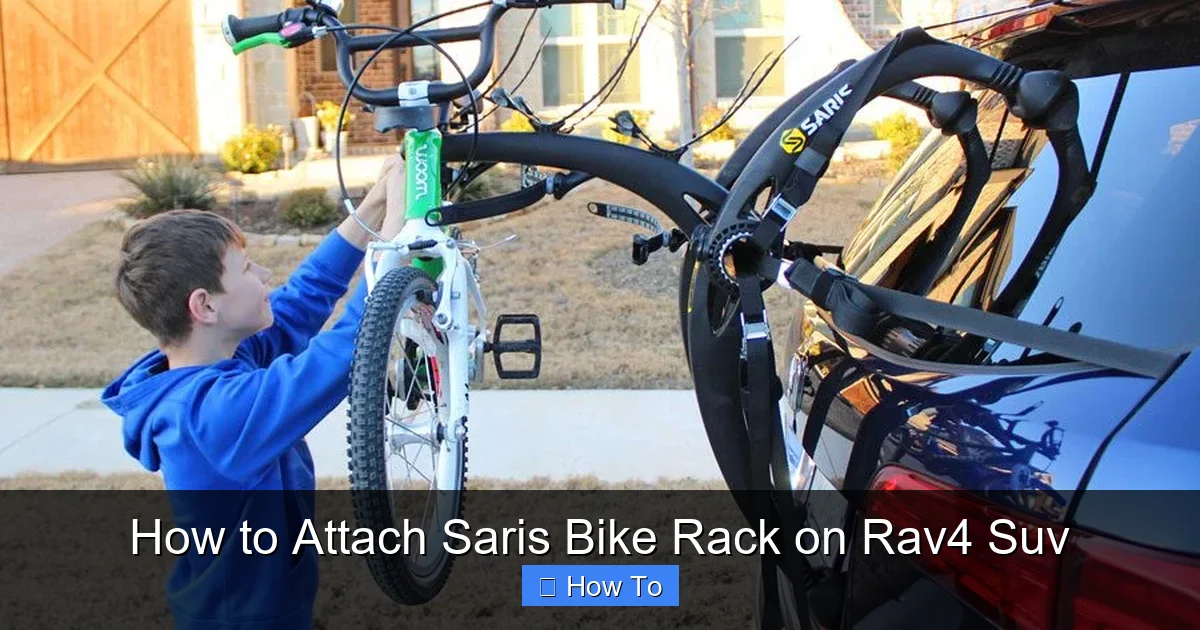
Why Choose a Saris Bike Rack for Your RAV4?
Visual guide about How to Attach Saris Bike Rack on Rav4 Suv
Image source: rcfact.com
Before diving into the installation process, it’s helpful to understand why Saris is a trusted name in bike transportation. Saris has been designing bike racks for over 40 years, focusing on safety, ease of use, and compatibility with a wide range of vehicles—including the popular Toyota RAV4.
One of the biggest advantages of Saris racks is their versatility. They offer several mounting options, including trunk-mounted, hitch-mounted, and platform-style racks. This means you can choose the best fit for your RAV4 based on your vehicle’s configuration, how many bikes you plan to carry, and your budget.
For example, if your RAV4 has a trailer hitch, a hitch-mounted Saris rack like the Saris SuperClamp EX 2 or the Saris Freedom 2 is an excellent choice. These racks are stable, easy to load, and protect your bikes from frame contact. If you don’t have a hitch, a trunk-mounted rack such as the Saris Bones 2-Bike or Bones 3-Bike can be a great alternative. These racks attach to the rear of your SUV using adjustable straps and are ideal for occasional use.
Another reason to choose Saris is their focus on bike protection. Many Saris racks feature padded arms, anti-sway cradles, and secure clamping systems that prevent your bikes from rubbing against each other or your vehicle. This is especially important if you’re transporting expensive road bikes or mountain bikes.
Finally, Saris racks are designed with user convenience in mind. Most models fold up when not in use, making them easy to store. Many also include integrated locks to secure your bikes and prevent theft.
In short, a Saris bike rack offers a reliable, safe, and user-friendly solution for transporting bikes on your RAV4. Now, let’s make sure you pick the right one and install it correctly.
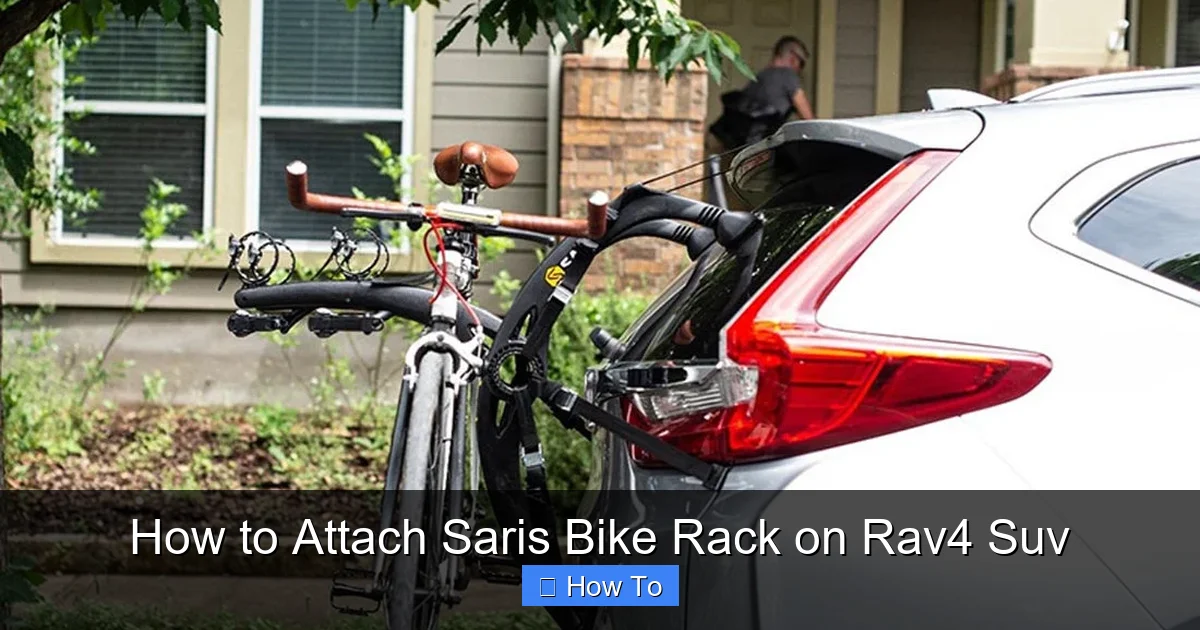
Step 1: Determine Your RAV4 Model and Year
Visual guide about How to Attach Saris Bike Rack on Rav4 Suv
Image source: saris.com
The first step in attaching a Saris bike rack to your RAV4 is confirming your vehicle’s model year and trim. This is crucial because not all Saris racks are compatible with every RAV4. Toyota has made design changes over the years, especially to the rear bumper, hatch, and hitch receiver locations, which can affect rack fit.
Start by checking your vehicle’s year. The RAV4 has gone through several generations:
– 1st Gen (1996–2000)
– 2nd Gen (2001–2005)
– 3rd Gen (2006–2012)
– 4th Gen (2013–2018)
– 5th Gen (2019–present)
Each generation has slight differences in rear design, so a rack that fits a 2015 RAV4 might not fit a 2022 model perfectly.
Next, identify whether your RAV4 has a factory-installed trailer hitch or if you’ve added an aftermarket one. Hitch-mounted Saris racks require a 1.25-inch or 2-inch receiver. If your RAV4 doesn’t have a hitch, you’ll need to use a trunk-mounted or roof-mounted rack.
You can usually find your vehicle’s model year and trim level on the driver’s side door jamb sticker or in your owner’s manual. If you’re unsure, you can also enter your VIN on Toyota’s official website or contact a dealership for confirmation.
Once you know your RAV4’s details, visit the Saris website and use their vehicle compatibility tool. Simply select your vehicle make, model, and year, and Saris will show you which racks are compatible. This step saves you time and prevents frustration down the road.
Step 2: Choose the Right Saris Bike Rack
Now that you know your RAV4’s specs, it’s time to choose the right Saris bike rack. Saris offers several models, each designed for different needs and vehicle types. Here’s a breakdown of the most popular options for RAV4 owners:
Hitch-Mounted Racks
If your RAV4 has a trailer hitch, a hitch-mounted rack is usually the best choice. These racks are more stable, easier to load, and cause less stress on your vehicle than trunk-mounted options.
– Saris SuperClamp EX 2: This is a premium platform-style rack that holds two bikes by the wheels, eliminating frame contact. It’s ideal for carbon bikes or high-end road bikes. It fits both 1.25-inch and 2-inch hitches and includes a built-in lock.
– Saris Freedom 2: A more affordable platform rack that also secures bikes by the wheels. It’s lightweight, foldable, and easy to use. Great for families or weekend riders.
– Saris Sentinel 2: A budget-friendly hitch rack that holds bikes by the frame. It’s simple to install and works well for casual use.
Trunk-Mounted Racks
If you don’t have a hitch, a trunk-mounted rack is a solid alternative. These racks attach to the rear hatch using adjustable straps and padded hooks.
– Saris Bones 2-Bike: A sleek, lightweight rack that fits most SUVs, including the RAV4. It uses a unique arc design to create space between the bikes and your vehicle.
– Saris Bones 3-Bike: The same design as the 2-bike version but holds three bikes. Perfect for families or group rides.
Roof-Mounted Racks
While not as common for SUVs like the RAV4, roof racks are an option if you have roof rails or crossbars. Saris offers roof-mounted fork-mount or wheel-mount systems, but these require lifting bikes overhead, which can be challenging.
When choosing a rack, consider:
– How many bikes you need to carry
– Your budget
– Whether you have a hitch
– How often you’ll use the rack
– The type of bikes you ride (e.g., road, mountain, e-bikes)
For most RAV4 owners, a hitch-mounted platform rack like the SuperClamp EX 2 or Freedom 2 offers the best balance of safety, convenience, and protection.
Step 3: Gather Your Tools and Materials
Before you begin installation, make sure you have everything you need. Most Saris racks come with all the necessary hardware, but it’s good to double-check.
Here’s what you’ll typically need:
– Your Saris bike rack (fully assembled or in parts)
– The instruction manual (always keep this handy)
– A clean, flat workspace (your driveway or garage works well)
– A soft cloth or towel (to protect your RAV4’s paint)
– A wrench or socket set (if tightening bolts)
– A tape measure (optional, for alignment)
– Gloves (to protect your hands)
If you’re installing a hitch-mounted rack, ensure your RAV4’s hitch receiver is clean and free of debris. For trunk-mounted racks, check that the rear hatch and bumper are clean so the straps don’t slip.
Also, make sure you have enough space to work. You’ll need room to open the rear hatch, lift the rack into place, and secure it properly.
Step 4: Install a Hitch (If Needed)
If your RAV4 doesn’t already have a trailer hitch, you’ll need to install one before using a hitch-mounted Saris rack. This step is essential for safety and stability.
Most RAV4 models from 2006 onward can accommodate a Class II or Class III hitch receiver. A 2-inch receiver is ideal for heavier racks or e-bikes, while a 1.25-inch receiver works for lighter models.
You can purchase a hitch from Toyota, U-Haul, or online retailers like Amazon or etrailer.com. Popular brands include Draw-Tite, Curt, and Reese.
Steps to Install a Hitch:
- Park your RAV4 on a level surface and engage the parking brake.
- Remove the rear bumper trim if necessary (some hitches require this for access).
- Position the hitch under the vehicle, aligning it with the mounting holes.
- Insert the bolts through the hitch and frame, then secure with nuts and washers.
- Tighten all bolts to the manufacturer’s torque specification using a torque wrench.
- Reattach any removed parts, like bumper covers or exhaust hangers.
If you’re not comfortable installing the hitch yourself, visit a professional installer. Many auto shops or U-Haul locations offer hitch installation services for around $100–$200.
Once the hitch is installed, you’re ready to attach your Saris rack.
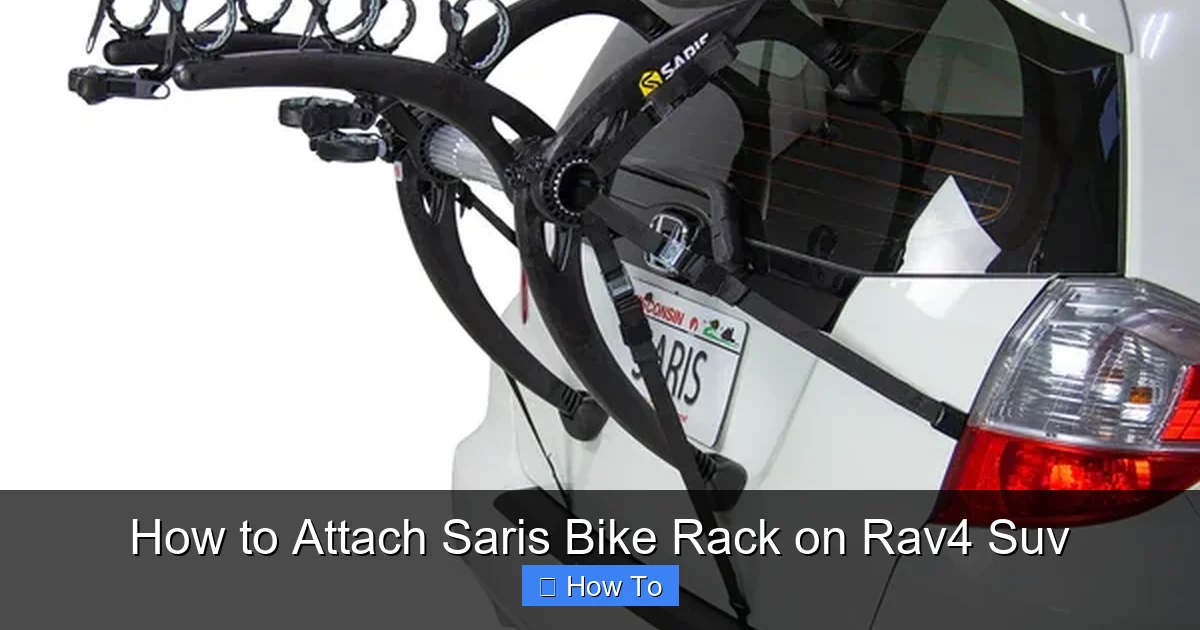
Step 5: Attach the Saris Bike Rack to Your RAV4
Now comes the fun part—installing the rack. The process varies slightly depending on the type of rack, but the general steps are similar.
For Hitch-Mounted Racks:
- Position the rack near the hitch receiver. If it’s a platform rack, unfold it so it’s ready to load.
- Insert the rack’s shank into the hitch receiver. Make sure it’s fully seated.
- Secure with the hitch pin. Most Saris racks come with a locking pin or bolt. Insert it through the shank and hitch, then tighten or lock it.
- Tighten the anti-rattle device (if included). This reduces movement and noise while driving. Use the provided knob or bolt to secure it.
- Check for wobble. Grab the rack and try to move it side to side. It should feel solid. If it wobbles, tighten the hitch pin or anti-rattle bolt.
For Trunk-Mounted Racks:
- Open the rear hatch of your RAV4 and lay a soft cloth on the edge to protect the paint.
- Position the rack on the back of the vehicle, centered over the license plate.
- Attach the top straps to the top edge of the hatch. Use the padded hooks and adjust the straps so the rack sits level.
- Secure the bottom straps to the lower edge of the bumper or under the hatch. Make sure they’re tight but not over-tightened.
- Attach the side straps (if included) to prevent lateral movement. These usually hook under the wheel wells or rear bumper.
- Tighten all straps using the buckles. The rack should feel snug and not shift when you push on it.
For Platform-Style Racks:
After attaching the rack to the hitch, you’ll need to prepare it for bikes:
- Unfold the bike arms and extend them to the desired width.
- Adjust the wheel trays so they’re level and spaced correctly for your bikes.
- Ensure the clamping mechanisms are in the open position.
Always refer to your specific Saris model’s manual for exact instructions, as designs can vary.
Step 6: Load Your Bikes Safely
Once the rack is securely attached, it’s time to load your bikes. Proper loading prevents damage to your bikes and ensures a smooth ride.
For Platform Racks:
- Lift the first bike and place the rear wheel into the rear wheel tray.
- Roll the front wheel into the front tray.
- Secure the wheels using the built-in straps or clamps. Most Saris platform racks have ratcheting straps or wheel clamps.
- Close the bike arm and lock it in place. This clamps the bike by the wheels, not the frame.
- Repeat for the second bike, making sure there’s at least 2–3 inches of space between them.
For Trunk or Frame-Mounted Racks:
- Lift the bike and rest the frame on the rack’s arms.
- Secure the bike using the provided straps. Attach the top strap to the top tube, the middle strap to the down tube, and the bottom strap to the seat post or rear triangle.
- Tighten all straps so the bike doesn’t move.
- Use anti-sway cradles (if included) to prevent bikes from rubbing.
Always load the heaviest bike first, closest to the vehicle. This improves balance and reduces strain on the rack.
Step 7: Perform a Final Safety Check
Before hitting the road, take a few minutes to double-check everything. A quick safety check can prevent accidents and damage.
Here’s what to verify:
– The rack is securely attached to the hitch or trunk. Give it a firm shake—it shouldn’t move.
– All straps and bolts are tight. Re-tighten if needed.
– Bikes are properly secured and not touching each other or the vehicle.
– The rear hatch can open (if applicable). Some racks block the hatch, so make sure you can still access your cargo area.
– License plate and taillights are visible. Don’t obstruct safety features.
– The rack doesn’t interfere with exhaust or sensors. Modern RAV4s have backup cameras and parking sensors—ensure they’re not blocked.
Take a short test drive around the block. Listen for unusual noises and check the rack after 5–10 minutes of driving. If everything feels solid, you’re ready to go!
Troubleshooting Common Issues
Even with careful installation, you might run into a few problems. Here are some common issues and how to fix them:
Rack Wobbles or Moves While Driving
This usually means the hitch pin isn’t tight enough or the anti-rattle device isn’t engaged. Re-tighten the pin and adjust the anti-rattle knob. For trunk racks, check that all straps are snug and the hooks are secure.
Bikes Rub Together or Against the Vehicle
Add anti-sway cradles or use additional straps to separate the bikes. On platform racks, adjust the wheel trays to increase spacing.
Trunk Rack Slips Off
This often happens if the straps aren’t tight enough or the hooks aren’t positioned correctly. Reattach the rack, ensuring the top hooks grip the top edge of the hatch firmly. Use a towel to protect the paint and improve grip.
Hitch Rack Doesn’t Fit the Receiver
Double-check that you have the correct shank size (1.25-inch vs. 2-inch). Some Saris racks come with adapters, or you can purchase one separately.
Difficulty Opening the Rear Hatch
Some hitch racks block the hatch. Look for models with a tilt or swing-away feature, or consider a trunk-mounted rack instead.
Maintenance and Care Tips
To keep your Saris bike rack in top condition, follow these maintenance tips:
– Clean the rack regularly with soap and water to remove dirt, salt, and grime.
– Inspect straps and bolts before each use. Replace worn straps immediately.
– Lubricate moving parts like hinges and clamps with silicone spray.
– Store the rack indoors when not in use to prevent rust and UV damage.
– Check the hitch receiver periodically for rust or damage.
Proper care extends the life of your rack and ensures safe transportation for years to come.
Conclusion
Attaching a Saris bike rack to your RAV4 SUV doesn’t have to be complicated. With the right preparation, tools, and step-by-step guidance, you can install your rack safely and confidently. Whether you choose a hitch-mounted platform rack for maximum stability or a trunk-mounted option for convenience, Saris offers reliable solutions for every need.
Remember to check your RAV4’s compatibility, follow the installation instructions carefully, and perform regular safety checks. By doing so, you’ll protect your bikes, your vehicle, and your peace of mind on every adventure.
Now that you know how to attach a Saris bike rack on a RAV4 SUV, you’re ready to explore trails, parks, and scenic routes with your bikes in tow. Happy riding!