
This guide walks you through the complete process of attaching a Saris bike rack to your SUV, ensuring a safe and secure fit. Whether you’re using a hitch-mounted or trunk-mounted model, you’ll find clear instructions and expert tips to get your bikes ready for the road.
Key Takeaways
- Choose the right Saris bike rack model: Match your rack type (hitch, trunk, or platform) to your SUV’s capabilities and your biking needs.
- Check your SUV’s hitch receiver size: Most Saris hitch racks require a 2-inch receiver, but some work with 1.25-inch hitches using an adapter.
- Follow the manufacturer’s instructions carefully: Saris provides detailed manuals—always refer to them before installation.
- Secure the rack properly to prevent movement: Use locking mechanisms, straps, and anti-sway features to keep the rack stable during travel.
- Load bikes correctly to avoid damage: Position bikes with adequate spacing, secure frames (not wheels), and double-check all connections.
- Perform a pre-trip safety check: Test the rack’s stability, ensure lights are visible, and confirm nothing blocks the license plate or taillights.
- Maintain your rack regularly: Inspect for wear, clean after use, and store properly to extend its lifespan.
How to Attach Saris Bike Rack to SUV
Whether you’re heading to the mountains for a weekend trail ride or transporting bikes to a family cycling event, a reliable bike rack is essential. Saris bike racks are known for their durability, innovative design, and ease of use—making them a top choice for SUV owners. But even the best rack won’t do its job if it’s not attached correctly.
In this comprehensive guide, you’ll learn exactly how to attach a Saris bike rack to your SUV—step by step. We’ll cover everything from choosing the right model to securing your bikes and performing final safety checks. By the end, you’ll feel confident loading up and hitting the road with your bikes safely in tow.
This guide applies to the most popular Saris models, including the Saris Freedom, Saris SuperClamp, and Saris Guardian. Whether you have a hitch-mounted or trunk-mounted rack, the principles remain similar. Let’s get started!
Step 1: Choose the Right Saris Bike Rack for Your SUV
Visual guide about How to Attach Saris Bike Rack to Suv
Image source: i.ebayimg.com
Before you can attach anything, you need the right tool for the job. Saris offers several types of bike racks, and selecting the correct one for your SUV is the first critical step.
Understand the Types of Saris Bike Racks
Saris makes three main types of bike racks:
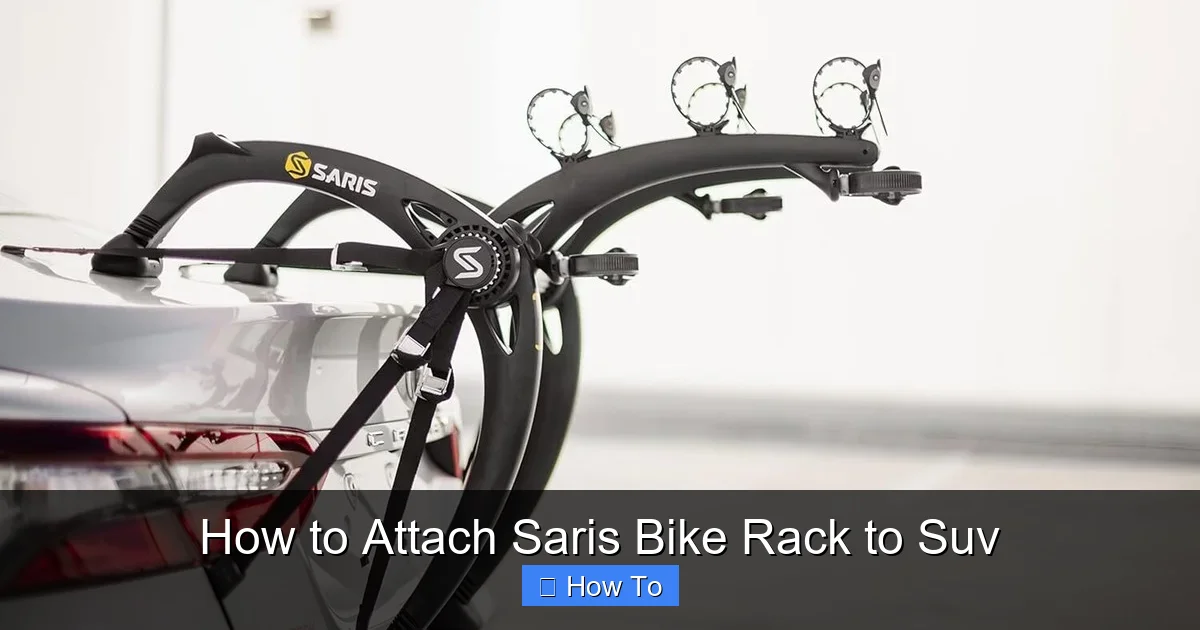
- Hitch-mounted racks: These attach to your SUV’s trailer hitch receiver. They’re sturdy, easy to load, and ideal for heavier bikes or multiple bikes. Models like the Saris Freedom and SuperClamp fall into this category.
- Trunk-mounted racks: These strap onto the rear hatch or trunk of your SUV. They’re more affordable and don’t require a hitch, but they’re less stable and can obstruct rear visibility. The Saris Guardian is a popular trunk model.
- Platform-style racks: A subset of hitch racks, these hold bikes by the wheels, minimizing frame contact. Great for carbon frames or full-suspension bikes.
Match the Rack to Your SUV’s Features
Not all SUVs are created equal. Consider these factors:
- Hitch receiver size: Most SUVs come with a 2-inch hitch receiver, but some smaller models have 1.25-inch receivers. Saris hitch racks typically require a 2-inch receiver, though adapters are available.
- Rear door design: SUVs with rear hatches that open upward (like the Subaru Forester or Toyota RAV4) work well with trunk racks. However, if your hatch opens sideways or has a spare tire mounted, a hitch rack is usually better.
- Weight capacity: Check your SUV’s towing capacity and the rack’s weight limit. Most Saris racks support 2–4 bikes, with a total weight limit of 120–160 pounds.
Example: Choosing a Rack for a Honda CR-V
Let’s say you drive a Honda CR-V with a 2-inch hitch receiver. You plan to carry two mountain bikes regularly. In this case, the Saris Freedom 2 is an excellent choice. It’s a hitch-mounted platform rack that holds two bikes securely by the wheels, protecting frames from scratches.
Step 2: Gather Your Tools and Equipment
Visual guide about How to Attach Saris Bike Rack to Suv
Image source: carbicyclerack.co.uk
You don’t need a full toolbox, but having the right items on hand will make installation smoother.
What You’ll Need
- Your Saris bike rack (fully assembled or in parts)
- SUV with a compatible hitch receiver or trunk
- Owner’s manual (included with the rack)
- Torque wrench (for hitch racks—optional but recommended)
- Rubber mallet (to gently tap parts into place, if needed)
- Clean cloth (to wipe down hitch and rack surfaces)
- Bike lock (optional, for added security)
Pre-Installation Tips
- Read the manual thoroughly before starting. Saris provides detailed diagrams and warnings.
- Work in a flat, well-lit area—your driveway or garage is ideal.
- Have a friend help if the rack is heavy or awkward to handle.
Step 3: Prepare Your SUV’s Hitch Receiver
If you’re using a hitch-mounted Saris rack, the hitch receiver must be clean, level, and properly secured.
Inspect the Hitch Receiver
- Remove any dirt, rust, or debris from the inside of the receiver tube using a brush or cloth.
- Check for damage—cracks, bends, or excessive wear can compromise safety.
- Ensure the hitch pin hole is clear and not obstructed.
Install or Verify the Hitch Ball Mount
Most SUVs come with a ball mount already installed. If not, you’ll need to install one that matches your receiver size (usually 2-inch).
- Slide the ball mount into the receiver.
- Insert the hitch pin through the receiver and ball mount.
- Secure with a cotter pin or locking pin.
- Tighten the hitch bolt (if applicable) using a torque wrench to the manufacturer’s specification (typically 30–50 ft-lbs).
Tip: Use a Hitch Lock
For added security, consider a hitch lock that prevents the rack from being removed without a key. Saris offers compatible locks for many of their models.
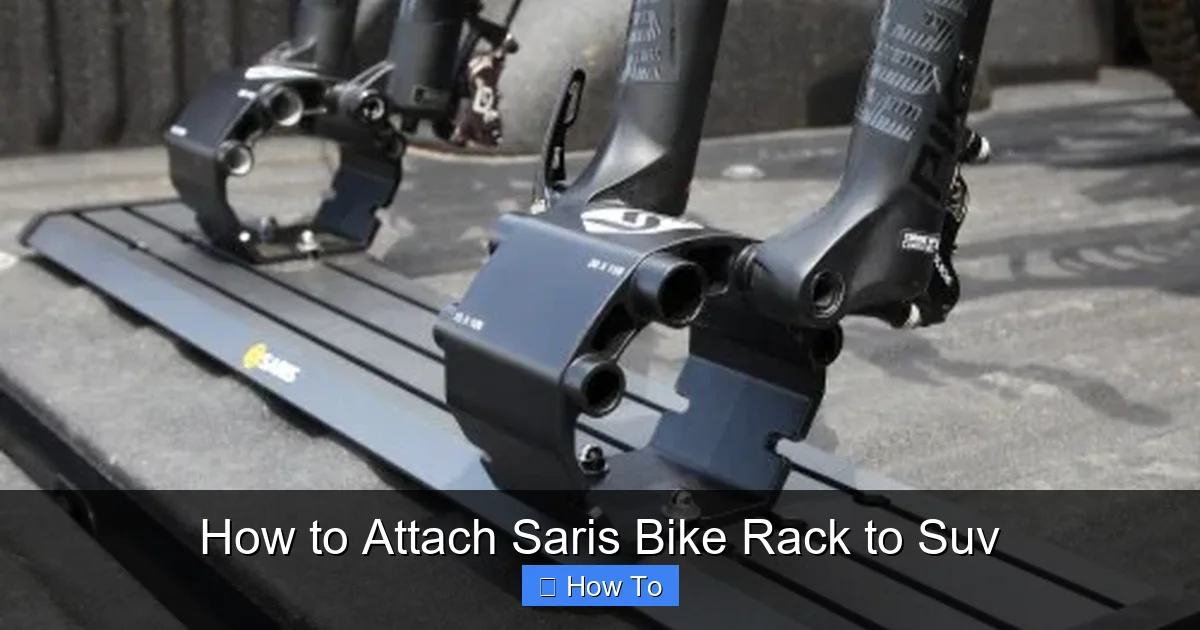
Step 4: Assemble the Saris Bike Rack (If Needed)
Some Saris racks come pre-assembled, while others require partial assembly. Follow the manual closely.
Common Assembly Steps
- Attach the upright mast to the base plate using the provided bolts and wrench.
- Install the bike arms or wheel trays according to the diagram.
- Attach any anti-sway brackets or stabilizing straps.
- Ensure all bolts are tightened securely—but don’t over-tighten, as this can strip threads.
Example: Assembling the Saris Freedom 2
The Freedom 2 arrives mostly assembled. You’ll need to:
- Attach the two bike arms to the main platform.
- Install the wheel straps and frame cradles.
- Attach the anti-sway bar to prevent bike-to-bike contact.
Use the included Allen wrench and follow the numbered steps in the manual.
Step 5: Attach the Saris Rack to Your SUV’s Hitch
Now it’s time to mount the rack.
Slide the Rack into the Hitch Receiver
- Align the rack’s hitch shank with the receiver tube.
- Slide the rack in until the pin hole lines up.
- If it’s tight, gently tap it with a rubber mallet—never use excessive force.
Secure with the Hitch Pin
- Insert the hitch pin through both the receiver and the rack’s shank.
- Attach a locking pin or cotter pin to prevent it from coming loose.
- For Saris racks with a built-in lock, insert the key and turn to secure.
Tighten the Anti-Rattle Bolt (If Applicable)
Many Saris hitch racks include an anti-rattle mechanism to reduce wobble.
- Locate the bolt on the side or bottom of the hitch shank.
- Use a wrench to tighten it until the rack feels snug but still allows for slight movement.
- Do not overtighten—this can damage the hitch or rack.
Check for Stability
Give the rack a firm shake. It should not move side-to-side or up-and-down. If it wobbles, recheck the hitch pin and anti-rattle bolt.
Step 6: Adjust the Rack for Optimal Positioning
Proper positioning ensures your bikes are secure and your SUV remains safe to drive.
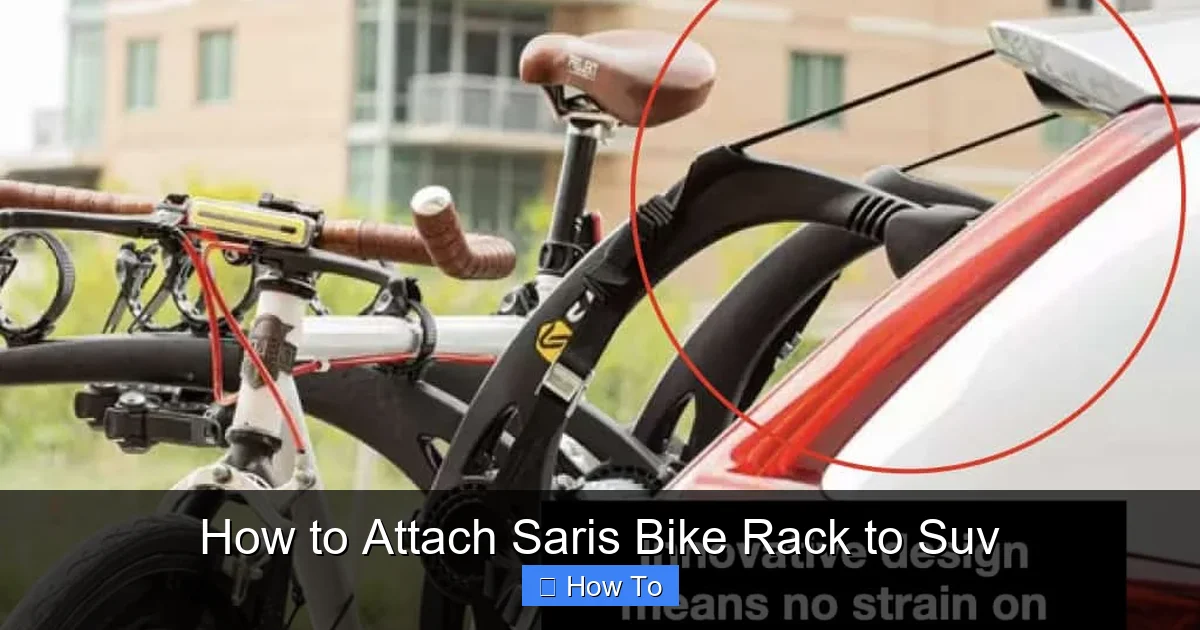
Tilt or Fold the Rack (If Available)
Many Saris racks can tilt away from the vehicle to allow trunk access.
- Locate the tilt-release lever or pin.
- Pull the lever and tilt the rack backward.
- Ensure it locks in place when tilted and when returned to the upright position.
Adjust the Bike Arms
- Spread the arms wide enough to prevent bike contact.
- Some models allow arm height adjustment—set them so bikes sit level.
Ensure Clearance
- The rack should not interfere with the rear wiper, spoiler, or license plate.
- When tilted, it should not hit the ground or bumper.
- Check that taillights and brake lights are still visible.
Step 7: Load Your Bikes Safely
Now for the fun part—loading your bikes! But do it right to avoid damage.
Prepare the Bikes
- Remove water bottles, pumps, or loose accessories.
- Lower or remove bike seats if they interfere with the rack.
- Ensure tires are properly inflated.
Load Bikes One at a Time
- Start with the bike closest to the vehicle.
- Lift the bike and place the front wheel into the designated tray.
- Lower the rear wheel into its tray.
- Secure the wheels using the provided straps—tighten until snug but not overly tight.
Secure the Frame (If Required)
Some Saris models use frame cradles in addition to wheel straps.
- Place the frame cradle around the bike’s downtube or top tube.
- Attach the strap and tighten securely.
- Avoid contact with suspension components or brake lines.
Use the Anti-Sway Feature
If your rack has an anti-sway bar or strap:
- Attach it between the bikes to prevent them from rubbing during travel.
- This is especially important on bumpy roads or long trips.
Double-Check All Connections
Before driving, go through this checklist:
- Are all wheel straps tight?
- Are frame cradles secure?
- Is the anti-sway device engaged?
- Are the bikes evenly spaced?
- Is the rack locked to the hitch?
Step 8: Perform a Final Safety Check
Never skip this step—your safety depends on it.
Test the Rack’s Stability
- Push and pull the rack to ensure it doesn’t shift.
- Check that the hitch pin is fully inserted and locked.
Verify Visibility
- Ensure your license plate is visible (some states require this by law).
- Confirm that brake lights, turn signals, and taillights are unobstructed.
- If needed, use a license plate relocation bracket or light extension.
Take a Short Test Drive
- Drive slowly around the block.
- Listen for rattling, clunking, or unusual noises.
- Check the rack and bikes after the drive—nothing should have loosened.
Troubleshooting Common Issues
Even with careful installation, problems can arise. Here’s how to fix them.
Rack Wobbles or Moves Excessively
- Cause: Loose hitch pin or missing anti-rattle bolt.
- Solution: Reinsert the pin and tighten the anti-rattle bolt. If the hitch is worn, consider a hitch tightener or upgrade.
Bikes Rub Together During Travel
- Cause: Insufficient spacing or missing anti-sway device.
- Solution: Adjust bike arms wider or install the anti-sway strap. Load heavier bikes on the inside.
Trunk or Hatch Won’t Open
- Cause: Rack is blocking the door.
- Solution: Tilt the rack back (if equipped) or switch to a hitch-mounted model.
Straps Keep Coming Loose
- Cause: Over-tightening or worn straps.
- Solution: Use a ratcheting strap or replace worn straps. Avoid over-tightening, which can damage wheels.
Rack Blocks License Plate or Lights
- Cause: Poor rack positioning or model incompatibility.
- Solution: Use a license plate extender or choose a rack with a built-in light bar. Some Saris models include this feature.
Maintenance and Storage Tips
To keep your Saris rack in top condition:
- Clean after each use: Wipe down metal parts to remove dirt, salt, and grime—especially after beach or winter trips.
- Lubricate moving parts: Apply a light grease to pivot points and bolts annually.
- Inspect regularly: Check for cracks, rust, or loose bolts before each trip.
- Store indoors: When not in use, keep the rack in a garage or shed to prevent weather damage.
- Use a cover: If storing outside, use a weatherproof bike rack cover.
Conclusion
Attaching a Saris bike rack to your SUV doesn’t have to be complicated. With the right model, proper installation, and careful loading, you can transport your bikes safely and confidently. Whether you’re a weekend warrior or a daily commuter, a well-mounted rack ensures your bikes arrive in perfect condition—ready for the next adventure.
Remember: always follow the manufacturer’s instructions, perform regular checks, and prioritize safety. Your bikes are valuable, and so is your peace of mind. Now go enjoy the ride!