
Building a shelf in your SUV is a smart way to organize gear, boost storage, and make the most of your vehicle’s space. This step-by-step guide walks you through planning, measuring, building, and installing a custom shelf that fits your needs—whether for camping, tools, or everyday use.
Key Takeaways
- Plan before you build: Measure your SUV’s cargo area and decide what you’ll store to design a shelf that fits perfectly and serves your purpose.
- Choose the right materials: Use lightweight but sturdy materials like plywood, MDF, or aluminum to ensure durability without adding too much weight.
- Safety first: Always secure the shelf properly using bolts, brackets, or straps to prevent movement while driving.
- Customize for function: Add dividers, drawers, or tie-down points to keep items organized and prevent shifting during travel.
- Test and adjust: After installation, load the shelf and test drive to ensure stability and make any necessary adjustments.
- Consider removable designs: A foldable or modular shelf gives you flexibility when you need full cargo space.
- Use weather-resistant finishes: If you’re using the shelf for outdoor gear, seal wood or use coated materials to resist moisture and wear.
How to Build a Shelf in Your SUV
Whether you’re a weekend camper, a contractor hauling tools, or just someone who likes a tidy car, building a shelf in your SUV can be a game-changer. A custom shelf helps you organize gear, maximize space, and keep your vehicle clutter-free. The best part? You don’t need to be a master carpenter to do it. With some basic tools, a little planning, and this step-by-step guide, you can build a sturdy, functional shelf that fits your SUV like a glove.
In this guide, we’ll walk you through everything from measuring your vehicle to installing the finished shelf. We’ll cover material choices, design tips, safety considerations, and even how to customize your shelf for specific uses—like camping, photography, or work equipment. By the end, you’ll have a professional-looking shelf that makes your SUV more practical and enjoyable to use.
Why Build a Shelf in Your SUV?
SUVs are known for their cargo space, but that space often goes underused because items shift around, get buried, or are hard to reach. A shelf solves these problems by creating defined storage zones. Here are a few reasons why building a shelf is worth the effort:
Visual guide about How to Build a Shelf in Your Suv
Image source: suvrving.com
- Better organization: Keep tools, groceries, camping gear, or sports equipment neatly separated and easy to find.
- Improved safety: Loose items can become dangerous projectiles in a crash. A shelf with secure storage reduces this risk.
- Maximized space: Use vertical space efficiently. A shelf lets you stack items without them tumbling over.
- Custom fit: Unlike generic cargo organizers, a DIY shelf is built specifically for your SUV’s dimensions and your needs.
- Cost-effective: Building your own shelf is often cheaper than buying a pre-made cargo system, especially if you already have tools.
From weekend adventurers to busy parents, a well-designed shelf can make life on the road much easier.
Planning Your SUV Shelf
Before you pick up a saw, take time to plan. A little preparation now saves time, money, and frustration later. Here’s how to get started:
Visual guide about How to Build a Shelf in Your Suv
Image source: suvrving.com
Step 1: Measure Your SUV’s Cargo Area
Grab a tape measure and head to your vehicle. Measure the following:
- Width: From the inside of one wheel well to the other (or side to side if no wheel wells).
- Depth: From the back of the rear seats (or cargo door) to the front of the cargo area.
- Height: From the floor to the ceiling, especially if you’re planning a multi-tier shelf.
Don’t forget to account for obstacles like spare tire compartments, seat latches, or air vents. Take photos and sketch a rough layout. This will help you visualize the space and avoid surprises during construction.
Step 2: Decide What You’ll Store
Your shelf’s design depends heavily on what you plan to store. Ask yourself:
- Will it hold heavy tools or lightweight camping gear?
- Do you need drawers, bins, or open shelving?
- Will you access the shelf frequently, or is it for long-term storage?
- Do you need tie-down points for securing items?
For example, a contractor might want a shelf with deep compartments for power tools, while a camper might prefer shallow bins for food and cooking supplies. Think about weight distribution too—heavier items should go on lower shelves.
Step 3: Choose a Shelf Style
There are several common shelf designs for SUVs:
- Single-level shelf: A flat platform across the cargo area. Great for stacking bins or creating a work surface.
- Double-decker shelf: Two levels for maximum storage. Ideal if you have tall cargo space.
- Modular or removable shelf: Built in sections that can be taken out or rearranged. Perfect for flexibility.
- Fold-down shelf: Attached to the wall or seatback and folds up when not in use. Saves space.
- Drawer system: Pull-out drawers for easy access to small items. More complex but very functional.
For beginners, a single-level or modular shelf is the easiest to build. More advanced builders can tackle drawers or multi-tier designs.
Choosing Materials and Tools
The right materials make your shelf strong, lightweight, and long-lasting. Here’s what you’ll need:
Recommended Materials
- Plywood (½” or ¾”): Affordable, strong, and easy to cut. Use birch or maple for a clean finish. Avoid particleboard—it swells when wet.
- MDF (Medium-Density Fiberboard): Smooth and uniform, great for painted finishes. But it’s heavier and not water-resistant.
- Aluminum or plastic panels: Lightweight and weatherproof, ideal for outdoor use. More expensive but durable.
- Wood screws, bolts, or brackets: For assembly and mounting. Use corrosion-resistant hardware if exposed to moisture.
- Foam padding or rubber mats: To protect items and reduce noise.
- Sandpaper, wood glue, and finish (paint, varnish, or sealant): For a professional look and added protection.
Essential Tools
- Tape measure
- Circular saw or jigsaw
- Drill and drill bits
- Screwdriver or impact driver
- Clamps
- Level
- Pencil and straightedge
- Safety gear (gloves, goggles, mask)
If you don’t own these tools, consider borrowing or renting. Many hardware stores offer tool rental programs.
Building the Shelf: Step-by-Step Instructions
Now for the fun part—building your shelf! Follow these steps to create a sturdy, custom-fit storage solution.
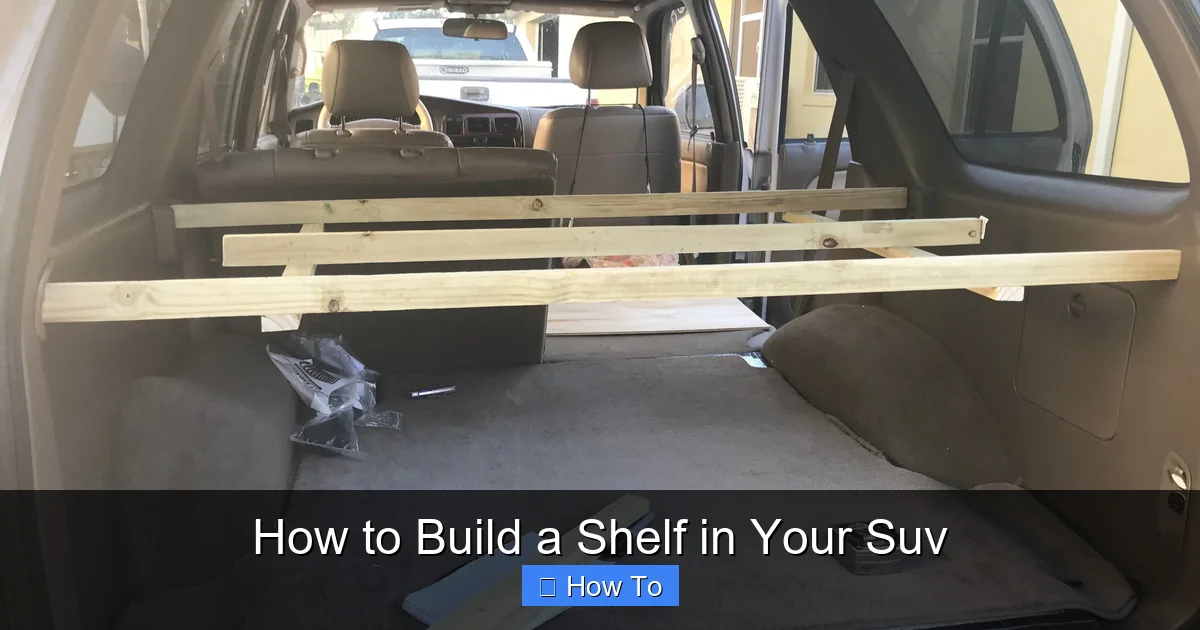
Step 1: Cut the Wood to Size
Using your measurements, mark the plywood or MDF with a pencil and straightedge. Double-check all dimensions before cutting.
For a basic single-level shelf:
- Cut one piece for the shelf top (e.g., 40” wide x 24” deep).
- Cut two or three support beams (e.g., 24” long x 2” wide) to run underneath for strength.
- If building sides or back, cut those pieces to match the height and depth.
Use a circular saw with a guide for straight cuts. Wear safety goggles and work in a well-ventilated area. Sand all edges to prevent splinters.
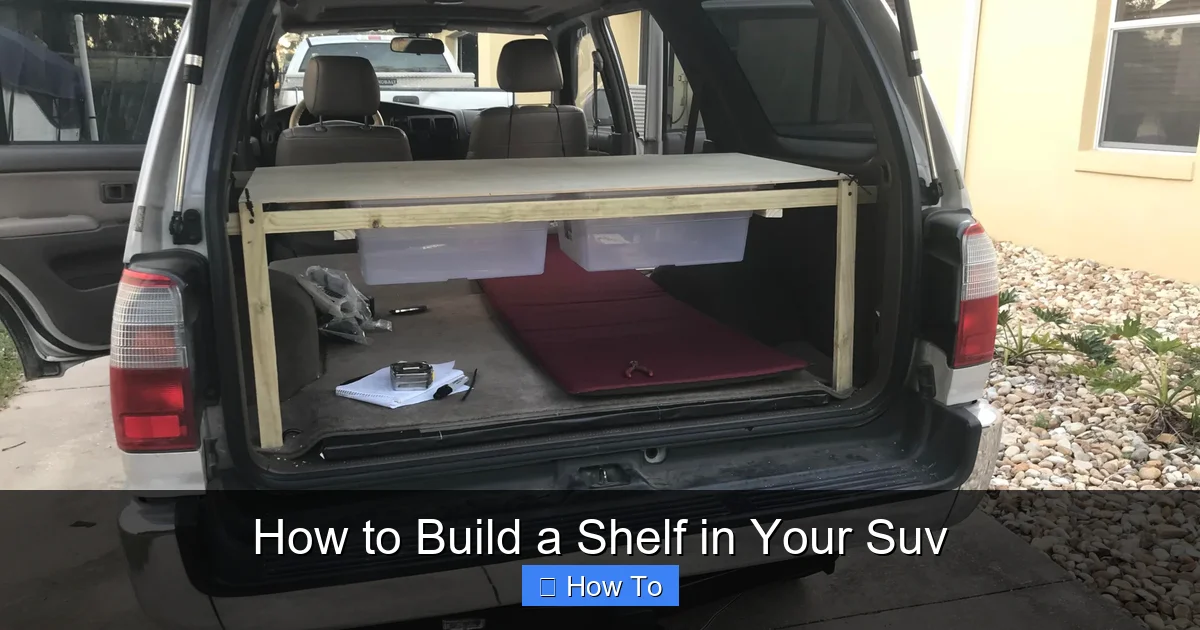
Step 2: Assemble the Frame
Start by attaching the support beams to the underside of the shelf top. Use wood glue and screws for a strong bond.
- Space the beams evenly—about 12” apart—to prevent sagging.
- Pre-drill holes to avoid splitting the wood.
- Use a level to ensure the shelf is flat.
If you’re building a box-style shelf with sides and a back, assemble those pieces first. Use corner brackets for extra stability.
Step 3: Add Dividers or Compartments (Optional)
To keep items organized, install dividers:
- Cut vertical pieces to the height of your shelf.
- Attach them with screws or sliding grooves for adjustable spacing.
- Use a spacer block to ensure even gaps.
For example, a camper might want three compartments: one for cooking gear, one for food, and one for cleaning supplies.
Step 4: Finish the Surface
Sand the entire shelf until smooth. Wipe away dust with a damp cloth.
Apply a finish to protect the wood:
- Paint: Use exterior-grade paint for durability. Choose a color that matches your SUV’s interior.
- Varnish or polyurethane: Adds a natural wood look and resists scratches.
- Sealant: Essential if the shelf will be exposed to moisture. Apply two coats, sanding lightly between.
Let the finish dry completely—usually 24 hours—before moving to installation.
Installing the Shelf in Your SUV
Now that your shelf is built, it’s time to install it safely and securely.
Step 1: Test Fit
Place the shelf in your SUV to ensure it fits properly. Check for clearance around doors, seats, and wheel wells. Make adjustments if needed.
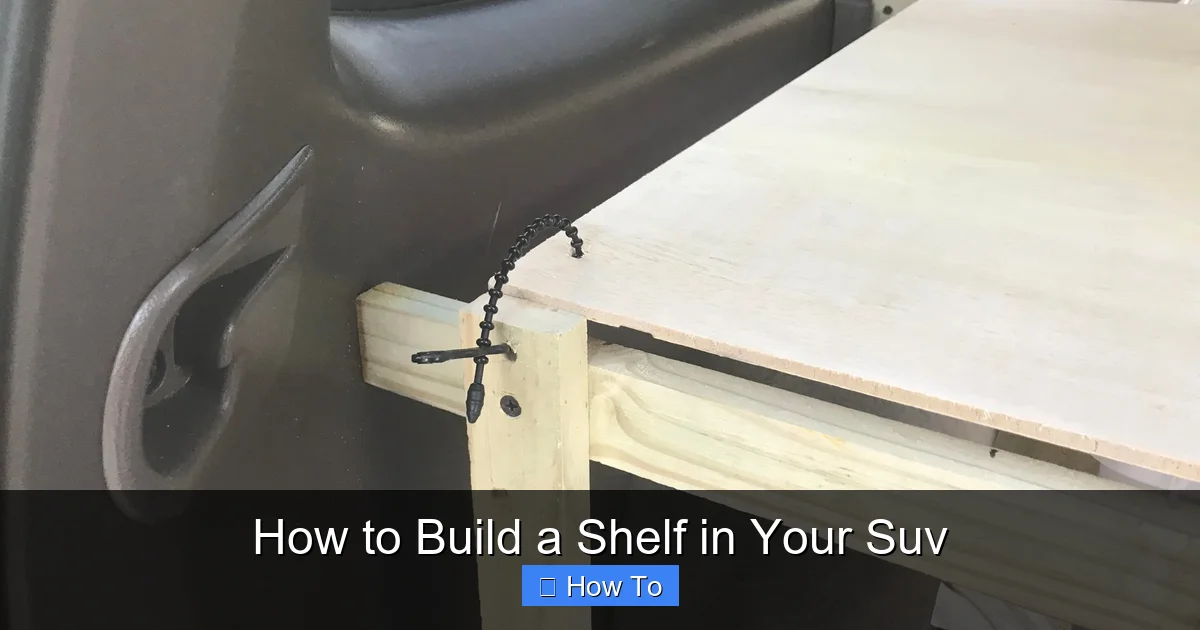
Step 2: Secure the Shelf
Never rely on friction alone—always anchor your shelf. Here are safe mounting options:
- Bolt through the floor: Drill holes in the shelf supports and bolt them to the SUV’s floor using existing anchor points or reinforced brackets. Use washers to distribute pressure.
- Use cargo tie-down hooks: Many SUVs have built-in tie-down points. Loop straps or ratchet straps around the shelf and hook them in place.
- Install L-brackets: Attach metal brackets to the shelf and the vehicle’s side panels or seat mounts.
- Non-slip matting: Place a rubber mat under the shelf to reduce sliding, but don’t depend on it alone.
For removable shelves, use quick-release straps or bungee cords with hooks. This lets you take the shelf out when you need full cargo space.
Step 3: Add Anti-Slip and Padding
To protect your gear and reduce noise:
- Line the shelf with foam padding or a rubber mat.
- Use non-slip drawer liners in compartments.
- Add edge guards if the shelf has sharp corners.
This small step prevents scratches and keeps items from sliding around.
Customizing Your Shelf for Specific Uses
Once the basics are in place, customize your shelf to fit your lifestyle.
For Camping and Outdoor Adventures
- Add bins for food, utensils, and first aid kits.
- Install a small drawer for maps, flashlights, or batteries.
- Use weatherproof materials and seal all edges.
- Include tie-down points for securing coolers or gear.
For Work and Tools
- Build deep compartments for power tools.
- Use metal reinforcements for heavy loads.
- Add a fold-down work surface for on-the-go repairs.
- Install a magnetic strip for screws and small parts.
For Families and Daily Use
- Create labeled bins for kids’ toys, sports gear, or school supplies.
- Use soft-close hinges if adding a lid.
- Choose light colors to keep the space feeling open.
- Include a charging station with USB ports (wired to the car’s power).
The possibilities are endless—let your needs guide your design.
Troubleshooting Common Issues
Even with careful planning, you might run into problems. Here’s how to fix them:
Shelf Sags in the Middle
Cause: Insufficient support or weak material.
Solution: Add more support beams underneath or switch to thicker plywood. For long spans, use aluminum braces.
Shelf Shifts While Driving
Cause: Poor anchoring or uneven weight distribution.
Solution: Re-secure with stronger bolts or straps. Place heavier items near the center and lower shelves.
Items Slide Off the Shelf
Cause: Smooth surface or sharp turns.
Solution: Add non-slip mats, raised edges, or bungee netting across the top.
Shelf Blocks Rearview Mirror or Door
Cause: Incorrect measurements or placement.
Solution: Reposition the shelf or trim it to fit. Consider a lower-profile design.
Wood Swells or Warps
Cause: Exposure to moisture or humidity.
Solution: Use sealed or synthetic materials. Store the shelf indoors when not in use.
Regular maintenance—like tightening bolts and checking finishes—will keep your shelf in top shape.
Safety Tips and Best Practices
Your shelf should make your SUV safer, not more dangerous. Follow these guidelines:
- Never overload the shelf: Check your SUV’s cargo weight limit and stay well below it.
- Secure all items: Use straps, bins, or nets to prevent shifting.
- Avoid blocking airbags or sensors: Keep the shelf away from side curtains or parking sensors.
- Test before long trips: Take a short drive with a full load to check stability.
- Inspect regularly: Look for loose screws, cracks, or wear and tear.
Remember: a well-built shelf is only safe if it’s used correctly.
Conclusion
Building a shelf in your SUV is a practical, rewarding project that enhances organization, safety, and functionality. With careful planning, the right materials, and attention to detail, you can create a custom storage solution that fits your vehicle and lifestyle perfectly.
Whether you’re gearing up for a cross-country road trip, organizing your work tools, or just tired of clutter, a DIY shelf puts you in control. It’s affordable, customizable, and built to last. So grab your tools, measure twice, and start building—your SUV (and your sanity) will thank you.