
Building a dog ramp for your SUV is a rewarding DIY project that improves your pet’s mobility and safety. This guide walks you through materials, measurements, and assembly to create a sturdy, portable ramp your dog will love using.
Key Takeaways
- Measure your SUV height first: Accurate measurements ensure the ramp fits properly and provides a safe incline for your dog.
- Choose durable, lightweight materials: Plywood, aluminum, or composite decking offer strength without excessive weight.
- Use non-slip surfaces: Add grip tape, carpet, or rubber matting to prevent slipping, especially in wet conditions.
- Include side rails for safety: Low barriers on both sides help keep your dog centered and confident while climbing.
- Test stability before use: Always check the ramp’s balance and secure footing to avoid accidents.
- Customize for your dog’s needs: Adjust length, width, and incline based on your dog’s size, age, and mobility.
- Store and transport easily: Design with foldable or detachable features for convenient use on the go.
How to Build a Dog Ramp for SUV
If you’ve ever watched your dog struggle to jump into your SUV—or worse, seen them hesitate because it’s too high—you know how important a dog ramp can be. Whether your pup is aging, recovering from surgery, or just not as agile as they used to be, a custom-built dog ramp for your SUV can make life easier and safer for both of you. The good news? You don’t need to spend hundreds of dollars on a store-bought model. With some basic tools, a little planning, and this step-by-step guide, you can build a sturdy, reliable dog ramp right at home.
In this guide, you’ll learn how to design, measure, cut, and assemble a dog ramp that fits your SUV perfectly. We’ll cover material choices, safety features, and customization tips so your dog can climb in and out with confidence. Whether you’re building a permanent ramp or a portable one for travel, this DIY project is practical, affordable, and deeply rewarding.
Why Build Your Own Dog Ramp?
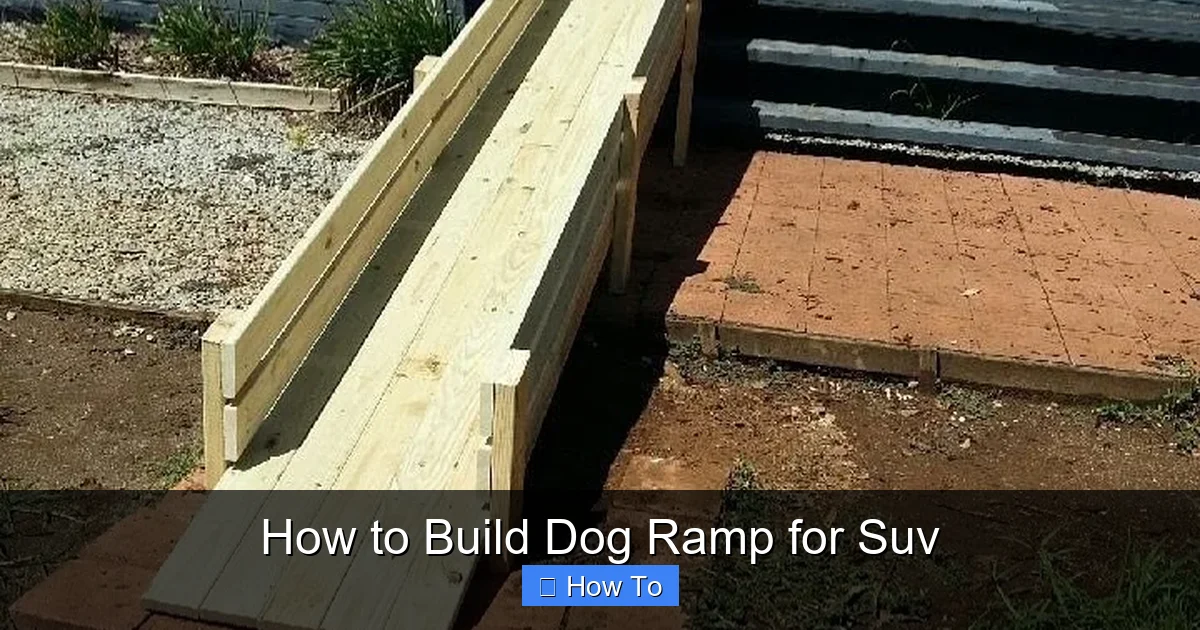
Visual guide about How to Build Dog Ramp for Suv
Image source: sirdoggie.com
Buying a pre-made dog ramp can cost anywhere from $80 to $300, depending on size and features. While convenient, many commercial ramps are flimsy, too narrow, or not adjustable enough for different vehicles. By building your own, you gain full control over the design, materials, and functionality.
A custom ramp lets you:
– Match the exact height and width of your SUV
– Choose materials that suit your dog’s weight and needs
– Add personal touches like non-slip surfaces or foldable legs
– Save money while creating something durable and long-lasting
Plus, building it yourself means you can involve your dog in the process—literally! Once it’s done, you’ll have peace of mind knowing your pet can get in and out of the car safely, especially during long trips or vet visits.
Tools and Materials You’ll Need
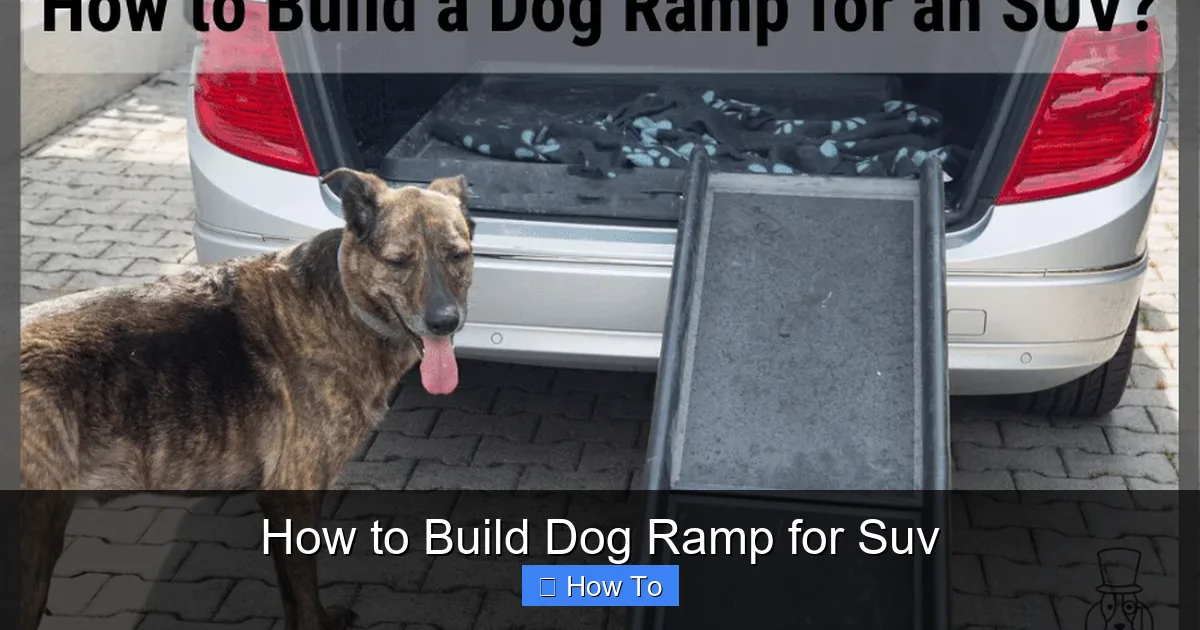
Visual guide about How to Build Dog Ramp for Suv
Image source: askingyard.com
Before you start, gather all the tools and materials. This ensures a smooth building process and avoids frustrating mid-project trips to the hardware store.
Essential Tools
- Tape measure
- Circular saw or jigsaw
- Drill with drill bits
- Screwdriver (manual or electric)
- Sandpaper (medium and fine grit)
- Clamps (optional but helpful)
- Pencil or marker
- Level
- Safety goggles and gloves
Recommended Materials
- Frame material: ¾-inch exterior-grade plywood or 1×4 pine boards (for strength and stability)
- Walking surface: ½-inch plywood or composite decking (smooth and weather-resistant)
- Non-slip surface: Outdoor carpet, rubber matting, or adhesive grip tape
- Side rails: 1×2 or 1×3 wood strips (to prevent slipping off the sides)
- Screws: 1½-inch and 2-inch wood screws (use exterior-grade for durability)
- Hinges (optional): For foldable designs
- Wood glue: Waterproof type for added strength
- Stain or sealant: To protect wood from moisture and UV damage
Optional Upgrades
- Adjustable legs or folding mechanism
- Carrying handle
- Velcro straps or buckles for securing the ramp
- Reflective tape for nighttime visibility
Step 1: Measure Your SUV and Dog
The most important step in building a dog ramp is getting the measurements right. A poorly sized ramp can be dangerous—too steep, and your dog might slip or refuse to use it; too short, and it won’t reach the vehicle.
Measure the SUV Entry Height
Start by measuring the height from the ground to the floor of your SUV’s cargo area or back seat. Use a tape measure and stand it straight up from the ground to the lowest point where your dog would step in. Record this number—this is your “rise.”
For example, if your SUV’s floor is 24 inches off the ground, your ramp must accommodate a 24-inch rise.
Determine the Ideal Ramp Length
The length of your ramp affects the incline, which directly impacts your dog’s comfort and safety. A gentler slope is easier to climb, especially for older or smaller dogs.
A good rule of thumb is a 3:1 ratio—for every 3 inches of length, the ramp rises 1 inch. So for a 24-inch rise, your ramp should be at least 72 inches (6 feet) long.
However, if space is limited, you can go steeper—up to a 2:1 ratio (2 inches of length per 1 inch of rise). But avoid anything steeper than that, as it becomes risky.
Consider Your Dog’s Size and Needs
Think about your dog’s weight, breed, and mobility:
– Small dogs (under 25 lbs): A 12–14 inch wide ramp is usually sufficient.
– Medium dogs (25–50 lbs): Aim for 16–18 inches wide.
– Large dogs (50+ lbs): Go for 18–20 inches or wider.
Also, consider if your dog has arthritis, hip dysplasia, or recent injuries. In those cases, a longer, gentler ramp is better.
Step 2: Design Your Ramp
Now that you have your measurements, it’s time to sketch a simple design. You don’t need to be an architect—just a rough plan on paper or in a notes app will help.
Basic Ramp Structure
Your ramp will have three main parts:
1. The frame: The support structure underneath (like legs and crossbeams)
2. The walking surface: The top layer your dog walks on
3. The side rails: Small barriers along the edges for safety
Choose a Style
There are two common designs:
– Solid ramp: One-piece, rigid structure—simple and sturdy
– Folding ramp: Hinged in the middle for easy storage and transport
For most SUV owners, a solid ramp works well. But if you travel often or have limited storage space, a folding design is worth the extra effort.
Sketch Your Plan
Draw a side view of your ramp showing:
– Total length (e.g., 72 inches)
– Height (e.g., 24 inches)
– Width (e.g., 18 inches)
– Placement of supports (every 12–16 inches)
Include notes like “add non-slip surface” or “use hinges at 36 inches” to remind yourself later.
Step 3: Cut the Wood
With your design ready, it’s time to cut the materials. Safety first—wear goggles and gloves, and work in a well-ventilated area.
Cut the Frame Pieces
Using 1×4 pine or ¾-inch plywood, cut the following:
– Two long side supports (same length as your ramp, e.g., 72 inches)
– Several cross supports (same width as your ramp minus 1 inch, e.g., 17 inches if ramp is 18 inches wide)
Space the cross supports every 12–16 inches along the length. These will prevent the ramp from sagging.
Cut the Walking Surface
Cut a piece of ½-inch plywood or composite decking to match the full length and width of your ramp (e.g., 72” x 18”).
Cut the Side Rails
Cut two strips of 1×2 or 1×3 wood to the same length as your ramp. These will be attached to the edges to keep your dog from slipping off.
Sand All Edges
Use medium-grit sandpaper to smooth rough cuts, then finish with fine-grit for a safe, splinter-free surface. This is especially important for areas your dog will touch.
Step 4: Assemble the Frame
Now it’s time to build the foundation of your ramp.
Attach Cross Supports
Lay the two long side supports parallel to each other on a flat surface. Space the cross supports evenly between them (every 12–16 inches). Use wood glue and 2-inch screws to secure each joint. Pre-drill holes to prevent splitting.
Check for Square
Use a carpenter’s square or measure diagonally from corner to corner. Both measurements should be equal. If not, adjust until the frame is perfectly square.
Reinforce if Needed
For heavier dogs or longer ramps, add diagonal braces between the cross supports for extra strength.
Step 5: Attach the Walking Surface
Once the frame is solid, it’s time to add the top layer.
Position the Plywood
Place the walking surface plywood on top of the frame. Make sure it overhangs slightly on the sides (about ¼ inch) for a clean look.
Secure with Screws
Drill pilot holes and use 1½-inch screws to attach the plywood to the frame. Space screws every 6–8 inches along the edges and across the cross supports.
Apply Wood Glue (Optional)
For extra durability, apply a thin layer of waterproof wood glue between the frame and plywood before screwing.
Step 6: Add Non-Slip Surface
This step is crucial for your dog’s safety. A smooth wood surface can be slippery, especially when wet.
Choose Your Grip Material
Options include:
– Outdoor carpet: Durable and comfortable under paws
– Rubber matting: Great for wet conditions, easy to clean
– Grip tape: Affordable and effective, but can be rough on sensitive paws
Cut and Attach
Measure and cut your chosen material to fit the walking surface. Use outdoor adhesive or staples to secure it. If using carpet, trim excess and seal edges with fabric glue to prevent fraying.
Test the Grip
Run your hand over the surface—it should feel rough enough to provide traction but not so sharp it could hurt your dog’s pads.
Step 7: Install Side Rails
Side rails are simple but essential. They give your dog confidence and prevent accidental slips.
Attach the Rails
Place the 1×2 or 1×3 strips along the long edges of the ramp, flush with the top surface. Use wood glue and 1½-inch screws to secure them. Pre-drill to avoid splitting.
Round the Corners
Use sandpaper to slightly round the top edges of the rails. This makes them more comfortable if your dog brushes against them.
Step 8: Finish and Protect the Ramp
To ensure your ramp lasts for years, protect it from the elements.
Apply Sealant or Stain
Use a waterproof wood sealant or outdoor stain to coat all exposed wood. This prevents rot, warping, and UV damage. Apply 2–3 coats, sanding lightly between coats.
Let It Dry Completely
Follow the product instructions for drying time—usually 24–48 hours before use.
Step 9: Test the Ramp
Before letting your dog use it, test the ramp yourself.
Check Stability
Place the ramp against your SUV and walk on it gently. It shouldn’t wobble, shift, or feel unsafe.
Adjust if Needed
If it’s unstable, add rubber feet to the bottom or adjust the angle. You can also place non-slip mats under the ramp’s base.
Introduce Your Dog
Let your dog sniff and explore the ramp. Use treats and encouragement to guide them up and down. Be patient—some dogs take time to adjust.
Troubleshooting Common Issues
Even with careful planning, you might run into problems. Here’s how to fix them:
Ramp Is Too Slippery
If your dog slips, reinforce the non-slip surface. Add more grip tape or replace the top layer with a higher-traction material like rubberized deck coating.
Ramp Sags in the Middle
This means the frame isn’t strong enough. Add more cross supports or use thicker wood for the frame.
Ramp Doesn’t Reach the SUV
Double-check your measurements. If it’s slightly short, you can add a small platform at the top or extend the ramp with a hinged section.
Dog Is Afraid to Use It
Go slow. Use high-value treats, walk beside them, and never force them. Practice on flat ground first, then gradually increase the incline.
Tips for Long-Term Use
To keep your ramp in great shape:
– Clean it regularly with soap and water
– Store it indoors or under cover when not in use
– Inspect for loose screws or wear every few months
– Reapply sealant annually if exposed to weather
Conclusion
Building a dog ramp for your SUV is a practical, heartfelt project that strengthens the bond between you and your pet. With the right measurements, materials, and a little patience, you can create a safe, durable ramp that makes every car ride easier for your dog.
Not only will you save money compared to buying a commercial ramp, but you’ll also gain the satisfaction of crafting something tailored to your dog’s unique needs. Whether you’re helping a senior dog stay mobile or giving a nervous pup more confidence, this DIY ramp is a small investment with big rewards.
So grab your tools, measure twice, and start building. Your dog will thank you with every confident step up into the SUV.