
This guide teaches you how to build storage for SUV using simple tools and materials. You’ll learn to maximize space, keep gear secure, and customize solutions for camping, road trips, or daily use.
Key Takeaways
- Plan your layout first: Measure your SUV’s cargo area and list what you need to store to design an efficient system.
- Use modular components: Build or buy stackable bins, drawers, and shelves that can be rearranged as needs change.
- Secure everything properly: Use tie-downs, straps, and anchors to prevent items from shifting during drives.
- Choose durable, lightweight materials: Plywood, aluminum, and plastic bins offer strength without adding too much weight.
- Prioritize accessibility: Place frequently used items in easy-to-reach spots and label compartments for quick identification.
- Consider ventilation and moisture: Use breathable materials and avoid sealing damp gear to prevent mold and odors.
- Test and refine: After building, load your SUV and take a test drive to check stability and make adjustments.
How to Build Storage for SUV: A Complete DIY Guide
If you’ve ever opened your SUV’s rear door and been greeted by a jumble of bags, tools, sports gear, or camping equipment, you’re not alone. SUVs offer great space, but without smart organization, that space quickly turns into chaos. Whether you’re a weekend warrior, a family road-tripper, or a contractor hauling tools, knowing how to build storage for SUV can transform your vehicle into a mobile command center.
This step-by-step guide will walk you through designing, building, and installing custom storage solutions tailored to your needs. You don’t need to be a master carpenter or spend hundreds of dollars—just a few tools, some planning, and a weekend of work can give you a clean, functional, and safe cargo area.
By the end of this guide, you’ll have a personalized storage system that keeps your gear organized, accessible, and secure—no matter where the road takes you.
Step 1: Assess Your Needs and Measure Your Space
Before you pick up a saw or buy a single screw, take time to understand what you’re working with. The key to successful SUV storage is matching your system to your lifestyle.
List Your Gear
Start by making a list of everything you regularly carry in your SUV. Group items into categories:
- Daily essentials: Jumper cables, first-aid kit, flashlight, umbrella
- Family items: Diaper bag, snacks, tablets, toys
- Outdoor gear: Camping tent, sleeping bags, coolers, hiking poles
- Work tools: Power tools, toolboxes, safety vests, ladders
- Travel accessories: Luggage, pet carriers, car seats
This list helps you determine how much space you need and what types of compartments make sense.
Measure Your SUV’s Cargo Area
Grab a tape measure and record the following dimensions:
- Width (between wheel wells and side panels)
- Depth (from the back of the rear seats to the tailgate)
- Height (from the floor to the ceiling or roof rack)
- Distance between seat mounts or anchor points
Don’t forget to measure around obstacles like spare tires, subwoofers, or third-row seat mechanisms. Take photos and sketch a rough layout of your cargo area. This visual will help when designing your storage system.
Consider Seat Configurations
Many SUVs have foldable rear seats. Think about how often you fold them down and whether your storage system needs to work in both upright and flat configurations. For example, a sliding drawer system might only work when seats are folded, while overhead nets can be used in any setup.
Step 2: Choose Your Storage Style
There’s no one-size-fits-all solution. The best storage system depends on your vehicle, habits, and budget. Here are the most popular styles:
Modular Bin Systems
These are pre-made plastic or fabric bins that stack and snap together. Brands like Sterilite, IRIS, or Husky offer rugged, affordable options. They’re great for:
- Families with kids’ gear
- People who want quick, no-build solutions
- Those who frequently change what they carry
Tip: Use clear bins so you can see contents without opening them.
Custom Wooden or Plywood Shelving
If you enjoy DIY projects, building shelves from ½” or ¾” plywood gives you full control over size and layout. This is ideal for:
- Contractors needing tool organization
- Campers who want dedicated spots for stoves, fuel, and utensils
- Anyone wanting a sleek, built-in look
Use sanded plywood or birch for a clean finish, and seal it with non-toxic varnish to resist moisture.
Sliding Drawer Systems
These are heavy-duty drawers that slide out like kitchen cabinets. You can buy ready-made units (like those from Decked or CargoEase) or build your own. They’re perfect for:
- Hiding valuables out of sight
- Storing tools or gear you access frequently
- Keeping items from sliding around
Pro tip: Install drawer slides with soft-close mechanisms to reduce noise and wear.
Overhead and Ceiling Storage
Use the space above your cargo area with nets, racks, or fabric pockets. This works well for:
- Lightweight items like blankets or jackets
- Keeping the floor clear for larger gear
- Adding storage without blocking access
Mounting requires drilling into the roof lining, so use caution and check for wiring or airbags.
Seatback and Door Organizers
These attach to the back of seats or inside doors and hold small items like maps, chargers, or water bottles. They’re inexpensive and easy to install—great for daily drivers.
Step 3: Gather Tools and Materials
Once you’ve chosen a style, it’s time to gather supplies. Here’s a basic checklist:
Tools
- Tape measure
- Circular saw or jigsaw (for cutting wood)
- Drill and drill bits
- Screwdriver set
- Level
- Clamps
- Sandpaper (120–220 grit)
- Straightedge or ruler
Materials
- Plywood (½” or ¾” thickness)
- Wood screws (1¼” to 2”)
- Wood glue
- Drawer slides (if building drawers)
- Heavy-duty straps or ratchet tie-downs
- Foam padding or carpet tiles (for lining)
- Hooks, eye bolts, or D-ring anchors
- Plastic bins or fabric organizers (if using modular systems)
Safety Gear
- Safety glasses
- Work gloves
- Dust mask (when cutting or sanding)
Step 4: Design Your Storage Layout
Now comes the fun part—designing your system. Use your measurements and gear list to sketch a layout.
Sketch It Out
Draw your cargo area from above and the side. Mark where shelves, drawers, or bins will go. Consider:
- Weight distribution (heavy items low and centered)
- Access points (can you reach everything without climbing in?)
- Clearance for opening doors or folding seats
Use Free Design Tools
Apps like SketchUp Free or even graph paper can help you visualize the design. Some online SUV storage planners let you input your vehicle model and suggest layouts.
Plan for Flexibility
Build in adjustable shelves or removable bins so you can adapt to different trips. For example, a camping weekend might need a cooler slot, while a workday needs tool trays.
Step 5: Build Your Storage System
With your plan ready, it’s time to build. We’ll focus on a custom plywood shelving unit—a popular and versatile option.
Cut the Wood
Using your measurements, cut the following pieces:
- Base panel (matches cargo floor width and depth)
- Side panels (height of your storage unit)
- Shelves (same width as base, depth adjusted for clearance)
- Back panel (optional, for stability)
Tip: Use a guide rail or straightedge to ensure clean, straight cuts.
Assemble the Frame
1. Lay the base panel flat.
2. Attach side panels to the base using wood glue and screws. Pre-drill holes to prevent splitting.
3. Add shelves at desired heights, securing with screws from the sides.
4. If using a back panel, attach it to the rear edges for extra rigidity.
Sand and Finish
Sand all edges and surfaces until smooth. Wipe away dust, then apply a coat of non-toxic sealant or paint. This protects the wood and gives a professional look.
Line the Interior
Cut foam padding or carpet tiles to fit the bottom and sides. Use adhesive spray to secure. This reduces noise, prevents scratches, and keeps items from sliding.
Install Drawer Slides (Optional)
If adding drawers:
1. Mount the drawer slides to the inside of the frame.
2. Build drawer boxes to fit the slides (leave ½” clearance on each side).
3. Attach the second half of the slides to the drawers.
4. Test the slide action—adjust if needed.
Step 6: Install and Secure the System
A great storage system is useless if it shifts or flies around during driving.
Anchor to the Vehicle
Use the SUV’s built-in anchor points (usually near the floor or seat mounts). Attach D-rings or eye bolts to your storage unit, then connect them to the vehicle with heavy-duty straps or ratchet tie-downs.
Never rely on friction alone. Even a well-fitted box can become a dangerous projectile in a sudden stop.
Use Anti-Slip Mats
Place rubberized mats under bins or on shelves to prevent sliding. You can find these at auto or hardware stores.
Test the Setup
Load your gear and take a short drive. Listen for rattling, check for movement, and ensure doors open easily. Make adjustments as needed.
Step 7: Organize and Label
Organization is just as important as storage.
Use Clear Bins
Store small items in labeled, clear containers. Group similar items: “Camping Kitchen,” “Emergency Kit,” “Kids’ Travel Bag.”
Add Labels
Use a label maker or waterproof stickers. This saves time and reduces frustration when you’re in a hurry.
Create Zones
Designate areas for different uses:
- Front: Daily essentials
- Middle: Frequently used gear
- Back: Heavy or rarely used items
Troubleshooting Common Issues
Problem: Storage unit wobbles or shifts
Solution: Add more anchor points or use longer straps. Check that all screws are tight and the base is level.
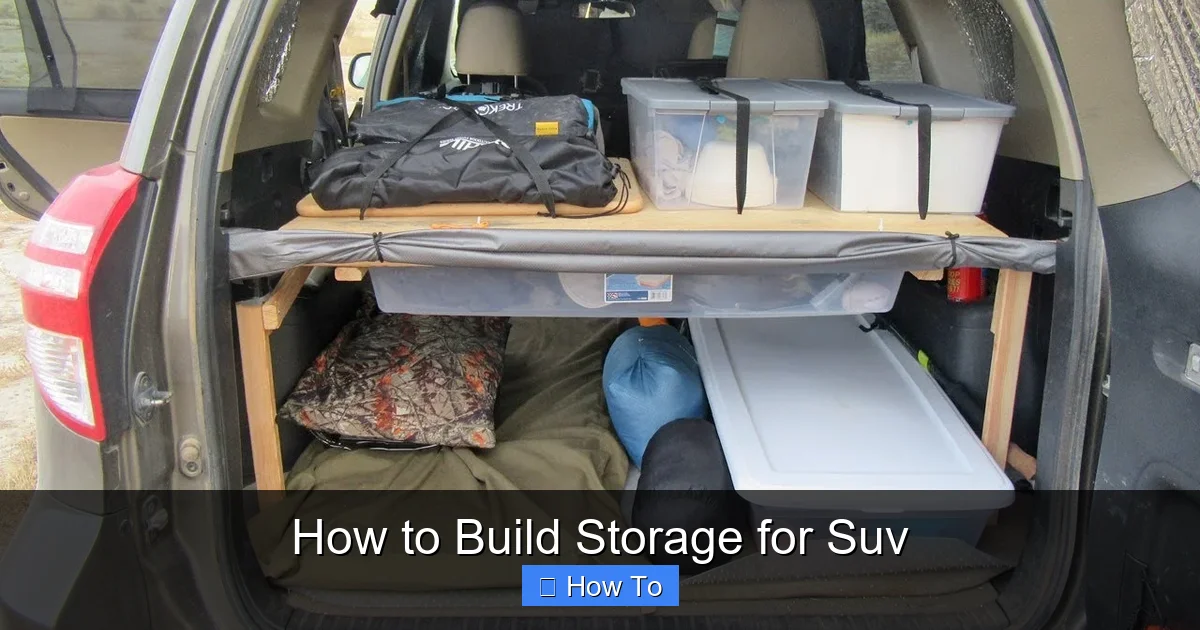
Visual guide about How to Build Storage for Suv
Image source: i.pinimg.com
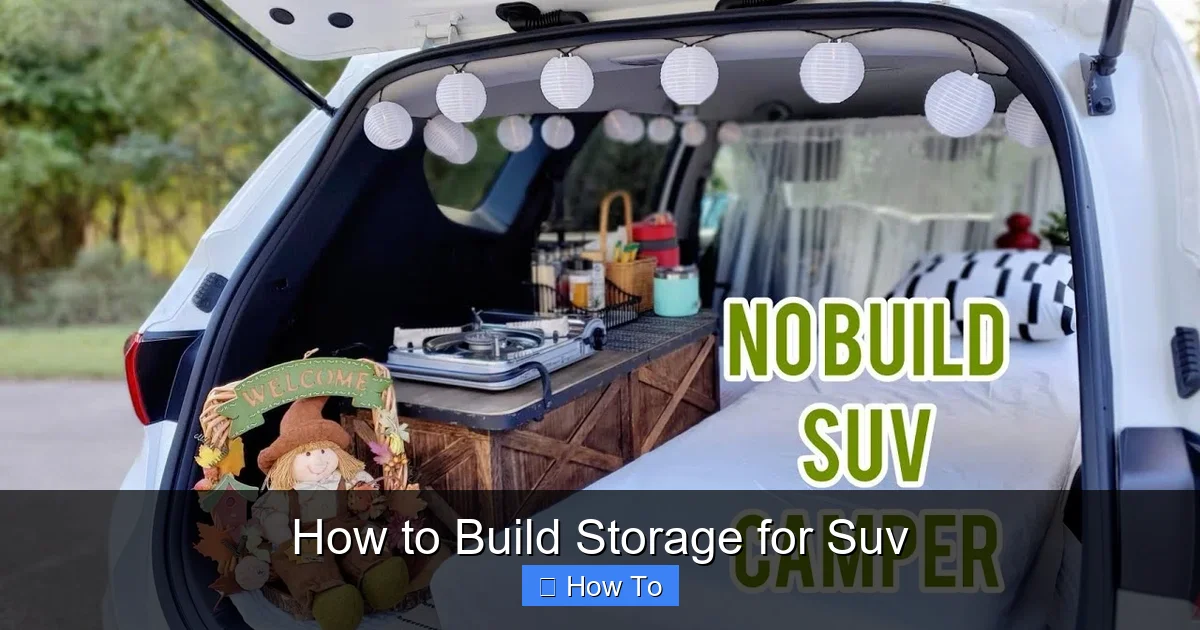
Visual guide about How to Build Storage for Suv
Image source: i.ytimg.com
Problem: Drawers stick or won’t open
Solution: Adjust the drawer slides. Make sure the drawer box is square and not warped.
Problem: Items still slide around
Solution: Use bungee nets, dividers, or foam inserts to compartmentalize bins.
Problem: Takes too long to access gear
Solution: Reorganize so frequently used items are in front or at waist level. Consider a sliding tray for hard-to-reach spots.
Problem: Moisture or odors build up
Solution: Avoid storing wet gear. Use breathable fabric bins or add small vents to wooden units.
Bonus Tips for Maximizing SUV Storage
- Use vertical space: Install hooks or nets on side panels for helmets, bags, or tools.
- Fold seats smartly: Some SUVs let you fold seats unevenly—use this to create custom gaps for long items.
- Invest in a roof box: For seasonal gear like skis or luggage, a roof-mounted box frees up interior space.
- Keep a “go-bag”: Store a pre-packed emergency kit so you’re always ready.
- Regularly declutter: Every few months, remove unused items to keep your system efficient.
Conclusion
Building storage for your SUV doesn’t have to be complicated or expensive. With a little planning, the right tools, and some creativity, you can create a system that keeps your gear organized, secure, and easy to access. Whether you go with modular bins, custom shelves, or sliding drawers, the key is to design for your lifestyle.
Remember: the best storage solution is one you’ll actually use. Start small, test your setup, and refine it over time. Soon, you’ll wonder how you ever drove without it.
Now grab your tape measure, fire up the saw, and get building—your perfectly organized SUV awaits.