
Carrying a kayak on a SUV doesn’t have to be stressful or dangerous. With the right equipment and technique, you can transport your kayak safely and efficiently. This guide walks you through everything you need to know—from choosing the right roof rack to securing your kayak and driving safely.
Key Takeaways
- Choose the right roof rack system: A proper roof rack is essential for safe kayak transport. Look for crossbars that fit your SUV and consider J-style, saddle, or stacker mounts depending on your needs.
- Use high-quality tie-down straps: Ratchet straps may seem strong, but cam buckle straps are safer for kayaks. Always use bow and stern lines for added security.
- Load the kayak correctly: Lift with your legs, not your back, and position the kayak upside down on the rack to reduce wind resistance and prevent damage.
- Double-check all connections: Before hitting the road, ensure the kayak is centered, straps are tight, and all lines are secure. Recheck after driving a short distance.
- Drive cautiously: Kayaks create wind drag and can affect handling. Reduce speed, avoid sudden maneuvers, and allow extra stopping distance.
- Protect your kayak and vehicle: Use foam blocks or padded cradles to prevent scratches and dents. Avoid over-tightening straps to prevent hull damage.
- Practice makes perfect: If you’re new to kayak transport, practice loading and unloading in a safe, open area before your first trip.
How to Carry a Kayak on a SUV
So, you’ve got your kayak, your paddle, and your sense of adventure—but how do you get it from your garage to the lake? If you drive an SUV, you’re in luck. SUVs are some of the best vehicles for transporting kayaks thanks to their high rooflines, strong frames, and ample cargo space. But just because your SUV can handle it doesn’t mean you should wing it. Carrying a kayak safely requires the right gear, proper technique, and a little know-how.
In this guide, we’ll walk you through everything you need to know about how to carry a kayak on a SUV. Whether you’re a weekend warrior heading to a nearby river or planning a cross-country paddling trip, these steps will help you transport your kayak securely and confidently. We’ll cover choosing the right roof rack, loading your kayak properly, securing it with straps, and driving safely with your new rooftop cargo.
By the end of this guide, you’ll be ready to hit the road with your kayak in tow—no stress, no damage, just smooth sailing (or paddling, as it were).
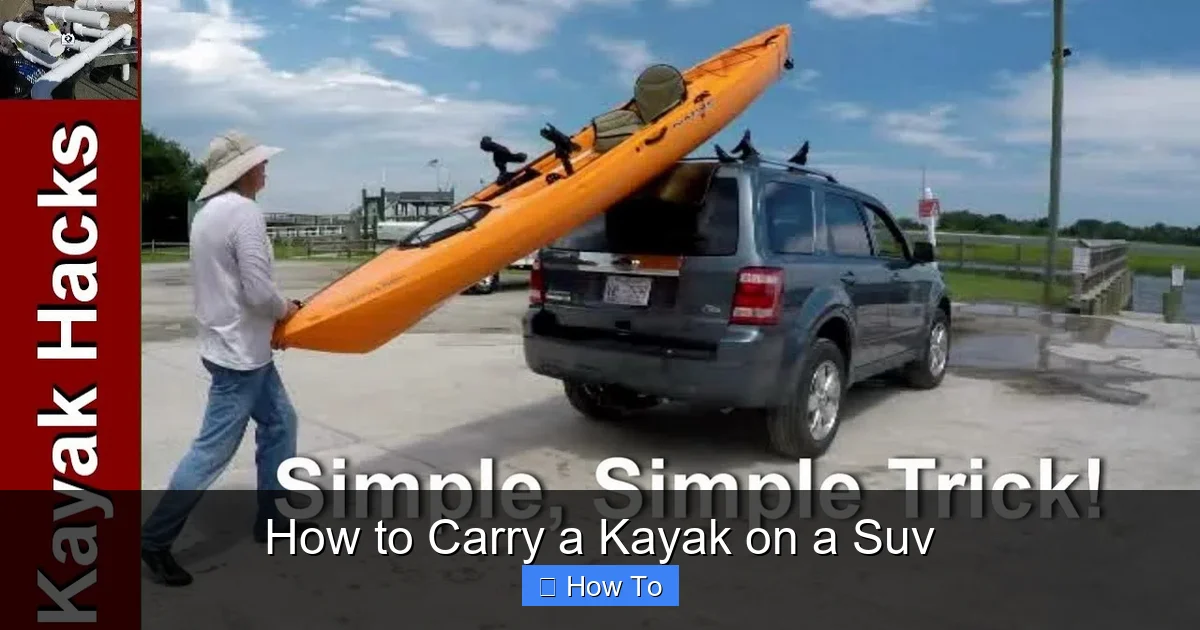
Step 1: Choose the Right Roof Rack System
Visual guide about How to Carry a Kayak on a Suv
Image source: i.ytimg.com
Before you even think about lifting your kayak onto your SUV, you need a solid foundation: a reliable roof rack system. Without one, you’re risking damage to your vehicle, your kayak, and possibly other drivers on the road.
Most modern SUVs come with factory-installed roof rails—those raised bars running along the sides of your roof. These are a great starting point, but they’re not enough on their own. You’ll need crossbars that attach to these rails to create a stable platform for your kayak.
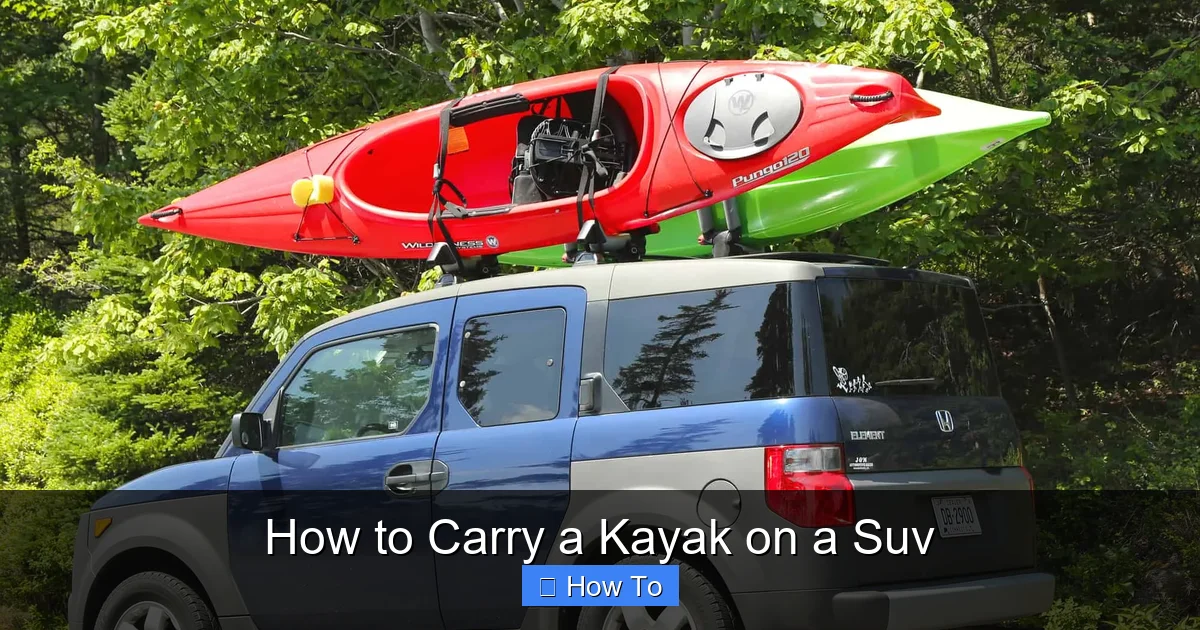
Types of Crossbars
There are two main types of crossbars: raised rail and flush rail. Raised rail crossbars clamp onto the existing rails and sit slightly above them, while flush rail crossbars are designed to sit flat against the roof. Both work well, but raised rail systems often offer more adjustability and weight capacity.
When choosing crossbars, make sure they’re compatible with your SUV’s make and model. Brands like Thule, Yakima, and Rhino-Rack offer vehicle-specific fit kits that ensure a secure, no-drill installation. Check the weight rating too—most crossbars can handle 100–165 pounds, which is more than enough for a single kayak (typically 40–80 pounds).
Kayak-Specific Mounts
Once you have crossbars, you’ll need a way to hold the kayak in place. There are several mounting options:
– Saddle mounts: These hold the kayak flat on its bottom. They’re stable and great for long trips, but can cause hull wear over time if not padded properly.
– J-style mounts: These hold the kayak on its side in a “J” shape. They take up less roof space and are ideal if you’re carrying multiple kayaks.
– Stacker mounts: These allow you to carry two kayaks side by side by stacking one on top of the other. They’re perfect for families or groups.
– Foam blocks: A budget-friendly option, foam blocks sit directly on the crossbars and support the kayak. They’re easy to use but less secure than dedicated mounts.
For most solo paddlers, a pair of saddle or J-style mounts is the best choice. They’re secure, easy to use, and widely available.
Step 2: Gather the Right Gear
Visual guide about How to Carry a Kayak on a Suv
Image source: kayakhelp.com
Now that your roof rack is ready, it’s time to gather the rest of your gear. You’ll need a few essential items to safely carry your kayak on your SUV.
Tie-Down Straps
You’ll need at least four straps: two for the main body of the kayak and two for the bow and stern (front and back). Here’s what to look for:
– Cam buckle straps: These are preferred over ratchet straps because they’re less likely to over-tighten and damage your kayak. Look for straps with a minimum breaking strength of 1,500 pounds and a working load limit of at least 500 pounds.
– Bow and stern lines: These attach from the front and back of the kayak to the bumper or tow hooks on your SUV. They prevent the kayak from shifting forward or backward during sudden stops or wind gusts.
Avoid using bungee cords or rope—they can stretch, slip, or break under stress.
Padding and Protection
Even with a good rack, your kayak and SUV need protection. Use padded cradles or foam blocks to cushion the contact points between the kayak and the rack. This prevents scratches, dents, and hull deformation.
You can also use a kayak cover or old towel to protect the roof of your SUV from scratches, especially if you’re loading and unloading frequently.
Additional Tools
Keep a few extra items in your vehicle:
– A step stool or ladder (if your SUV is tall)
– Gloves (to improve grip and protect your hands)
– A flashlight (for nighttime loading)
– A checklist (to ensure nothing is forgotten)
Step 3: Prepare Your Kayak and SUV
Before lifting, take a moment to prepare both your kayak and your vehicle.
Clean the Kayak
Wipe down your kayak to remove dirt, sand, or debris. This prevents scratches and makes it easier to handle. If your kayak has scupper holes (drainage holes), make sure they’re clear so water doesn’t pool inside during transport.
Check the Weather
Avoid loading your kayak in high winds, rain, or icy conditions. Wet surfaces can make the kayak slippery, and wind can make it harder to control. If you must load in bad weather, take extra precautions and consider using a helper.
Position Your SUV
Park your SUV on a flat, level surface. Turn on your hazard lights if you’re loading on the side of the road. Make sure there’s enough space around the vehicle for you to move safely.
If your SUV is tall, consider using a step stool or asking someone to help. Never stand on the bumper or doors—this can damage your vehicle and increase the risk of injury.
Step 4: Load the Kayak onto the Roof Rack
Now comes the tricky part: getting the kayak onto the roof. With the right technique, it’s manageable—even for one person.
Lift with Your Legs, Not Your Back
Kayaks can be heavy, so proper lifting technique is crucial. Bend your knees, keep your back straight, and lift with your leg muscles. If the kayak is too heavy, don’t hesitate to ask for help or use a kayak loader assist device.
Position the Kayak Upside Down
Most experts recommend loading the kayak upside down (hull facing up). This reduces wind resistance, improves aerodynamics, and prevents water from pooling inside. It also protects the cockpit and any gear inside.
Use the “Back-and-Toss” Method
Here’s a simple technique for loading solo:
1. Place the kayak on the ground behind your SUV, parallel to the vehicle.
2. Lift the front end (bow) and rest it on the rear crossbar.
3. Step back and lift the rear end (stern), sliding it forward onto the front crossbar.
4. Adjust the position so the kayak is centered and balanced.
If you have a helper, you can lift from both ends simultaneously. Communication is key—agree on a count (“1, 2, 3, lift!”) to avoid mishaps.
Use a Kayak Loader (Optional)
If you frequently transport your kayak alone, consider investing in a kayak loader. These devices attach to your SUV’s rear bumper or hitch and allow you to roll the kayak up a ramp onto the roof. They’re especially helpful for heavier kayaks or taller vehicles.
Step 5: Secure the Kayak with Straps
Once the kayak is on the roof, it’s time to tie it down. This step is critical—loose straps can lead to disaster on the highway.
Attach the Main Straps
Use two cam buckle straps to secure the kayak to the crossbars. Loop each strap over the kayak and through the crossbar, then pull tight. Make sure the straps are centered over the kayak and not twisted.
Don’t overtighten—this can warp the hull or damage the rack. The kayak should be snug but not compressed. You should be able to press down on the kayak slightly without it moving side to side.
Add Bow and Stern Lines
Next, attach bow and stern lines. These run from the front and back of the kayak to anchor points on your SUV.
– For the bow line: Attach one end to the front of the kayak (usually a handle or strap) and the other to a secure point on the front bumper, tow hook, or frame.
– For the stern line: Do the same at the back.
These lines prevent the kayak from shifting forward or backward, especially during sudden stops or wind gusts. They’re especially important on highways or in windy conditions.
Double-Check Everything
Before you drive, do a final inspection:
– Are the straps tight and secure?
– Is the kayak centered on the rack?
– Are the bow and stern lines attached to solid anchor points?
– Are all buckles closed and locked?
Give the kayak a firm shake. If it moves more than an inch, tighten the straps.
Step 6: Drive Safely with Your Kayak
You’re almost ready to go—but driving with a kayak on your SUV requires some adjustments.
Reduce Your Speed
A kayak on the roof creates wind drag and can affect your vehicle’s handling. Reduce your speed, especially on highways and in windy conditions. Avoid sudden acceleration, braking, or sharp turns.
Allow Extra Stopping Distance
The added weight and wind resistance mean your SUV will take longer to stop. Leave extra space between you and the vehicle in front.
Watch for Low Clearances
Remember: your SUV is now taller. Watch out for low bridges, drive-thrus, parking garages, and tree branches. A good rule of thumb: if you’re unsure, don’t risk it.
Check the Kayak Periodically
Stop every 20–30 minutes to check the straps and lines. Vibrations and wind can loosen them over time. Re-tighten if necessary.
Troubleshooting Common Problems
Even with the best preparation, issues can arise. Here’s how to handle common problems:
Straps Keep Loosening
If your straps keep coming loose, try using strap tighteners or ratchet straps with a locking mechanism. You can also wrap the straps around the kayak and crossbar multiple times for extra grip.
Kayak Shifts Side to Side
This usually means the main straps aren’t tight enough or the kayak isn’t centered. Stop and re-secure the straps, making sure the kayak is balanced on the rack.
Wind Noise or Flapping
Loose straps or an improperly positioned kayak can cause flapping and noise. Check all connections and ensure the kayak is lying flat. Adding a fairing (a wind deflector) to your roof rack can also reduce noise.
Scratches on the SUV or Kayak
Use more padding between the kayak and rack. Consider upgrading to padded cradles or adding foam pipe insulation to the crossbars.
Conclusion
Carrying a kayak on a SUV is a skill that gets easier with practice. By choosing the right roof rack, using quality straps, loading correctly, and driving cautiously, you can transport your kayak safely and confidently. Remember: safety starts before you even leave the driveway. Take your time, double-check your setup, and never rush the process.
With these tips, you’ll be ready to explore rivers, lakes, and coastlines without worrying about your gear. So load up, hit the road, and enjoy the adventure that awaits.