
This guide teaches you how to carry a kayak on an SUV safely and efficiently. You’ll learn about equipment, loading techniques, and essential safety tips to protect your kayak and vehicle.
Key Takeaways
- Choose the right roof rack: A proper roof rack system is essential for safely carrying a kayak on your SUV. Look for crossbars that match your vehicle and support the kayak’s weight.
- Use kayak carriers or cradles: These accessories secure the kayak in place and prevent damage to both the boat and your SUV’s roof.
- Load the kayak correctly: Always lift with your legs, not your back, and position the kayak upside down on the rack for better aerodynamics and stability.
- Secure with high-quality straps: Use cam straps or ratchet straps to tie down the kayak, and add bow and stern lines for extra security during transport.
- Check local laws and weight limits: Ensure your setup complies with road safety regulations and doesn’t exceed your SUV’s roof load capacity.
- Inspect before every trip: Regularly check straps, racks, and tie-down points for wear and tear to avoid accidents.
- Practice makes perfect: The first few times loading your kayak may take longer—practice in a safe, open area to build confidence.
How to Carry a Kayak on an SUV: A Complete Step-by-Step Guide
So, you’ve got your kayak, your adventure gear, and your trusty SUV—now what? Transporting a kayak might seem tricky at first, but with the right tools and techniques, it’s easier than you think. Whether you’re heading to a calm lake, a rushing river, or the open ocean, knowing how to carry a kayak on an SUV safely is essential. This guide will walk you through everything you need—from choosing the right equipment to securing your kayak and hitting the road with confidence.
In this comprehensive how-to guide, you’ll learn:
– What equipment you need to carry a kayak on your SUV
– How to properly install roof racks and kayak carriers
– Step-by-step instructions for loading and securing your kayak
– Safety tips to protect your kayak, your vehicle, and other drivers
– Troubleshooting common problems
– And answers to frequently asked questions
By the end, you’ll be ready to transport your kayak like a pro—no matter the distance or terrain.
Why Proper Kayak Transport Matters
Before we dive into the how-to, let’s talk about why this matters. Carrying a kayak incorrectly can lead to serious problems:
– The kayak could shift or fall off while driving, creating a dangerous hazard.
– Improper loading can damage your SUV’s roof or the kayak itself.
– Loose straps or poor weight distribution can affect your vehicle’s handling and fuel efficiency.
Safety should always come first. A properly secured kayak ensures a smooth, worry-free journey—so you can focus on the fun ahead.
Step 1: Choose the Right Roof Rack System
The foundation of safe kayak transport is a solid roof rack. Without it, you’re risking damage and danger.
Check Your SUV’s Roof Compatibility
Not all SUVs come with factory-installed crossbars. Some have fixed mounting points, while others require aftermarket solutions. Start by checking your owner’s manual or visiting the manufacturer’s website to see what roof rack options are compatible with your vehicle.
Most modern SUVs—like the Toyota RAV4, Honda CR-V, or Ford Explorer—support universal or vehicle-specific roof racks. If your SUV has raised side rails, you’re in luck—they make installing crossbars much easier.
Select the Right Crossbars
Crossbars are the horizontal bars that run across your SUV’s roof. They support the weight of your kayak and carriers. When choosing crossbars, consider:
– **Weight capacity:** Most SUVs can handle 100–165 lbs on the roof. Check your vehicle’s specs.
– **Bar type:** Square, round, or aerodynamic bars. Aerodynamic bars reduce wind noise and improve fuel efficiency.
– **Compatibility:** Ensure the bars fit your SUV’s make and model.
Popular brands include Thule, Yakima, and Rhino-Rack. These offer reliable, easy-to-install systems designed for outdoor enthusiasts.
Install the Crossbars
Follow the manufacturer’s instructions carefully. Most systems involve:
1. Attaching mounting feet to the roof rails or door frames.
2. Sliding the crossbars into place and tightening them securely.
3. Using a torque wrench or built-in tension indicators to ensure proper tightness.
Pro tip: Don’t overtighten—this can damage your roof or the rack. Also, make sure the bars are evenly spaced and parallel.
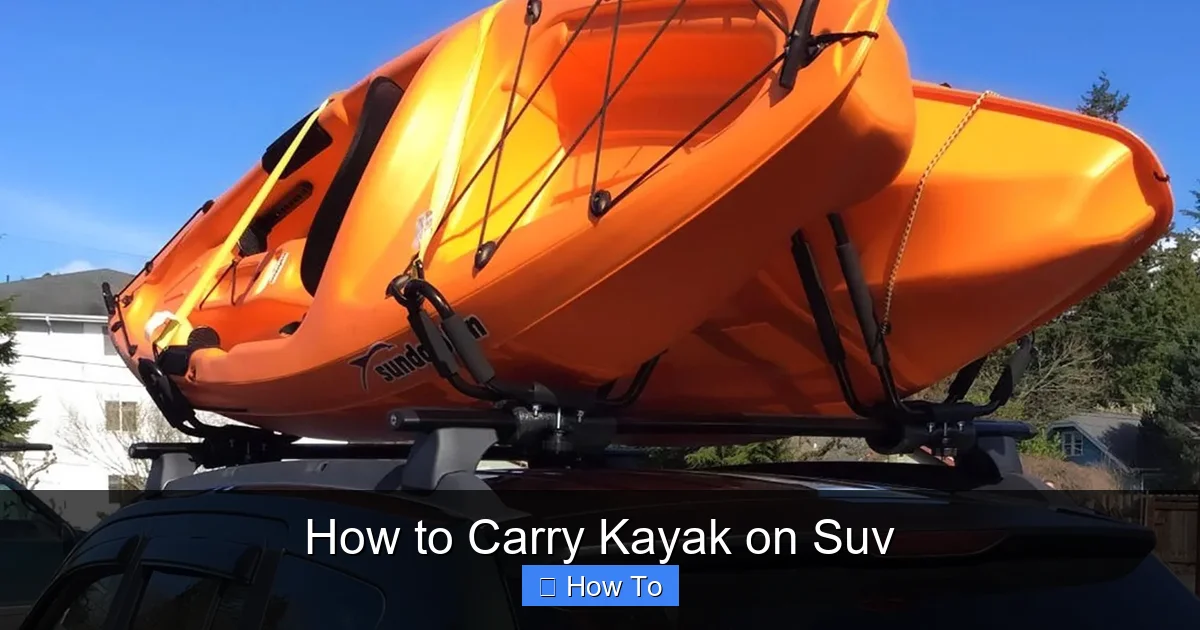
Step 2: Add Kayak Carriers or Cradles
Crossbars alone aren’t enough. You need kayak carriers to hold the boat in place and prevent it from scratching your roof or slipping.
Types of Kayak Carriers
There are three main types:
– **Cradles:** These are padded supports that hold the kayak in place. They’re affordable and easy to install.
– **J-style carriers:** These hold the kayak on its side, like a J. They’re great for saving space and reducing wind resistance.
– **Saddle carriers:** These hold the kayak flat and are ideal for wider boats.
For most beginners, cradles are the best choice. They’re simple, effective, and gentle on your kayak.
Install the Carriers
1. Position the carriers on the crossbars where the kayak’s heaviest points (usually the cockpit and stern) will rest.
2. Secure them using the provided clamps or bolts.
3. Make sure they’re level and tightly fastened.
If you’re using J-style carriers, install them so the “J” faces outward. This allows you to load the kayak from the side.
Step 3: Prepare Your Kayak for Transport
Before loading, take a few minutes to prepare your kayak. This ensures a smoother, safer process.
Clean the Kayak
Remove any dirt, sand, or debris from the bottom. This prevents scratches on your SUV’s roof and keeps your gear clean.
Check for Damage
Inspect the kayak for cracks, dents, or weak spots. A damaged kayak is more likely to shift or break during transport.
Remove Loose Gear
Take out paddles, life jackets, and other loose items. Store them inside the SUV or in a dry bag. Loose gear can become projectiles in windy conditions.
Step 4: Load the Kayak Onto the SUV
Now comes the physical part—lifting and placing the kayak on the roof. This step requires care to avoid injury and damage.
Use Proper Lifting Technique
Never lift with your back. Instead:
– Bend your knees and keep your back straight.
– Lift with your leg muscles.
– Keep the kayak close to your body.
If the kayak is heavy (most recreational kayaks weigh 40–70 lbs), consider using a kayak loader or asking for help.
Position the Kayak Upside Down
Always transport your kayak upside down (hull up). This:
– Lowers the center of gravity for better stability.
– Reduces wind resistance.
– Protects the cockpit and interior from rain and debris.
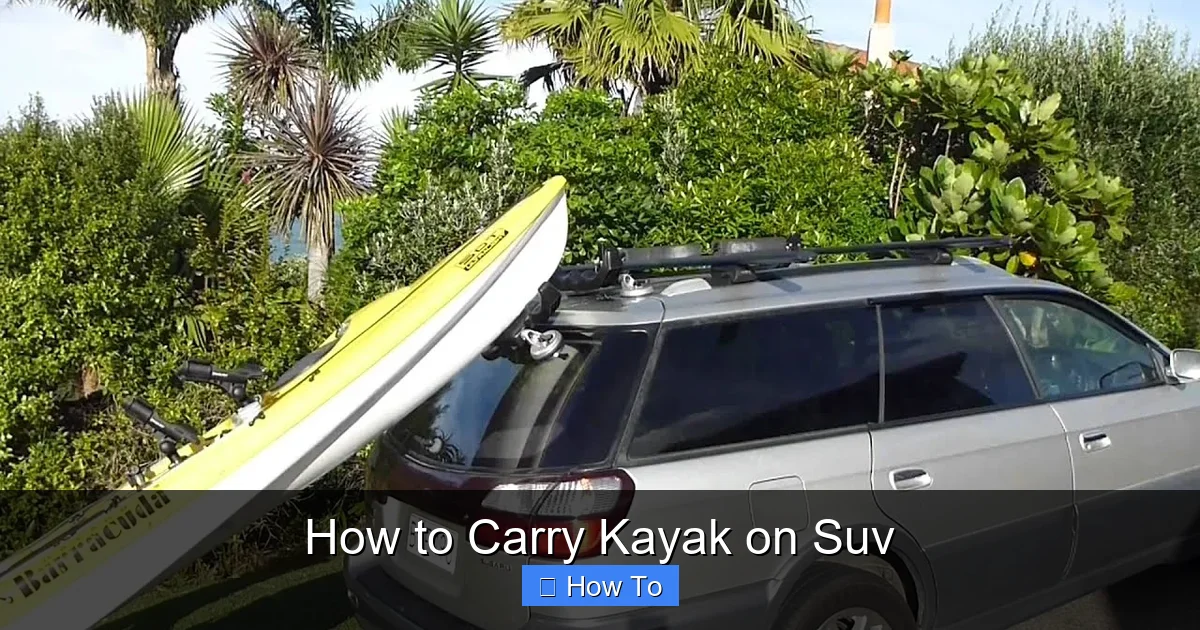
Load from the Side
Stand beside the SUV and lift one end of the kayak onto the roof. Then, lift the other end and slide it into place. If you’re alone, use a kayak loading aid like a roller or ramp.
For J-style carriers, lift the kayak and slide it into the “J” from the side.
Center the Kayak
Make sure the kayak is centered on the roof. An off-center load can affect handling and increase the risk of tipping.
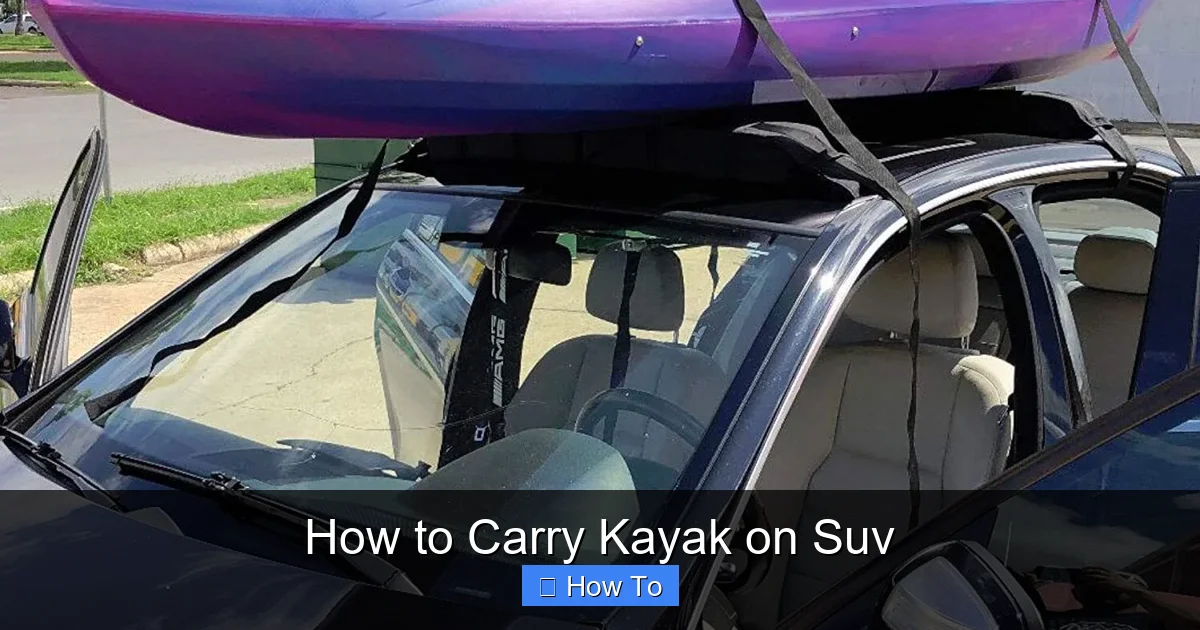
Step 5: Secure the Kayak with Straps
A properly tied-down kayak won’t budge—even at highway speeds.
Use High-Quality Straps
Avoid bungee cords—they stretch and can fail. Instead, use:
– **Cam straps:** Easy to use and secure. Look for 1-inch-wide straps with padded handles.
– **Ratchet straps:** Stronger but require caution—don’t overtighten, or you could damage the kayak.
Pro tip: Choose straps with UV-resistant webbing to prevent sun damage.
Tie Down the Kayak
1. Loop the strap through the carrier and over the kayak.
2. Pull it tight and secure the cam buckle.
3. Repeat on the other side.
Make sure the straps are snug but not overly tight. You should be able to press down slightly on the kayak—if it’s rock solid, it’s too tight.
Add Bow and Stern Lines
These are essential for long trips or high-speed driving. They prevent the kayak from shifting forward or backward.
– Attach one end to the front (bow) of the kayak and the other to a secure point on the SUV’s front bumper or tow hook.
– Do the same at the back (stern).
Use separate straps for bow and stern lines—don’t rely on the main tie-downs.
Step 6: Double-Check Everything
Before you drive, do a final inspection.
Test the Security
Grab the kayak and try to move it side to side and front to back. It shouldn’t shift at all.
Check Strap Tension
Make sure all straps are tight and secure. Loose straps can loosen further while driving.
Inspect Clearance
Visual guide about How to Carry Kayak on Suv
Image source: gtmall.com.au
Visual guide about How to Carry Kayak on Suv
Image source: i.ytimg.com
Visual guide about How to Carry Kayak on Suv
Image source: gtmall.com.au
Visual guide about How to Carry Kayak on Suv
Image source: i.ytimg.com
Ensure the kayak doesn’t block your view or extend too far beyond the SUV. Most states limit how far a load can overhang—usually 4 feet in front and back.
Look for Loose Ends
Tuck in any loose strap ends to prevent flapping, which can damage the kayak or create noise.
Safety Tips for Transporting Your Kayak
Even with the best setup, safety requires ongoing attention.
Drive Cautiously
– Avoid sudden stops, sharp turns, and high speeds.
– Allow extra following distance—your SUV may handle differently with a load on top.
Check Straps Periodically
Stop every 30–60 minutes to check that straps are still tight. Vibration and wind can loosen them over time.
Be Mindful of Height
With a kayak on top, your SUV is taller. Watch for low bridges, drive-thrus, and parking garages.
Use a Flag for Overhang
If your kayak extends more than 4 feet beyond the SUV, attach a red flag to the end. This alerts other drivers and complies with many state laws.
Troubleshooting Common Problems
Even experienced kayakers run into issues. Here’s how to solve them.
Problem: Kayak Shifts While Driving
This usually means the straps aren’t tight enough or the carriers aren’t positioned correctly. Stop safely, readjust the kayak, and tighten all straps. Add bow and stern lines if you haven’t already.
Problem: Roof Rack Squeaks or Rattles
Check that all bolts and clamps are tight. Add rubber pads or foam tape between the rack and roof to reduce noise.
Problem: Kayak Scratches the Roof
Make sure the carriers are padded and the kayak isn’t rubbing against the SUV. Use extra foam blocks or pool noodles as temporary padding if needed.
Problem: Difficulty Loading Alone
Invest in a kayak loader, ramp, or pulley system. These tools make solo loading much easier and safer.
Problem: Wind Noise or Drag
Aerodynamic crossbars and J-style carriers reduce wind resistance. Also, ensure the kayak is centered and streamlined.
Alternative Methods for Carrying a Kayak
Roof racks aren’t the only option. Depending on your SUV and kayak, you might consider:
Trailer Transport
A kayak trailer attaches to your hitch and carries one or more boats. It’s great for heavy or multiple kayaks but requires more space and a hitch receiver.
Hitch-Mounted Carriers
These attach to the rear hitch and hold the kayak behind the SUV. They’re easier to load but can block the rear view and license plate.
Foam Blocks (Temporary Use Only)
Foam blocks can be placed directly on the roof for short trips. However, they’re not secure for highway driving and should only be used as a last resort.
For most SUV owners, a roof rack system is the best balance of safety, convenience, and cost.
Final Thoughts
Learning how to carry a kayak on an SUV doesn’t have to be overwhelming. With the right equipment, a little practice, and attention to safety, you can transport your kayak confidently—whether you’re heading out for a weekend paddle or a cross-country adventure.
Remember: the key is preparation. Invest in quality roof racks and carriers, use proper lifting techniques, and always double-check your setup before hitting the road. Your kayak, your SUV, and everyone else on the road will thank you.
Now that you know how to carry a kayak on an SUV, it’s time to plan your next trip. Pack your gear, check the weather, and get out there—your next great adventure is waiting.