
This guide teaches you how to carry luggage on top of SUV vehicles safely and efficiently. You’ll learn the right equipment, proper loading techniques, and essential safety checks to protect your gear and vehicle.
Key Takeaways
- Use a roof rack or cargo carrier: A sturdy roof rack system is essential for safely securing luggage on top of your SUV. Without it, your bags could shift or fly off during transit.
- Distribute weight evenly: Always balance the load across the roof to prevent swaying, tipping, or damage to your vehicle’s roof structure.
- Secure luggage with high-quality straps: Use ratchet or cam buckle straps with soft loops to avoid scratching your SUV’s paint and ensure a tight, reliable hold.
- Check height and clearance: Remember that adding luggage increases your SUV’s height, which can affect parking garages, drive-thrus, and low-hanging branches.
- Inspect before and during travel: Stop every few hours to check straps and cargo, especially on long trips or in windy conditions.
- Choose weatherproof gear: Use waterproof bags or covers to protect your belongings from rain, snow, and road debris.
- Follow weight limits: Never exceed your SUV’s roof load capacity, typically listed in the owner’s manual or on the rack itself.
How to Carry Luggage on Top of SUV: A Complete Step-by-Step Guide
Whether you’re heading out on a family road trip, moving across the country, or just need extra space for camping gear, learning how to carry luggage on top of SUV is a valuable skill. SUVs are popular for their spacious interiors, but sometimes even they aren’t enough. That’s when the roof becomes your best friend.
In this guide, we’ll walk you through everything you need to know—from choosing the right equipment to securing your load and driving safely. We’ll cover roof racks, cargo boxes, soft bags, and safety tips so you can travel with confidence. By the end, you’ll be ready to pack up and hit the road without worrying about your luggage flying off or damaging your vehicle.
Why Carry Luggage on Top of Your SUV?
There are several reasons why people choose to carry luggage on the roof of their SUV:

Visual guide about How to Carry Luggage on Top of Suv
Image source: m.media-amazon.com
- Extra storage space: Ideal for large families, outdoor enthusiasts, or anyone with bulky items like coolers, tents, or sports equipment.
- Keep the interior clean: Pets, muddy boots, or wet gear can stay outside, preserving your SUV’s upholstery.
- Better fuel efficiency than trailers: While roof cargo does reduce gas mileage slightly, it’s often more efficient than towing a trailer.
- Flexibility: You can remove the roof setup when not in use, unlike permanent trailers or hitches.
However, carrying luggage on top isn’t as simple as tossing bags up there and driving off. It requires the right tools, proper technique, and ongoing attention to safety.
Step 1: Choose the Right Roof Rack System
The foundation of safely carrying luggage on top of your SUV is a reliable roof rack. Without it, you risk damaging your vehicle and losing your belongings.
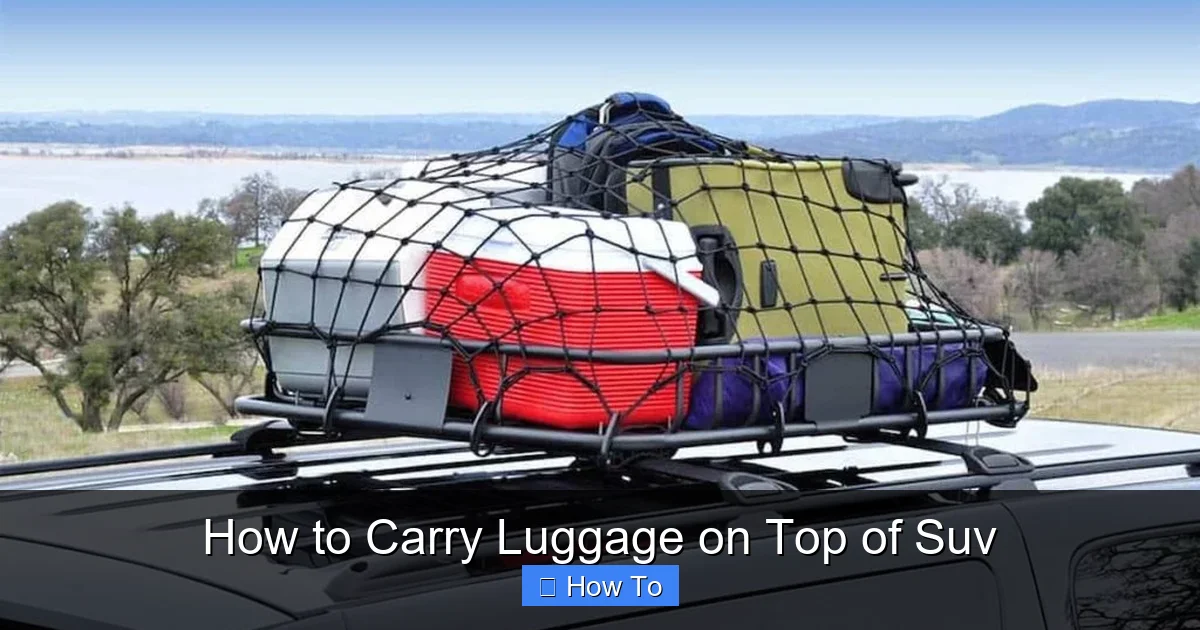
Visual guide about How to Carry Luggage on Top of Suv
Image source: thebrooklynnomad.com
Types of Roof Racks
Most SUVs come with factory-installed roof rails or crossbars. If yours doesn’t, you’ll need to install a compatible system. Here are the main types:
- Factory roof rails: These are permanent metal bars running along the sides of your SUV’s roof. They’re strong and designed for cargo.
- Aftermarket crossbars: If your SUV has flush rails or no rails at all, you can add crossbars that clamp onto the door frames or roof edges.
- Raised side rails: Some SUVs have raised rails that make it easier to attach crossbars and cargo carriers.
Check your owner’s manual or the manufacturer’s website to find the correct rack system for your SUV model. Popular brands include Thule, Yakima, and Rhino-Rack.
Weight Capacity Matters
Every roof rack has a maximum weight limit. This includes the weight of the rack itself, the cargo carrier (if used), and the luggage. Most SUVs can handle between 100 to 165 pounds on the roof, but always verify your specific model’s limit.
For example, a Toyota Highlander might support up to 150 pounds, while a larger Ford Expedition could handle 165 pounds. Exceeding this limit can damage your roof, cause instability, or even lead to accidents.
Step 2: Select the Best Cargo Carrier
Once you have a roof rack, you’ll need a way to hold your luggage. There are three main types of cargo carriers:
Hard-Shell Cargo Boxes
These are durable, lockable, and weatherproof. They’re ideal for long trips or valuable items.
- Pros: Excellent protection, aerodynamic design, secure locking, easy to load.
- Cons: Expensive, bulky to store, heavier than soft options.
Popular models include the Thule Motion XT and Yakima SkyBox. They typically hold 12 to 18 cubic feet of gear and can be opened from either side for convenience.
Soft Roof Bags
Made from heavy-duty vinyl or polyester, these flexible bags are lightweight and foldable.
- Pros: Affordable, easy to store, lightweight, good for irregularly shaped items.
- Cons: Less secure, can flap in the wind, not lockable, may leak in heavy rain.
Look for bags with reinforced seams, UV protection, and multiple attachment points. Brands like Rightline Gear and Leader Accessories offer reliable options.
Basket-Style Carriers
These metal frames provide an open platform for bulky or oddly shaped items like coolers, kayaks, or camping chairs.
- Pros: Great for large or heavy items, easy to access, versatile.
- Cons: Items must be strapped down individually, less aerodynamic, can be noisy.
Baskets are best when used with a cargo net or tarp to keep smaller items from falling out.
Step 3: Prepare Your Luggage for Roof Transport
Not all luggage is created equal when it comes to roof travel. Follow these tips to ensure your gear stays safe and secure.
Use Durable, Weather-Resistant Bags
Avoid using regular suitcases or fabric duffels unless they’re specifically designed for roof transport. Instead, opt for:
- Waterproof roof bags
- Hard-shell cargo boxes
- Heavy-duty duffels with reinforced bottoms
If you must use regular bags, wrap them in a tarp or heavy-duty plastic sheet and secure with bungee cords or straps.
Pack Smart
Distribute weight evenly and pack heavier items at the bottom and center. This lowers the center of gravity and reduces wind resistance.
Avoid overpacking. Bulky, lightweight items like pillows or sleeping bags can catch the wind and act like sails, increasing drag and the risk of shifting.
Label and Organize
Use color-coded bags or labels so you can easily identify what’s inside without unpacking everything. Keep frequently needed items (like snacks or maps) in a separate, easily accessible bag.
Step 4: Load and Secure Your Luggage
Now it’s time to load your luggage onto the roof. This step is critical—improper loading can lead to accidents or damage.
Step-by-Step Loading Process
- Park on level ground: Make sure your SUV is on a flat surface to prevent the vehicle from tipping or the luggage from sliding.
- Open all doors: This gives you better access to the roof and reduces the risk of scratching paint.
- Place the cargo carrier (if using): Attach the box, bag, or basket to the crossbars according to the manufacturer’s instructions. Use the provided clamps or brackets.
- Load luggage evenly: Start with heavier items in the center, then add lighter items around them. Avoid stacking too high—keep the load below the height of the cargo box or carrier.
- Secure with straps: Use ratchet or cam buckle straps to tie down the luggage. Never use bungee cords alone—they can stretch or snap.
How to Use Straps Correctly
Proper strapping is essential for safety. Here’s how to do it right:
- Use soft loop straps: These protect your SUV’s paint and prevent scratches. Avoid metal hooks that can dent or chip the roof.
- Crisscross the straps: This creates a tighter, more secure hold. Cross them over the top of the luggage and anchor them to opposite sides of the rack.
- Tighten gradually: Ratchet straps should be tightened slowly and evenly. Over-tightening can damage bags or the rack.
- Check for slack: After tightening, press down on the luggage. It should not move more than an inch in any direction.
For extra security, use a cargo net over soft bags or add a tarp and tie it down with additional straps.
Step 5: Perform a Safety Check Before Driving
Before you hit the road, take a few minutes to inspect your setup. This quick check can prevent disasters.
Checklist Before Driving
- Are all straps tight and secure?
- Is the cargo carrier properly attached to the crossbars?
- Is the luggage evenly distributed?
- Are there any loose flaps or dangling straps?
- Is the total weight within the roof’s limit?
- Have you removed any tools or loose items from the roof?
Give the luggage a firm shake. If it moves, re-tighten the straps. Also, make sure nothing is blocking your view through the rearview mirror.
Step 6: Drive Safely with Roof Cargo
Driving with luggage on top changes how your SUV handles. Be aware of these factors:
Increased Wind Resistance
Roof cargo creates drag, which can reduce fuel efficiency by 10–25%. It also makes your SUV more susceptible to crosswinds.
Tips to minimize impact:
- Drive at moderate speeds—avoid highways with strong crosswinds if possible.
- Use aerodynamic cargo boxes instead of bulky bags.
- Remove the carrier when not in use to improve gas mileage.
Higher Center of Gravity
Adding weight to the roof raises your SUV’s center of gravity, making it more prone to tipping in sharp turns or sudden maneuvers.
To stay safe:
- Avoid sharp turns at high speed.
- Brake earlier and more gently.
- Be extra cautious on winding roads or mountain passes.
Height Clearance Issues
Your SUV is now taller. This can be a problem in:
- Parking garages
- Drive-thrus
- Low-hanging branches
- Tunnels or overpasses
Always check height restrictions before entering parking structures. Consider using a height flag or sticker on your dashboard as a reminder.
Step 7: Monitor and Maintain During Your Trip
Don’t assume your luggage is secure just because it was tight at the start. Conditions change—wind, temperature, and road vibrations can loosen straps.
Stop and Inspect Regularly
On long trips, stop every 100 miles or so to check:
- Strap tightness
- Luggage position
- Signs of wear or damage
If you hear flapping or rattling, pull over immediately. Re-secure any loose items before continuing.
Weather Considerations
Rain, snow, and ice can affect your setup:
- Rain: Ensure your luggage is waterproof. Use a tarp if needed.
- Snow: Clear snow from the roof before driving to prevent ice buildup and added weight.
- Ice: Cold temperatures can make straps brittle. Inspect for cracks or fraying.
Troubleshooting Common Problems
Even with the best preparation, issues can arise. Here’s how to handle common problems:
Straps Keep Loosening
This often happens due to vibration or temperature changes. Solutions:
- Use ratchet straps with locking mechanisms.
- Double-check tension after the first 10–15 minutes of driving.
- Replace old or worn straps.
Luggage Shifts During Driving
If your bags move, it’s usually due to uneven loading or loose straps. Pull over, redistribute the weight, and re-secure everything.
Noise from the Roof
Flapping bags or loose parts can create annoying sounds. Fix it by:
- Tightening all straps.
- Using a cargo net to cover loose items.
- Adding foam padding between bags and the rack.
Water Leaks in Soft Bags
Even “waterproof” bags can leak in heavy rain. Prevent this by:
- Using a tarp over the bag.
- Sealing zippers with waterproof tape.
- Choosing a hard-shell box for wet climates.
Removing and Storing Your Roof Setup
When your trip is over, proper removal and storage extend the life of your gear.
How to Remove Cargo Safely
- Park on level ground.
- Loosen and remove all straps.
- Unload luggage carefully—don’t drop heavy items.
- Detach the cargo carrier or bag from the crossbars.
- Wipe down the roof and rack to remove dirt or debris.
Storing Your Equipment
- Cargo boxes: Store indoors in a dry place. Remove batteries from locks if applicable.
- Soft bags: Clean, dry, and fold neatly. Store in a breathable bag to prevent mold.
- Straps and hardware: Keep in a labeled container so they’re easy to find next time.
Regular maintenance—like checking for rust, fraying, or loose bolts—ensures your gear lasts for years.
Final Tips for Safe and Successful Roof Cargo Travel
To wrap up, here are some bonus tips for mastering how to carry luggage on top of SUV:
- Start small: Practice loading and driving with a light load before taking a big trip.
- Use a spotter: Have someone help you load and check the setup, especially if you’re new to roof cargo.
- Know your limits: If you’re unsure about weight or balance, consider using a trailer instead.
- Insurance check: Verify that your auto or home insurance covers roof cargo damage or theft.
- Be weather-aware: Avoid driving in high winds, storms, or icy conditions with roof luggage.
With the right preparation and attention to detail, carrying luggage on top of your SUV can be safe, convenient, and stress-free.
Conclusion
Learning how to carry luggage on top of SUV opens up new possibilities for travel, adventure, and everyday convenience. By choosing the right roof rack, selecting a suitable cargo carrier, and following proper loading and safety procedures, you can transport your belongings with confidence.
Remember: safety comes first. Always check weight limits, secure your load properly, and inspect your setup regularly. Whether you’re heading to the mountains, the beach, or just need extra room for a weekend getaway, your SUV’s roof can be a reliable ally—when used correctly.
Now that you’re equipped with this complete guide, you’re ready to pack up, tie down, and hit the road. Safe travels!