
Transporting window samples in an SUV can be tricky without proper planning. This guide shows you how to pack, secure, and organize samples to prevent damage and save time. Follow these practical steps for a smooth, professional experience every time.
Key Takeaways
- Measure your SUV cargo space: Know the dimensions of your vehicle’s trunk or cargo area to determine how many and what size window samples you can safely transport.
- Use protective covers and padding: Wrap each sample in bubble wrap, foam, or soft cloth to prevent scratches, cracks, and breakage during transit.
- Invest in a custom sample rack or organizer: A dedicated rack keeps samples upright, organized, and secure, reducing the risk of damage and making client presentations easier.
- Secure samples with straps or bungee cords: Prevent shifting during driving by anchoring samples to anchor points or using non-slip mats and dividers.
- Label and categorize samples: Clearly mark each sample with type, size, and client name to streamline loading, unloading, and presentation.
- Plan your route and driving style: Avoid sudden stops and rough roads when carrying fragile items, and allow extra time for safe handling.
- Clean and inspect samples before and after transport: Maintain a professional appearance by wiping down frames and glass, and check for damage post-trip.
How to Carry Window Samples in SUV: A Complete Step-by-Step Guide
If you’re in the window installation, sales, or home improvement business, you know how important it is to present high-quality window samples to clients. Whether you’re meeting a homeowner at their residence or showcasing options at a job site, your samples represent your brand and expertise. But transporting these fragile, often bulky items in an SUV can be a challenge—especially if you’re juggling multiple appointments in one day.
Carrying window samples in an SUV doesn’t have to be stressful or risky. With the right preparation, tools, and techniques, you can transport your samples safely, efficiently, and professionally. This comprehensive guide will walk you through everything you need to know—from measuring your vehicle to securing your load and maintaining sample quality. By the end, you’ll be equipped with a system that saves time, prevents damage, and impresses clients.
Whether you’re a seasoned contractor or just starting out, this guide is designed to help you master the art of mobile sample transport. Let’s dive in.
Step 1: Assess Your SUV’s Cargo Capacity
Visual guide about How to Carry Window Samples in Suv
Image source: sampco.com
Before you load a single sample, take time to understand your SUV’s cargo space. Not all SUVs are created equal—some have deep trunks, while others offer fold-flat seating for extra room. Knowing your vehicle’s dimensions will help you plan how many samples you can carry and how to arrange them.
Measure the Cargo Area
Grab a tape measure and record the length, width, and height of your SUV’s cargo space with the rear seats up and down. Pay attention to:
- The distance from the back of the rear seats to the tailgate
- The width between the wheel wells (this is often the narrowest point)
- The height from the floor to the ceiling
For example, a midsize SUV like a Honda CR-V might offer about 39 inches of length with seats up and up to 75 inches with seats folded. A larger SUV like a Ford Explorer can provide over 80 inches when fully expanded.
Consider Seat Configuration
Most SUVs allow you to fold down rear or even middle seats to create a flat loading surface. If you frequently carry large samples, consider investing in seat-back protectors or mats to prevent scratches. Some vehicles also have removable seats—check your owner’s manual to see if this is an option.
Account for Other Gear
Don’t forget about tools, brochures, ladders, or other equipment you might need on-site. Plan your load so that samples aren’t squeezed in last-minute or stacked under heavy items. A well-organized cargo area means safer transport and quicker access.
Step 2: Choose the Right Window Samples to Transport
Visual guide about How to Carry Window Samples in Suv
Image source: shethesamples.com
Not all window samples are equal—some are heavier, larger, or more fragile than others. Selecting the right mix for each trip can make a big difference in how easily you can carry them.
Prioritize Client Needs
Before heading out, review your appointments. If you’re meeting a client interested in energy-efficient windows, bring double- or triple-pane samples. For a historic home renovation, include wood-frame or custom-shaped options. Tailoring your selection reduces clutter and ensures you’re prepared.
Use Lightweight Replicas When Possible
For initial consultations, consider using lightweight mock-ups made from foam board, acrylic, or aluminum. These replicas mimic the look and feel of real windows but are much easier to carry. Save full-sized, functional samples for final presentations or installations.
Limit the Number of Samples
Even with a large SUV, it’s best to limit yourself to 6–10 samples per trip. More than that increases the risk of damage and makes organization difficult. Use a checklist to ensure you’re bringing only what’s needed.
Step 3: Protect Your Window Samples
Window samples—especially those with glass—are vulnerable to scratches, cracks, and breakage. Proper protection is essential to maintain their appearance and functionality.
Wrap Each Sample Individually
Use bubble wrap, foam sheets, or soft moving blankets to cover each sample. Pay special attention to corners and edges, which are most prone to impact. Secure the wrapping with painter’s tape (avoid duct tape, which can leave residue).
Use Corner Protectors
Plastic or rubber corner guards are inexpensive and highly effective. They absorb shock and prevent chipping, especially during loading and unloading. You can find them at hardware stores or online.
Seal Glass Surfaces
For samples with glass panes, apply a thin layer of clear packing tape in an “X” pattern across the glass. This holds shards together in case of breakage and prevents dangerous fragments from scattering.
Store Hardware Separately
Remove handles, locks, and other small parts and store them in labeled zip-top bags. Attach the bag to the sample with a clip or tape to avoid losing pieces.
Step 4: Organize Samples for Easy Access
A disorganized cargo area leads to frustration, damage, and wasted time. Organizing your samples properly ensures you can find what you need quickly and present them professionally.
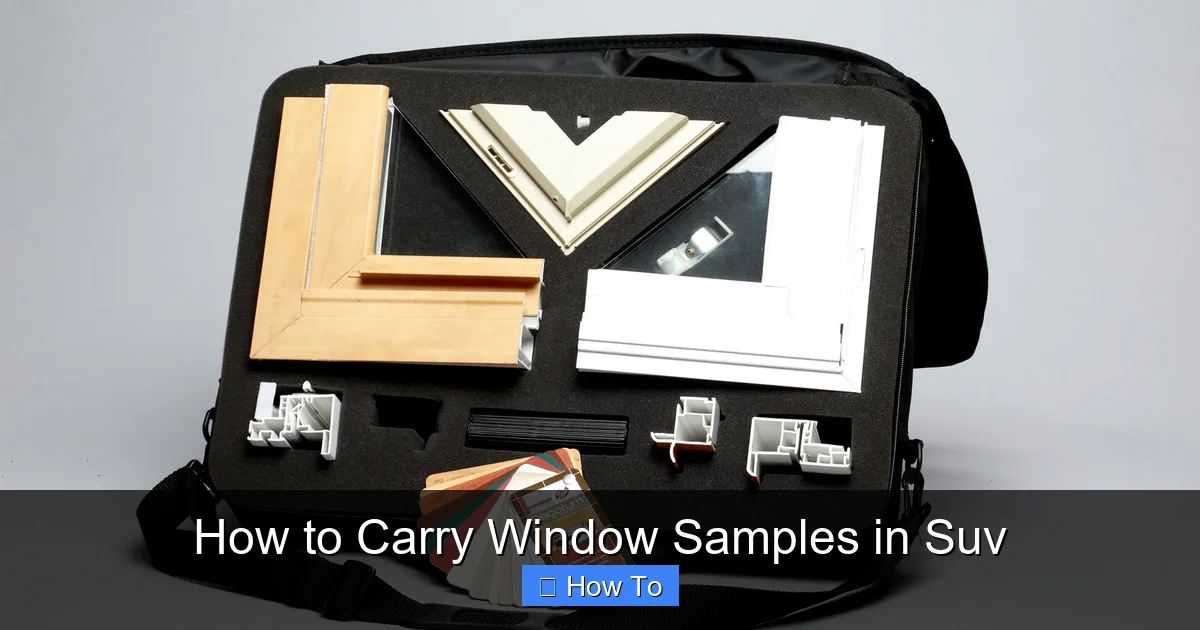
Use a Sample Rack or Organizer
Invest in a custom-built or commercially available window sample rack. These racks are designed to hold samples upright, like books on a shelf, preventing them from tipping or rubbing against each other. Many are made from lightweight aluminum or steel and can be bolted or strapped into your SUV.
Label Every Sample
Attach a durable label to each sample with:
- Window type (e.g., double-hung, casement)
- Material (vinyl, wood, fiberglass)
- Size (e.g., 36” x 48”)
- Client name or project ID
Use waterproof labels and permanent markers. This makes it easy to grab the right sample without unpacking everything.
Group by Category
Arrange samples by type, size, or client. For example, place all vinyl windows on one side and wood frames on the other. This reduces confusion and speeds up setup at client sites.
Step 5: Secure Samples During Transport
Even the best-protected samples can be damaged if they shift during transit. Securing your load is critical for safety and sample integrity.
Use Ratchet Straps or Bungee Cords
Anchor samples to your SUV’s built-in tie-down points using ratchet straps or heavy-duty bungee cords. Avoid over-tightening, which can crack frames or warp materials. Loop straps around the rack or individual samples, ensuring they’re snug but not strained.
Install Non-Slip Mats
Place rubber or carpeted mats on the cargo floor to prevent sliding. These mats add friction and cushion the base of your samples. You can also use them between layers if stacking is unavoidable.
Use Dividers or Foam Inserts
Custom-cut foam inserts or plastic dividers keep samples separated and upright. They’re especially useful in deep cargo areas where samples might tip forward when braking.
Fold Seats Strategically
If you’re carrying long samples, fold down only part of the rear seat to create a tunnel effect. This allows you to slide samples in lengthwise while keeping the rest of the cargo area usable.
Step 6: Load and Unload with Care
How you load and unload samples can make or break their condition. Rushing this step often leads to accidents.
Use a Loading Ramp or Dolly
For heavy or oversized samples, use a portable ramp or hand truck. This reduces strain on your back and minimizes the risk of dropping or dragging samples.
Work with a Partner
If possible, have someone assist you—especially with large or awkwardly shaped windows. Communication is key: agree on signals for lifting, lowering, and positioning.
Lift with Your Legs, Not Your Back
Bend your knees, keep your back straight, and lift smoothly. Avoid twisting while carrying. If a sample feels too heavy, don’t hesitate to ask for help or use mechanical aids.
Unload in Reverse Order
Take out samples in the reverse order they were loaded. This prevents you from having to move already-unpacked items to reach others.
Step 7: Maintain Samples Before and After Trips
Your samples should always look their best—clean, undamaged, and professional. Regular maintenance ensures they make a great impression every time.
Inspect Before Loading
Before each trip, check each sample for:
- Cracks or chips in glass
- Loose frames or hardware
- Dirty surfaces or smudges
Address any issues immediately. A damaged sample can hurt your credibility.
Clean After Each Use
Wipe down frames with a microfiber cloth and glass cleaner. Remove dust, fingerprints, or debris. For vinyl or aluminum, use a mild soap solution. Avoid harsh chemicals that could degrade finishes.
Store Properly Between Trips
When not in use, store samples in a dry, climate-controlled area. Avoid attics, garages, or basements where temperature swings and humidity can warp materials or fog glass.
Troubleshooting Common Issues
Even with the best planning, problems can arise. Here’s how to handle common challenges:
Samples Keep Sliding Around
If your samples shift during driving, double-check your tie-downs. Add more straps or use non-slip mats. Consider upgrading to a rack with built-in restraints.
Glass Breaks During Transport
This usually happens due to impact or pressure. Ensure samples aren’t stacked too high or squeezed between hard objects. Use extra padding and avoid sudden stops.
Can’t Fit All Samples in the SUV
Reassess your selection. Are you bringing duplicates or unnecessary items? Use replicas for early meetings. Alternatively, make multiple trips or use a trailer for large loads.
Labels Fall Off
Use weatherproof labels and strong adhesive. Alternatively, attach labels with zip ties or Velcro strips for easy replacement.
Samples Get Dirty or Scratched
Always wrap samples and store them in a clean cargo area. Avoid placing them near tools or dirty equipment. Regular cleaning prevents buildup.
Conclusion
Carrying window samples in an SUV is a common task for professionals in the home improvement industry, but it doesn’t have to be a headache. With careful planning, the right tools, and a systematic approach, you can transport your samples safely, efficiently, and professionally.
Start by measuring your SUV’s cargo space and selecting only the samples you need. Protect each one with padding, corner guards, and secure wrapping. Organize them using a rack or dividers, and label everything for quick access. Secure the load with straps and non-slip mats, and always load and unload with care. Finally, maintain your samples by cleaning and inspecting them regularly.
By following this guide, you’ll not only protect your investment in high-quality samples but also enhance your reputation with clients. A well-organized, damage-free presentation shows attention to detail and professionalism—qualities that win trust and close sales.
Remember, the goal isn’t just to move samples from point A to point B. It’s to arrive ready to impress, with everything you need at your fingertips. With these tips, you’ll be doing just that—trip after trip.