
Changing the EGR valve on your Buick SUV can improve engine performance and reduce emissions. This guide walks you through the entire process, from diagnosis to installation, using simple tools and clear instructions.
Key Takeaways
- Diagnose the problem first: Use a scan tool to confirm the EGR valve is faulty before replacing it to avoid unnecessary repairs.
- Gather the right tools: You’ll need a socket set, wrenches, screwdrivers, and safety gear like gloves and goggles.
- Disconnect the battery: Always disconnect the negative battery terminal before starting to prevent electrical shorts or accidental engine starts.
- Clean the intake manifold: Remove carbon buildup around the EGR valve seat to ensure a proper seal with the new valve.
- Follow torque specs: Tighten mounting bolts to the manufacturer’s recommended torque to prevent leaks or damage.
- Test after installation: Reconnect the battery, start the engine, and check for codes or rough idling to confirm success.
- Use OEM or high-quality parts: Avoid cheap aftermarket valves that may fail prematurely or cause drivability issues.
How to Change an EGR Valve on a Buick SUV
If your Buick SUV is running rough, stalling at idle, or showing a check engine light, the culprit might be a faulty EGR (Exhaust Gas Recirculation) valve. The EGR valve plays a crucial role in reducing harmful emissions by recirculating a portion of exhaust gases back into the engine’s combustion chambers. Over time, carbon buildup can cause the valve to stick, clog, or fail entirely—leading to poor performance and increased emissions.
Replacing the EGR valve might sound intimidating, but with the right tools, a bit of patience, and this detailed guide, you can tackle the job yourself. Whether you drive a Buick Enclave, Encore, or Terrain, the process is similar across most models. This step-by-step tutorial will walk you through diagnosing the issue, removing the old valve, installing a new one, and testing your repair—all while keeping safety and precision in mind.
By the end of this guide, you’ll not only save money on a mechanic’s labor but also gain confidence in handling future maintenance tasks. Let’s get started!
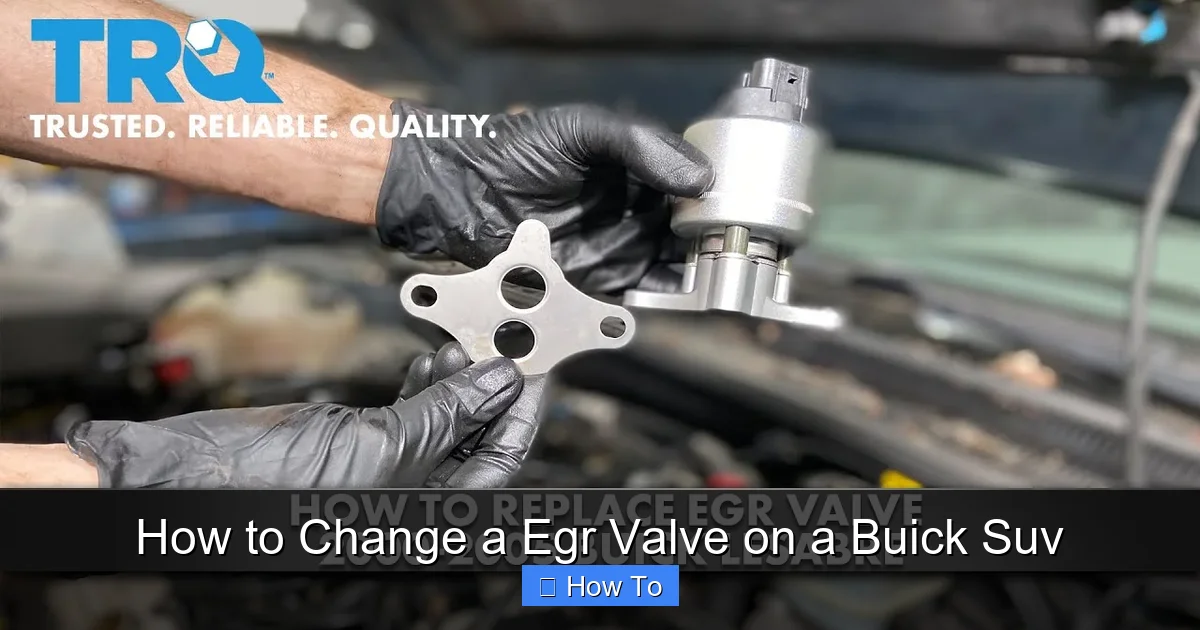
What Is an EGR Valve and Why Does It Matter?
Visual guide about How to Change a Egr Valve on a Buick Suv
Image source: deshiye.com
The EGR valve is a small but vital component in your Buick SUV’s emissions control system. Its job is to reduce nitrogen oxide (NOx) emissions by redirecting a controlled amount of exhaust gas back into the intake manifold. This lowers combustion temperatures, which in turn reduces the formation of harmful pollutants.
When the EGR valve works properly, your engine runs cleaner and more efficiently. But when it fails—often due to carbon deposits clogging the valve or its passages—you may notice symptoms like:
– Rough idling
– Engine hesitation or stalling
– Poor fuel economy
– A persistent check engine light (often with codes like P0401 or P0402)
– Reduced power during acceleration
Ignoring a bad EGR valve can lead to more serious engine problems over time, including damage to the intake manifold or oxygen sensors. That’s why timely replacement is essential.
Tools and Materials You’ll Need
Visual guide about How to Change a Egr Valve on a Buick Suv
Image source: images.platforum.cloud
Before you begin, gather all the necessary tools and parts. Having everything ready will make the job smoother and safer.
Essential Tools
- Socket wrench set (including metric sockets, typically 8mm to 13mm)
- Ratchet with extensions
- Torque wrench (for precise tightening)
- Flathead and Phillips screwdrivers
- Needle-nose pliers
- Wire brush or small scraper
- Safety gloves and safety glasses
- Shop rags or paper towels
- Penetrating oil (like WD-40 or PB Blaster)
Replacement Parts
- New EGR valve (OEM or high-quality aftermarket—check compatibility with your Buick model and year)
- New EGR valve gasket (often included with the valve, but double-check)
- Intake manifold cleaner (optional, for deep cleaning)
Optional but Helpful
- Scan tool or OBD2 reader (to check for trouble codes)
- Flashlight or work light
- Jack and jack stands (if access is tight and you need to lift the vehicle)
- Fender covers (to protect your paint)
Step 1: Prepare Your Vehicle and Workspace
Safety and preparation are key to a successful repair. Follow these steps before touching any parts.
Park on a Level Surface
Make sure your Buick SUV is parked on a flat, stable surface. Engage the parking brake and place wheel chocks behind the rear tires to prevent rolling.
Let the Engine Cool
Never work on a hot engine. Allow the vehicle to cool for at least 2–3 hours after driving. The EGR valve and surrounding components can get extremely hot.
Disconnect the Battery
Open the hood and locate the battery. Use a wrench to loosen the nut on the negative (-) terminal, then carefully remove the cable and tuck it away from the battery. This prevents accidental sparks or short circuits while working on electrical components.
Set Up Your Workspace
Clear a clean, well-lit area around the engine bay. Lay out your tools and parts within easy reach. If you’re working indoors, ensure proper ventilation—exhaust fumes and cleaning chemicals can be hazardous.
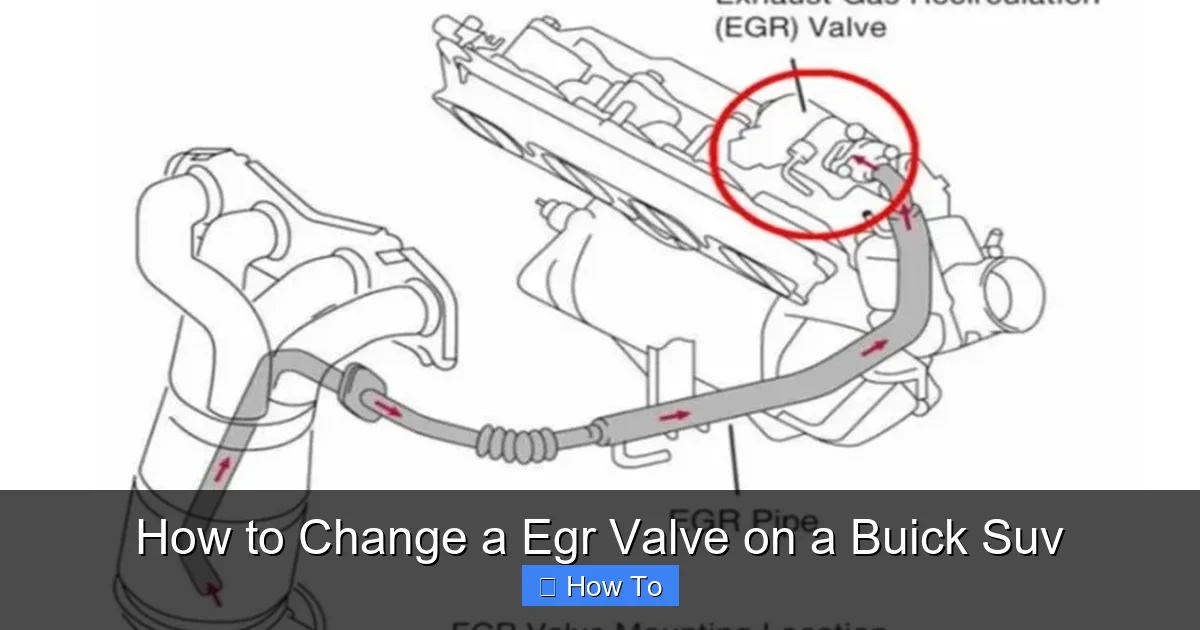
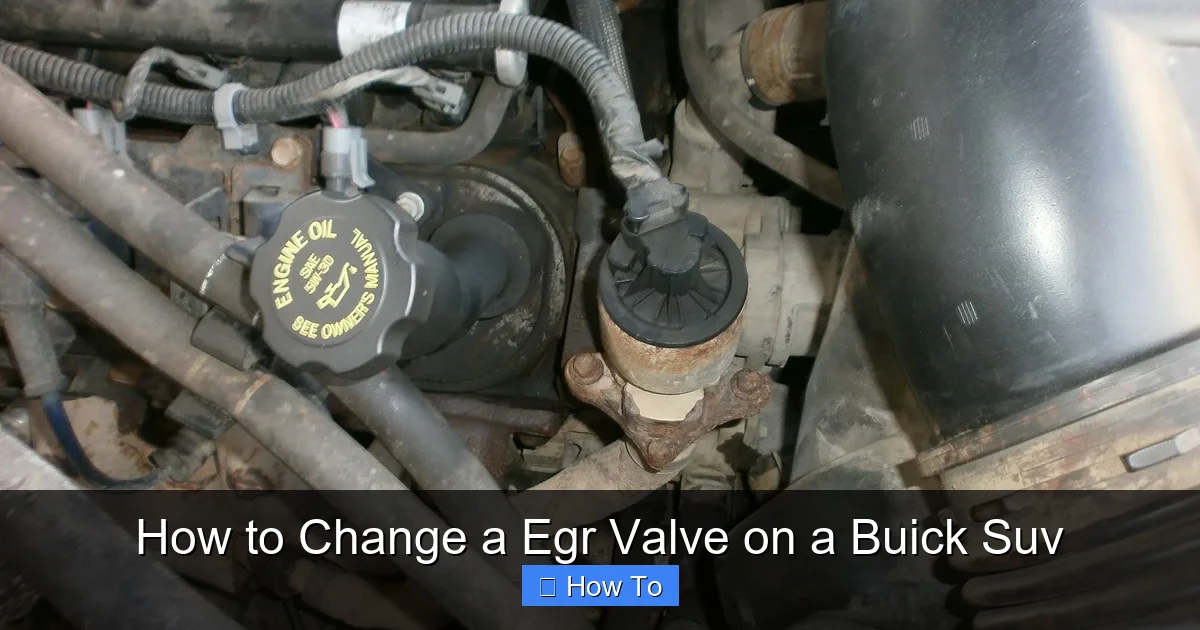
Step 2: Locate the EGR Valve
The EGR valve is typically mounted on or near the intake manifold. Its exact location varies slightly depending on your Buick SUV model and engine type, but here’s how to find it:
– On most Buick Enclave and Encore models with a 3.6L V6 or 1.4L turbo engine, the EGR valve is located on the driver’s side of the engine, near the firewall.
– On the Buick Terrain with a 2.4L engine, it’s often on the passenger side, attached to the intake manifold.
– Look for a small, cylindrical or rectangular metal component with an electrical connector and vacuum lines (if applicable).
– The valve usually has 2–4 bolts holding it in place and a gasket between it and the manifold.
If you’re unsure, consult your owner’s manual or search for a diagram specific to your model year. You can also use an online repair database like AllData or Mitchell1 for detailed photos.
Step 3: Disconnect Electrical and Vacuum Connections
Before removing the valve, you’ll need to disconnect any wires or hoses attached to it.
Unplug the Electrical Connector
Locate the wiring harness connected to the EGR valve. Press the release tab (if present) and gently pull the connector straight off. Avoid yanking on the wires—this can damage the pins.
Remove Vacuum Lines (If Applicable)
Some older Buick models use vacuum-operated EGR valves. If your valve has small rubber hoses attached, carefully pull them off. Label them with tape or take a photo so you can reconnect them correctly later.
Tip: Take a Photo
Snap a quick picture of the valve and its connections before disconnecting anything. This serves as a helpful reference during reassembly.
Step 4: Remove the Old EGR Valve
Now it’s time to take out the faulty valve. Be patient—carbon buildup can make bolts stubborn.
Spray Penetrating Oil
If the mounting bolts look rusty or seized, spray them with penetrating oil. Let it sit for 10–15 minutes to loosen corrosion.
Loosen the Mounting Bolts
Use the appropriate socket and ratchet to loosen the bolts holding the EGR valve in place. Most valves use 10mm or 13mm bolts. Turn them counterclockwise until they’re free.
Carefully Remove the Valve
Once the bolts are out, gently wiggle the valve to break it free from the gasket and carbon buildup. Do not force it—excessive pressure can crack the intake manifold.
Inspect the Valve and Mounting Surface
Look at the old valve. Is it covered in black, greasy carbon? Does the pintle (the moving part inside) move freely? A stuck or clogged valve confirms the need for replacement.
Also, inspect the intake manifold where the valve was mounted. You’ll likely see a ring of carbon deposits. This needs to be cleaned before installing the new valve.
Step 5: Clean the Intake Manifold and Valve Seat
A clean mounting surface is essential for a proper seal and optimal performance.
Scrape Off Carbon Buildup
Use a wire brush, small scraper, or even a plastic razor blade to remove carbon deposits from the valve seat and surrounding area. Be careful not to scratch or gouge the metal surface.
Clean with Intake Cleaner (Optional)
For stubborn buildup, spray a small amount of intake manifold cleaner on a rag and wipe the area. Allow it to dry completely before proceeding.
Check the Gasket Surface
Ensure the surface is flat and free of debris. If the old gasket is stuck, gently scrape it off. Never install a new valve on a dirty or uneven surface—this can cause leaks and poor performance.
Step 6: Install the New EGR Valve
With the area clean, you’re ready to install the new valve.
Position the New Gasket
Place the new gasket onto the intake manifold. Make sure it’s aligned properly with the bolt holes.
Set the New Valve in Place
Carefully position the new EGR valve over the gasket. Ensure it sits flush and aligns with the bolt holes.
Insert and Tighten the Bolts
Hand-thread the mounting bolts first to avoid cross-threading. Then, use a torque wrench to tighten them to the manufacturer’s specification—usually between 15 and 25 ft-lbs (check your service manual for exact specs). Tighten in a crisscross pattern to ensure even pressure.
Reconnect Electrical and Vacuum Lines
Plug the electrical connector back in until it clicks. Reattach any vacuum hoses, matching them to your photo or labels.
Step 7: Reconnect the Battery and Test the Repair
You’re almost done! Now it’s time to test your work.
Reconnect the Battery
Reattach the negative battery cable and tighten the nut securely.
Start the Engine
Turn the key and start your Buick SUV. Listen for unusual noises and watch for warning lights.
Check for Leaks and Smooth Operation
Let the engine idle for a few minutes. Feel around the EGR valve for exhaust leaks (you may hear a hissing sound). The engine should idle smoothly without stalling or hesitation.
Take a Short Test Drive
Drive the vehicle for 10–15 minutes, including stop-and-go traffic and highway speeds. Pay attention to acceleration, idle quality, and any warning lights.
Scan for Trouble Codes
Use an OBD2 scanner to check for any remaining codes. If the P0401 or similar code is gone, your repair was successful. If the light returns, double-check connections or consider further diagnosis.
Troubleshooting Common Issues
Even with careful installation, problems can arise. Here’s how to handle common post-repair issues.
Check Engine Light Still On
If the light persists, the EGR valve may not be the only issue. Possible causes include:
– Clogged EGR passages in the intake manifold
– Faulty EGR position sensor
– Vacuum leaks
– PCM (engine computer) needing a reset
Use a scan tool to read live data and monitor EGR flow. If the valve isn’t opening or closing properly, the passages may need professional cleaning.
Rough Idle or Stalling
This could mean the new valve is defective or the intake manifold has residual carbon. Try cleaning the throttle body and idle air control valve. If the problem continues, have the EGR system inspected.
Exhaust Smell or Hissing Noise
This indicates an exhaust leak. Recheck the valve gasket and bolt torque. Replace the gasket if necessary and ensure all connections are tight.
Valve Won’t Stay in Place
If the new valve feels loose, the mounting surface may be warped or the gasket too thick. Remove the valve, inspect the manifold, and use the correct OEM gasket.
Tips for Long-Term EGR System Health
To prevent future EGR valve failures, follow these maintenance tips:
– Use high-quality fuel and consider a fuel system cleaner every 5,000–10,000 miles.
– Avoid short trips where the engine doesn’t reach full operating temperature—this promotes carbon buildup.
– Replace the air filter regularly to reduce contaminants entering the intake.
– Have the EGR system inspected during routine maintenance, especially if you notice performance issues.
Conclusion
Replacing the EGR valve on your Buick SUV is a manageable DIY project that can save you hundreds in labor costs. By following this guide, you’ve learned how to diagnose the problem, safely remove the old valve, clean the mounting surface, and install a new one with confidence.
Remember: always prioritize safety, use the right tools, and don’t skip the cleaning step. A clean intake manifold ensures a proper seal and optimal performance from your new EGR valve.
With regular maintenance and attention to warning signs, your Buick SUV will continue to run smoothly and efficiently for years to come. If you’re ever unsure, consult a professional—but now you know that changing an EGR valve is well within the reach of a determined DIYer.