

Changing the cabin air filter in your 2014 Chevrolet SUV is a simple DIY task that improves air quality and HVAC performance. This guide walks you through locating, removing, and replacing the filter in under 30 minutes with basic tools.
Key Takeaways
- Locate the cabin filter behind the glove box: Most 2014 Chevrolet SUVs house the cabin air filter behind the passenger-side glove compartment, accessible after removing a few panels.
- Use the correct filter type: Always check your owner’s manual or use an OEM-compatible cabin filter (typically a pleated paper or carbon-activated design) for optimal performance.
- Replace every 12,000 to 15,000 miles: Regular replacement prevents clogging, maintains airflow, and ensures clean, odor-free air inside the cabin.
- No special tools required: A Phillips screwdriver and flashlight are usually enough to complete the job quickly and safely.
- Watch for debris and mold: Inspect the filter housing for dirt or moisture buildup during replacement—clean it if necessary to prevent future issues.
- Reset the maintenance light (if applicable): Some models may require a system reset after service; consult your manual for instructions.
- DIY saves money: Replacing the filter yourself costs under $20 and avoids dealership labor fees of $50–$100.
How to Change Cabin Filter on 2014 Chevrolet SUV
Keeping the air inside your 2014 Chevrolet SUV clean and fresh isn’t just about comfort—it’s about health. The cabin air filter plays a crucial role in filtering out dust, pollen, exhaust fumes, and other airborne contaminants before they enter your vehicle’s interior through the HVAC system. Over time, this filter gets clogged with debris, reducing airflow and potentially allowing unpleasant odors or allergens to circulate. Fortunately, replacing it is one of the easiest and most cost-effective maintenance tasks you can do yourself.
In this comprehensive guide, we’ll walk you through every step of changing the cabin air filter on a 2014 Chevrolet SUV—whether you drive a Tahoe, Suburban, Traverse, or Equinox. You’ll learn where the filter is located, what tools you’ll need, how to remove the old filter safely, and how to install a new one correctly. We’ll also share practical tips to avoid common mistakes, troubleshoot issues, and keep your SUV’s interior air as clean as possible.
Best of all, this job takes less than 30 minutes and requires only basic tools. No mechanic experience? No problem. By the end of this guide, you’ll feel confident tackling this simple but important maintenance task—and save yourself a trip (and a bill) from the dealership.
Why Replace Your Cabin Air Filter?
Before diving into the how-to, let’s quickly cover why this task matters. The cabin air filter is your first line of defense against pollutants entering your vehicle. Think of it like the air filter in your home HVAC system—but for your car. When it’s dirty or clogged, you might notice:
– Reduced airflow from the vents
– A musty or mildew smell when you turn on the AC or heat
– Increased dust inside the cabin
– Allergy flare-ups or respiratory irritation, especially for sensitive passengers
Most manufacturers, including Chevrolet, recommend replacing the cabin air filter every 12,000 to 15,000 miles, or once a year—whichever comes first. If you drive in heavy traffic, dusty areas, or during high-pollen seasons, you may need to replace it more often.
A clean filter ensures your HVAC system works efficiently, improves fuel economy slightly (by reducing strain on the blower motor), and keeps your passengers breathing easier. It’s a small investment of time and money for big returns in comfort and health.
Tools and Materials You’ll Need
One of the best things about changing the cabin air filter is how little you need to get started. Here’s a quick checklist:
- Cabin air filter (new): Make sure it’s compatible with your 2014 Chevrolet SUV model. Check your owner’s manual or look up the part number online. Popular brands include ACDelco, Fram, and K&N.
- Phillips head screwdriver: Most glove box panels are held in place with Phillips screws.
- Flashlight: Helps you see into tight spaces, especially if the filter housing is dimly lit.
- Gloves (optional): Keep your hands clean, especially if the old filter is dirty or moldy.
- Shop vacuum or rag (optional): Useful for cleaning out debris from the filter housing.
You don’t need any special automotive tools or lifts—just a flat, well-lit workspace (like your driveway or garage) and about 20–30 minutes of free time.
Step-by-Step Guide to Replacing the Cabin Filter
Now that you’re prepared, let’s get to the main event. Follow these steps carefully to replace your cabin air filter safely and correctly.
Step 1: Locate the Cabin Air Filter
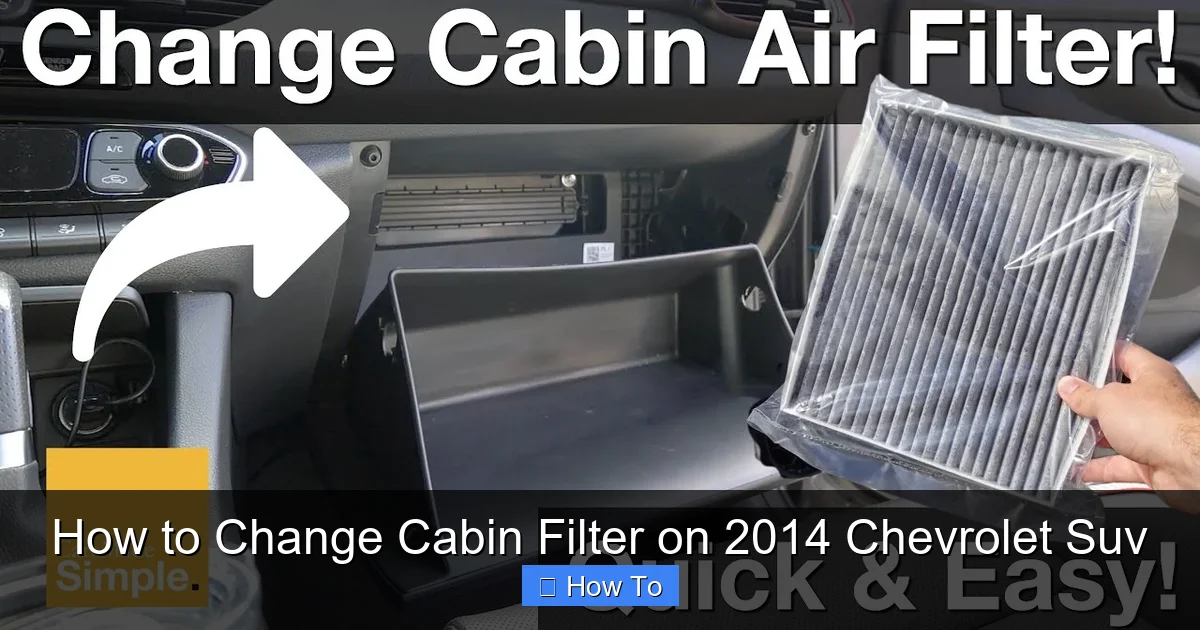
The cabin air filter in most 2014 Chevrolet SUVs is located behind the glove box on the passenger side. This includes models like the Tahoe, Suburban, Traverse, and Equinox. The exact access method may vary slightly between models, but the general process is the same.
Start by opening the glove box and emptying its contents. Look for a small latch or stopper on the right side of the glove box interior. This is designed to limit how far the glove box can open—and it’s your key to accessing the filter.
Step 2: Remove the Glove Box
To access the filter, you’ll need to partially remove the glove box. Here’s how:
- Open the glove box fully and locate the stopper arm on the right side.
- Gently squeeze the sides of the stopper arm to release it from the glove box frame. This allows the glove box to drop down further.
- On some models, you may also need to remove a small plastic pin or clip on the left side. Use your fingers or a flathead screwdriver to pop it out.
- Once the stopper is released, carefully lower the glove box until it hangs freely. Be gentle—don’t force it, as the damper arm or wiring (if present) could be damaged.
Now you should see a rectangular plastic cover behind the glove box. This is the cabin air filter housing.
Step 3: Remove the Filter Cover
The filter housing is typically held in place by two or three Phillips head screws. Use your screwdriver to remove them. Keep the screws in a small container or magnetic tray so you don’t lose them.
Once the screws are out, gently pull the cover straight out. It may have a slight clip or tab, so wiggle it slightly if it doesn’t come out easily. Be careful not to break the plastic tabs—they’re fragile.
With the cover removed, you’ll see the old cabin air filter inside. Take note of how it’s positioned—most filters have an arrow indicating airflow direction. This will help you install the new one correctly.
Step 4: Remove the Old Filter
Carefully slide the old filter out of the housing. It may be snug, so wiggle it gently from side to side as you pull. If it’s been a while since the last replacement, expect it to be dirty, discolored, or even moldy.
Inspect the filter:
– Is it clogged with leaves, dirt, or debris?
– Does it smell musty or mildewed?
– Are the pleats flattened or damaged?
If you notice excessive dirt or moisture, take a moment to clean the filter housing with a dry rag or shop vacuum. This prevents contaminants from entering the HVAC system.
Step 5: Install the New Filter
Before inserting the new filter, double-check that it’s the correct size and type for your vehicle. Compare it side-by-side with the old one—they should match in dimensions and design.
Look for the airflow arrow on the new filter. This arrow should point downward or toward the HVAC system—usually in the direction of the arrow you noted on the old filter. Installing it backward can reduce efficiency and cause poor airflow.
Slide the new filter into the housing, making sure it sits flat and secure. It should fit snugly without forcing. If it doesn’t go in easily, double-check the orientation and alignment.
Step 6: Reattach the Filter Cover
Once the new filter is in place, reattach the plastic cover. Align it with the housing and press it firmly until it clicks or sits flush. Replace the screws and tighten them securely—but don’t over-tighten, as this can crack the plastic.
Step 7: Reinstall the Glove Box
Now it’s time to put the glove box back in place:
- Lift the glove box back into position.
- Reattach the stopper arm by pushing it back into the slot on the glove box frame.
- If you removed a pin or clip on the left side, reinsert it.
- Test the glove box by opening and closing it a few times to ensure it moves smoothly and doesn’t interfere with the filter housing.
Make sure the glove box closes fully and latches properly. If it feels loose or misaligned, double-check the stopper and clips.
Step 8: Test the HVAC System
Start your SUV and turn on the air conditioning or heater. Set the fan to different speeds and check that air flows freely from all vents. Listen for unusual noises or reduced airflow—these could indicate a problem with the installation.
If everything works as expected, you’re done! Take a moment to reset the maintenance light if your vehicle has one (see troubleshooting section below).
Tips for a Successful Filter Replacement
To make the process even smoother, keep these practical tips in mind:
- Replace during dry weather: Avoid doing this job in rain or high humidity, as moisture can promote mold growth in the HVAC system.
- Use a carbon-activated filter: If you live in a city or drive in heavy traffic, consider upgrading to a charcoal or activated carbon filter. These offer better odor and gas filtration.
- Mark your calendar: Note the replacement date and mileage in your maintenance log or on the filter frame. This helps you stay on schedule.
- Inspect the HVAC ducts: While the glove box is down, take a quick look at the blower motor and duct openings. If you see debris, use a vacuum to clean it out.
- Wear a mask if needed: If the old filter is moldy or extremely dirty, wear a dust mask to avoid inhaling spores or allergens.
Troubleshooting Common Issues
Even with careful steps, you might run into a few hiccups. Here’s how to handle them:
Problem: Glove box won’t stay closed after reassembly
This usually means the stopper arm isn’t properly reattached. Open the glove box, check that the stopper is fully seated in the slot, and ensure the damper arm (if present) isn’t bent or misaligned.

Visual guide about How to Change Cabin Filter on 2014 Chevrolet Suv
Image source: parkers-images.bauersecure.com
Visual guide about How to Change Cabin Filter on 2014 Chevrolet Suv
Image source: airconditionsolve.com
Problem: Reduced airflow after replacement
Double-check that the new filter is installed in the correct direction. Also, verify that the filter cover is fully sealed—any gaps can cause air to bypass the filter.
Problem: Filter doesn’t fit snugly
You may have the wrong filter size. Compare the part number with your owner’s manual or consult an auto parts store. Never force a filter that doesn’t fit—it can damage the housing.
Problem: Maintenance light stays on
Some 2014 Chevrolet models have a cabin filter reminder. To reset it, turn the ignition to “ON” (without starting the engine), then press and hold the “OFF” button on the climate control panel for 5–10 seconds until the light blinks or turns off. Refer to your owner’s manual for model-specific instructions.
Problem: Mold or mildew smell persists
If the odor remains after replacing the filter, the evaporator core or ductwork may be contaminated. Consider using an HVAC cleaner spray or scheduling a professional duct cleaning.
When to Call a Professional
While changing the cabin filter is a straightforward DIY task, there are times when it’s best to seek help:
- If you can’t locate the filter or access panel
- If the glove box or housing is damaged and needs repair
- If you suspect a refrigerant leak or HVAC malfunction
- If you’re uncomfortable working inside the dashboard area
In these cases, a certified technician can safely diagnose and resolve the issue.
Conclusion
Changing the cabin air filter in your 2014 Chevrolet SUV is a quick, easy, and rewarding maintenance task. Not only does it improve the air quality inside your vehicle, but it also helps your HVAC system run more efficiently and lasts longer. With just a screwdriver, a new filter, and 20 minutes of your time, you can breathe easier and drive healthier.
Remember to replace the filter every 12,000 to 15,000 miles, inspect it regularly, and keep your glove box and housing clean. By following this guide, you’ll save money, avoid unnecessary service visits, and keep your SUV’s interior fresh and comfortable year-round.
So the next time you notice a musty smell or weak airflow, don’t ignore it—grab a new filter and get to work. Your lungs (and your passengers) will thank you.