
Transform your SUV into a cozy sleeping space with a custom-built car camping platform. This step-by-step guide walks you through designing, building, and installing a sturdy, removable platform that maximizes storage and comfort—no fancy tools or experience required.
Key Takeaways
- Maximize space efficiently: A well-designed platform lets you sleep flat while storing gear underneath, turning your SUV into a functional camper.
- Use affordable, accessible materials: Plywood, 2x4s, and basic hardware are all you need—most available at any hardware store.
- Design for your specific SUV: Measure your vehicle’s cargo area carefully to ensure a snug, safe fit without damaging interiors.
- Prioritize safety and stability: Secure the platform properly to prevent shifting during travel and ensure it supports your weight without sagging.
- Make it removable and versatile: Build with portability in mind so you can easily take it out when not camping.
- Customize for comfort: Add padding, drawers, or fold-out extensions to enhance usability and sleep quality.
- Test before you camp: Always do a dry run at home to check fit, stability, and comfort before hitting the road.
Introduction: Why Build a Car Camping Platform for Your SUV?
So you’ve got an SUV, a sense of adventure, and a dream of sleeping under the stars—without sleeping on the cold, hard floor. That’s where a car camping platform comes in. Whether you’re road-tripping through national parks, weekend camping, or just need a quick overnight setup in your driveway, a DIY camping platform turns your SUV into a cozy, functional sleeping space.
Building your own platform is not only cost-effective—saving you hundreds compared to pre-made options—but also lets you customize it perfectly to your vehicle and needs. You’ll gain extra storage underneath, a flat sleeping surface, and the freedom to camp almost anywhere. Plus, it’s a fun weekend project that doesn’t require advanced woodworking skills.
In this guide, we’ll walk you through everything you need to know: from measuring your SUV and choosing materials, to cutting, assembling, and installing your platform. By the end, you’ll have a sturdy, removable camping platform that makes car camping comfortable, organized, and stress-free.
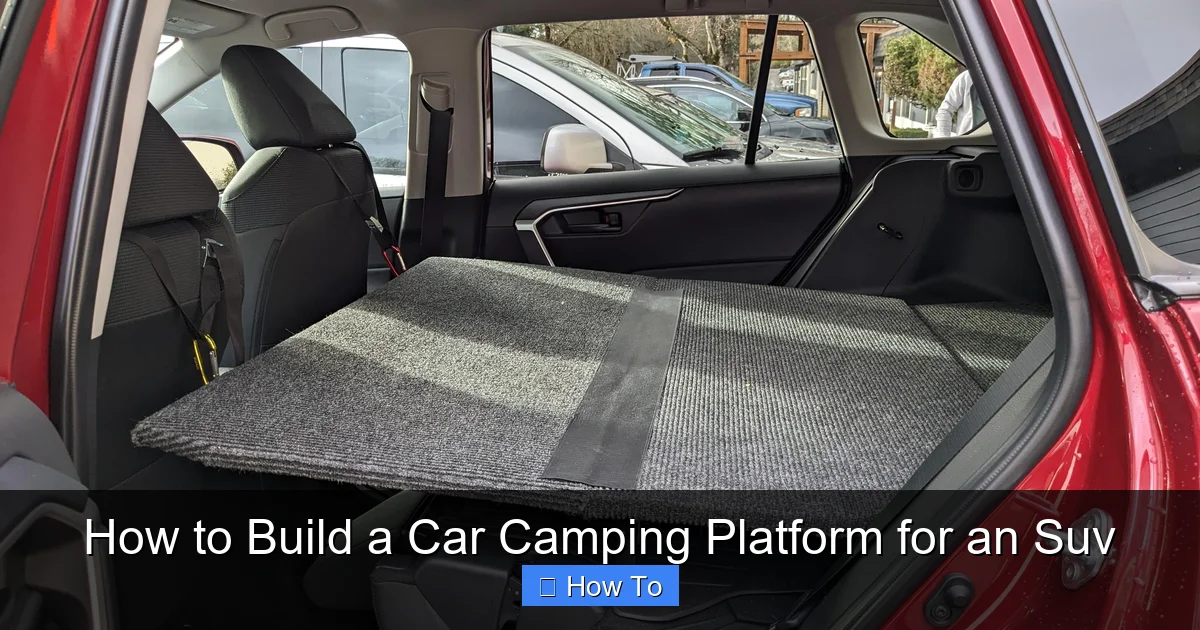
Step 1: Measure Your SUV’s Cargo Area
Before you buy a single screw or board, you need accurate measurements. Every SUV is different—some have flat floors, others have wheel wells, seat brackets, or uneven surfaces. Taking precise measurements ensures your platform fits snugly and safely.
Visual guide about How to Build a Car Camping Platform for an Suv
Image source: suvrving.com
Gather Your Tools
You’ll need:
- A tape measure
- A notepad or phone app to record dimensions
- A flashlight (to see under seats and in corners)
- A level (optional, but helpful)
Measure Key Dimensions
Start by removing any floor mats, cargo covers, or seats that might interfere. Then measure:
- Length: From the back of the front seats (or rear of the second row) to the tailgate.
- Width: At the widest point, usually between the wheel wells. Measure both at the top and bottom of the cargo area—some SUVs taper.
- Height: From the floor to the bottom of the tailgate opening. This tells you how thick your platform can be.
- Wheel well clearance: Measure the height and width of the wheel wells. You’ll need to account for these in your design.
- Seat bracket locations: Note where seat mounts or anchors are—these can interfere with platform placement.
Account for Seat Recline and Movement
If your rear seats recline or fold, test different positions. You want your platform to fit when the seats are in their most upright position (for maximum cargo space). Also, check if the seats fold flat—some SUVs have a slight ramp when folded, which affects platform height.
Create a Simple Sketch
Draw a rough top-down and side-view sketch of your cargo area. Label all measurements and note obstacles like wheel wells, seat brackets, or spare tire compartments. This sketch will guide your build and help you visualize the final product.
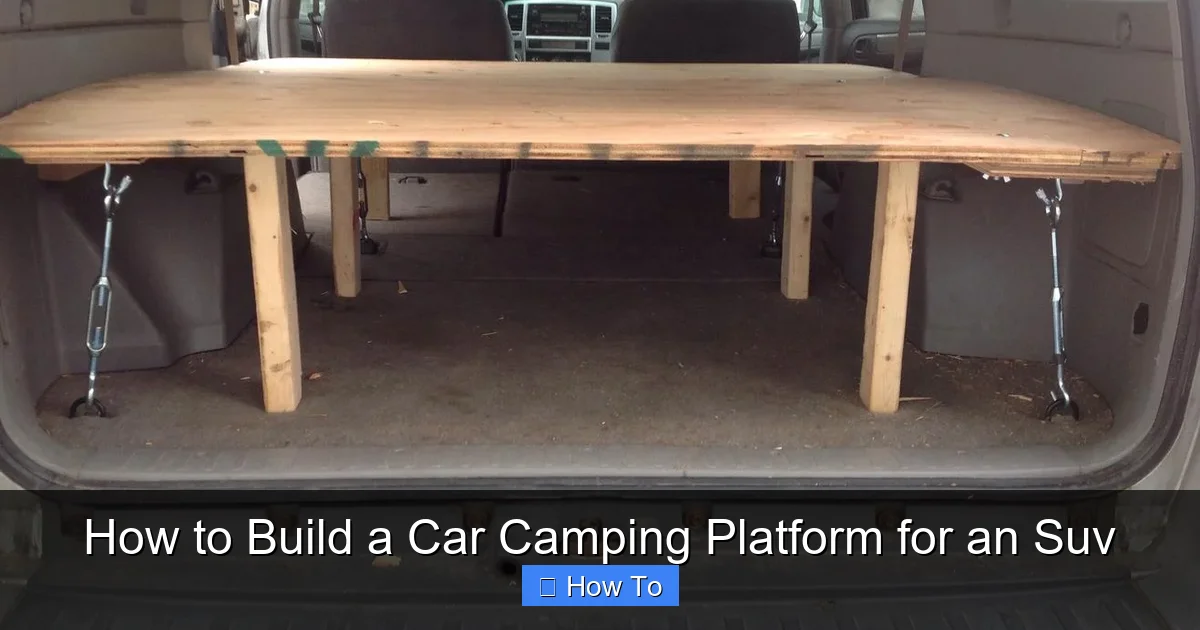
Step 2: Design Your Platform
Now that you have your measurements, it’s time to design your platform. The goal is a flat, stable surface that spans the cargo area, clears wheel wells, and leaves room underneath for gear.
Visual guide about How to Build a Car Camping Platform for an Suv
Image source: content.instructables.com
Choose the Platform Style
There are three common designs:
- Single-level platform: A flat board across the entire cargo area. Simple and sturdy, but may not clear wheel wells.
- Raised platform: Elevated on legs or supports to create storage underneath. Ideal for maximizing space.
- Modular or split platform: Two or more pieces that fit around wheel wells or seat brackets. Easier to remove and store.
For most SUVs, a raised modular platform works best. It gives you storage, fits around obstacles, and is easier to handle.
Determine Platform Height
The height depends on how much storage you want underneath and how thick your materials are. A common height is 6–8 inches. This gives enough room for duffel bags, coolers, or bins while keeping the sleeping surface low enough for comfort.
Subtract the height of your supports (e.g., 2x4s = 3.5 inches) from your total desired height to determine how tall your legs or frames should be.
Plan for Wheel Wells and Obstacles
Your platform should sit above the wheel wells, not over them. Use your sketch to mark where cuts or notches are needed. For example, if your wheel wells are 6 inches high and 12 inches wide, design supports that go around them.
Decide on Removability
Will you leave the platform in full-time, or take it out when not camping? If removable, consider:
- Using lightweight materials
- Adding handles
- Building in sections that fit together easily
- Using quick-release fasteners or straps
Sketch the Final Design
Draw your platform from top, side, and front views. Include dimensions, support locations, and any cutouts. This will serve as your blueprint during construction.
Step 3: Gather Materials and Tools
Now that your design is ready, it’s time to gather supplies. You don’t need expensive or exotic materials—just sturdy, affordable basics.
Materials List
Here’s what you’ll typically need:
- 1/2″ or 3/4″ plywood: For the platform surface. 3/4″ is stronger but heavier. Use exterior-grade or sanded plywood for durability.
- 2×4 lumber: For supports, legs, and framing. You’ll need about 8–12 linear feet, depending on your design.
- Wood screws: 1.5″ and 2.5″ screws for assembly. Use deck or exterior screws to prevent rust.
- Wood glue: Adds strength to joints.
- Sandpaper or sander: To smooth rough edges.
- Optional: Carpet, foam padding, or vinyl: For a more comfortable sleeping surface.
- Optional: Drawer slides, hinges, or latches: If adding storage drawers or fold-out features.
Tools You’ll Need
- Circular saw or jigsaw (for cutting plywood)
- Drill/driver
- Measuring tape
- Square (to ensure straight cuts)
- Clamps (to hold pieces while gluing/screwing)
- Safety gear: goggles, gloves, mask
Where to Buy
Most materials are available at Home Depot, Lowe’s, or local hardware stores. Check for sales on plywood and lumber. If you’re on a budget, ask about “project panels” or cut-offs—they’re often cheaper and pre-cut to size.
Step 4: Cut the Wood
With materials in hand, it’s time to cut. Accuracy here is key—measure twice, cut once!
Cut the Platform Surface
Using your design sketch, cut the plywood to the length and width of your cargo area. If your platform is modular, cut it into two or more pieces. For example, a two-piece platform might be easier to handle and store.
Tip: Use a straight edge or guide to ensure clean, straight cuts. A circular saw with a fine-tooth blade works best for plywood.
Cut the Supports and Legs
Cut 2x4s to the height of your platform legs. For a 7-inch raised platform with 3/4″ plywood, cut legs to 6.25 inches (7 – 0.75 = 6.25).
If your design includes cross-braces or frames, cut those to fit between the legs or along the edges.
Cut Around Wheel Wells (If Needed)
If your platform needs notches for wheel wells, mark the cutout on the plywood and use a jigsaw to carefully remove the section. Sand the edges smooth to prevent splinters.
Label Your Pieces
Use a pencil to label each piece (e.g., “Left Panel,” “Front Support”) so you don’t get confused during assembly.
Step 5: Assemble the Platform
Now comes the fun part—putting it all together. Take your time, and double-check alignment as you go.
Attach Legs to the Platform
Flip the plywood panel upside down. Position the 2×4 legs at each corner and at the center (for longer platforms). Use wood glue and screws to secure them. Pre-drill holes to prevent splitting.
For extra stability, add cross-braces between the legs. Screw 2x4s horizontally between the legs at the top and bottom.
Reinforce the Frame
If your platform is long (over 4 feet), add a center support beam underneath. This prevents sagging when you lie on it.
Join Modular Pieces (If Applicable)
If your platform has two panels, connect them with hinges, brackets, or simple butt joints. Hinges allow the panels to fold for storage. For a flat surface, use metal joining plates or wooden cleats underneath.
Sand All Edges
Use sandpaper or a sander to smooth any rough spots, especially on the top surface and edges. This prevents splinters and makes the platform safer to handle.
Optional: Add a Finish
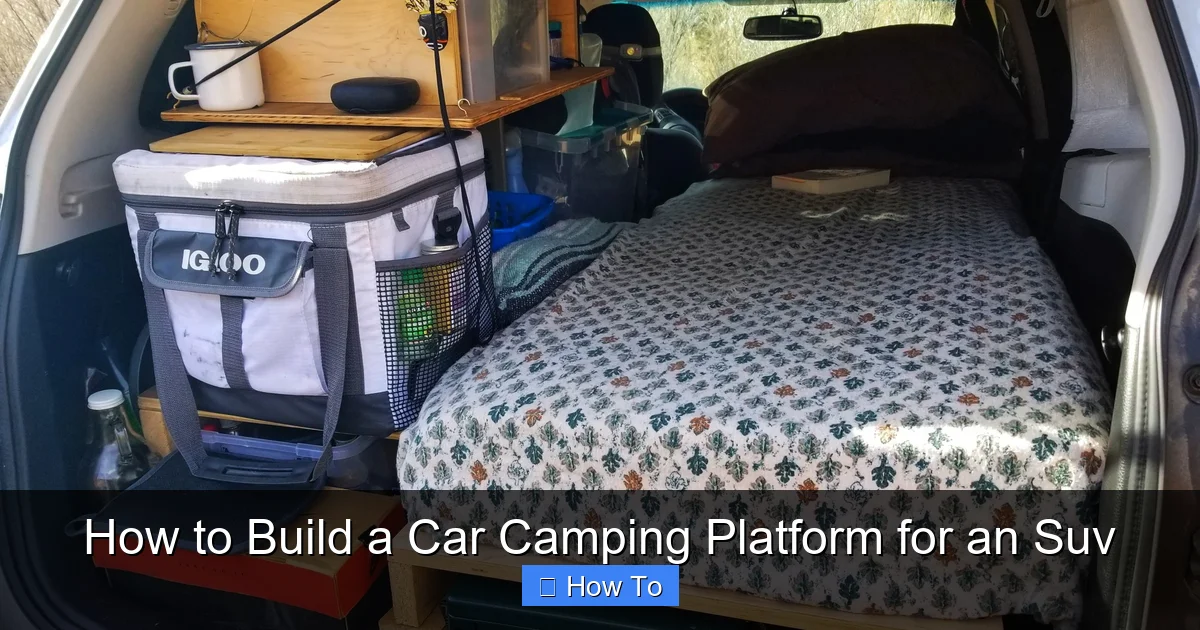
Apply a coat of outdoor wood sealant or paint to protect the wood from moisture. If you plan to sleep directly on it, consider adding a layer of carpet, foam mattress topper, or vinyl flooring for comfort.
Step 6: Install and Secure the Platform
Your platform is built—now let’s get it into your SUV safely.
Test Fit in Your SUV
Place the platform in the cargo area. Make sure it sits flat, clears the wheel wells, and doesn’t interfere with seat operation. Lie on it to test comfort and stability.
Secure the Platform
You don’t want your platform sliding around while driving. Here are a few secure options:
- Ratchet straps: Loop through cargo hooks and around the platform legs.
- Non-slip mat: Place a rubber mat (like a yoga mat or truck bed liner) underneath to prevent sliding.
- Custom brackets: Bolt or screw the platform to existing anchor points (only if removable and safe).
- Bungee cords: For lightweight platforms, bungees can work in a pinch.
Never use glue or permanent fasteners unless you’re okay with modifying your vehicle.
Add Handles (Optional)
Drill holes or attach rope handles to the sides for easier lifting and removal.
Step 7: Customize for Comfort and Function
Your basic platform is ready, but a few upgrades can make it even better.
Add Storage Drawers
Mount shallow drawers on drawer slides underneath the platform. Use plywood or plastic bins. Label them for easy access.
Install a Mattress Topper
A 2-inch memory foam topper makes a huge difference in sleep quality. Cut it to fit your platform and secure with straps or Velcro.
Include Lighting
Add battery-powered LED strip lights underneath for ambient lighting. Great for finding gear at night.
Create a Fold-Out Table
Attach a small hinged table to the side of the platform for cooking or working.
Use Modular Bins
Store gear in labeled plastic bins that slide in and out easily. This keeps things organized and protects your items.
Troubleshooting Common Issues
Even with careful planning, you might run into a few hiccups. Here’s how to fix them.
Platform Sags in the Middle
Cause: Insufficient support or weak plywood.
Solution: Add a center support beam or upgrade to 3/4″ plywood. Reinforce with additional cross-braces.
Platform Shifts While Driving
Cause: Not secured properly.
Solution: Use ratchet straps anchored to cargo hooks. Add a non-slip mat underneath.
Doesn’t Fit Around Wheel Wells
Cause: Incorrect measurements or cuts.
Solution: Double-check your measurements. Use a jigsaw to carefully trim the platform. Consider a modular design next time.
Too Heavy to Remove
Cause: Thick materials or large size.
Solution: Switch to 1/2″ plywood or build in smaller sections. Add handles for easier lifting.
Splintering or Rough Edges
Cause: Poor sanding or low-quality wood.
Solution: Sand all edges thoroughly. Apply wood filler to cracks and seal with varnish.
Conclusion: Enjoy Your DIY Car Camping Setup
Congratulations! You’ve built a custom car camping platform that fits your SUV perfectly. Not only did you save money, but you also gained a deeper understanding of your vehicle’s layout and your own camping needs.
This platform opens up a world of adventure—whether you’re chasing sunsets in the desert, hiking mountain trails, or just enjoying a quiet night under the stars. With a little creativity, you can keep improving it: add solar lights, a portable stove mount, or even a privacy curtain.
Remember, the best camping setup is one that’s safe, comfortable, and easy to use. Test your platform before your first trip, and don’t hesitate to tweak the design as you go. Happy camping!