
Resetting the maintenance light on your Toyota RAV4 is quick and easy—no mechanic required. Whether you’ve just changed the oil or completed routine service, this guide walks you through the process for every model year, from the early 2000s to the latest 2024 RAV4.
Key Takeaways
- Know your model year: Reset procedures vary slightly between generations, so identifying your RAV4’s year is the first step.
- Use the trip meter button: Most RAV4 models use the trip/reset button on the instrument cluster to access maintenance reset modes.
- Turn the ignition on (not start): You don’t need to start the engine—just turn the key to the “ON” position or press the start button without your foot on the brake.
- Follow the sequence carefully: Timing matters. Hold buttons for the correct duration and watch for the light to blink or turn off.
- Confirm the reset: After completing the steps, turn the ignition off and back on to ensure the maintenance light is gone.
- When to reset: Only reset the light after performing the required maintenance, such as an oil change or tire rotation.
- Consult your owner’s manual: For rare or complex cases, your RAV4’s manual provides model-specific guidance.
📑 Table of Contents
- Why Does the Maintenance Light Come On?
- Tools and Preparation Needed
- Step-by-Step Guide for 2006–2012 Toyota RAV4 Models
- Resetting the Light on 2013–2018 Toyota RAV4 Models
- How to Reset the Maintenance Light on 2019–2024 Toyota RAV4
- Troubleshooting Common Issues
- When Should You Reset the Maintenance Light?
- Final Tips for RAV4 Owners
Why Does the Maintenance Light Come On?
If you’ve ever been behind the wheel of your Toyota RAV4 and noticed a little wrench icon or “MAINT REQD” message lighting up on your dashboard, you’re not alone. This light is part of Toyota’s Maintenance Reminder System—a smart feature designed to help you stay on top of routine service. It’s not a warning that something is broken, but rather a friendly nudge that it’s time for scheduled maintenance, like an oil change, tire rotation, or filter replacement.
The maintenance light typically comes on every 5,000 to 10,000 miles, depending on your driving habits and the specific service interval set by Toyota. For most RAV4 models, the system tracks mileage and engine runtime to estimate when service is due. Once the threshold is reached, the light illuminates to remind you to visit your mechanic or perform the service yourself.
It’s important to understand that this light is different from the “Check Engine” light. The maintenance light is preventive, not diagnostic. It doesn’t indicate a problem—just that it’s time for routine care. Ignoring it won’t damage your vehicle immediately, but skipping regular maintenance can lead to reduced performance, lower fuel efficiency, and costly repairs down the road.
So, once you’ve completed the required service, the next step is resetting the light. And the good news? You don’t need to visit a dealership or pay a technician. With a few simple steps, you can reset the maintenance light on your Toyota RAV4 right from your driveway.
Tools and Preparation Needed
Visual guide about How to Reset Maintenance Light on Toyota Rav4
Image source: i.ytimg.com
Before diving into the reset process, let’s make sure you’re prepared. The beauty of resetting the maintenance light on a Toyota RAV4 is that it requires no special tools—just your hands and a few minutes of your time. However, there are a few things to keep in mind to ensure a smooth experience.
First, make sure your vehicle is parked on a flat surface and the engine is off. You’ll be working with the ignition in the “ON” position, so it’s safest to keep the car in “Park” (for automatic transmissions) and engage the parking brake. This prevents any accidental movement while you’re focused on the dashboard.
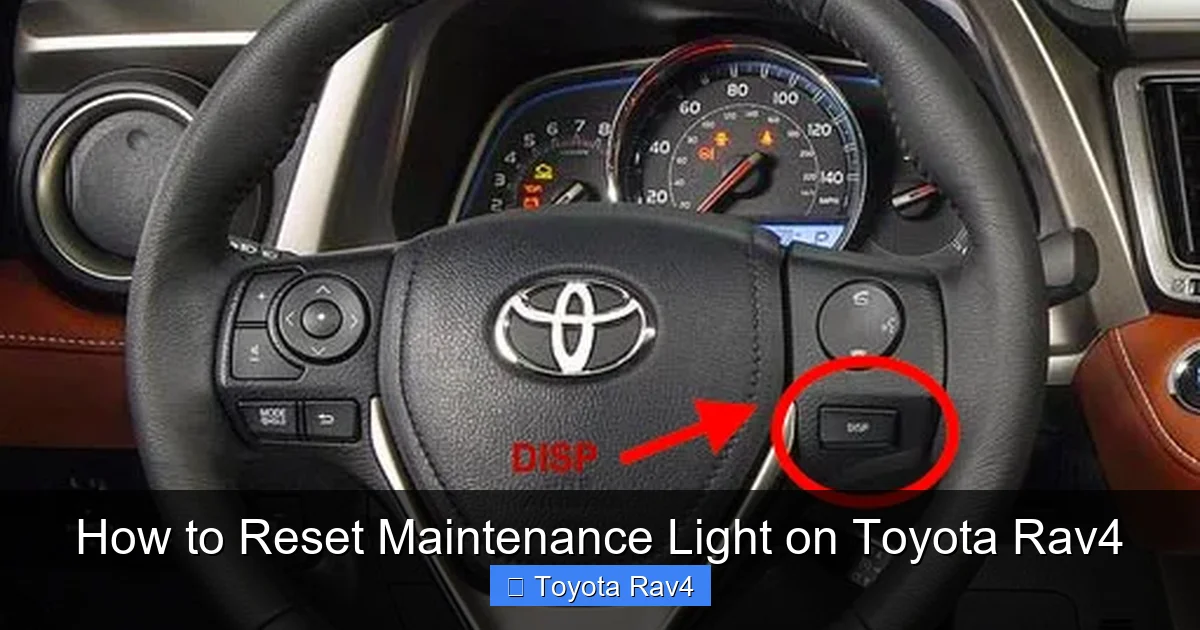
Next, locate the trip meter button. This is usually found on the right side of the instrument cluster, near the speedometer. It’s labeled “TRIP” or “ODO/TRIP” and is used to switch between odometer and trip readings. You’ll be using this button repeatedly during the reset process, so make sure it’s easily accessible.
You’ll also want to have your owner’s manual handy—especially if you’re driving an older or less common model year. While most RAV4s follow a similar reset pattern, there are slight variations between generations. If you don’t have the physical manual, you can often find a digital copy on Toyota’s official website by entering your VIN or model details.
Finally, confirm that the maintenance you’re resetting the light for has actually been completed. There’s no point in clearing the reminder if you haven’t changed the oil or rotated the tires. Resetting the light prematurely could lead to missed service intervals, which defeats the purpose of the system.
With these basics covered, you’re ready to begin. No scanners, no apps, no extra cost—just you, your RAV4, and a few button presses.
Step-by-Step Guide for 2006–2012 Toyota RAV4 Models
If you’re driving a Toyota RAV4 from 2006 to 2012, you’re in luck—this generation uses one of the simplest reset procedures. These models feature a mechanical trip button and a straightforward sequence that takes less than a minute to complete. Let’s walk through it step by step.
Step 1: Turn the Ignition to “ON”
Start by getting into your driver’s seat and closing the door. Insert your key into the ignition and turn it to the “ON” position. This powers up the dashboard and instrument cluster, but does not start the engine. You’ll see all the warning lights briefly illuminate—this is normal. If your RAV4 has a push-button start, press the “Start” button once without pressing the brake pedal. The dashboard should light up, and the engine should remain off.
Step 2: Locate the Trip Button
Look at your instrument cluster. On the right side, you’ll see a small button labeled “TRIP” or “ODO/TRIP.” This button cycles through your odometer and trip readings. Press it once to make sure it’s working—you should see the display change from total mileage to trip A or trip B.
Step 3: Reset the Maintenance Light
Now, press and hold the trip button. While holding it down, turn the ignition from “OFF” to “ON” (or press the start button again if you have push-button ignition). Keep holding the trip button for about 5 to 10 seconds. During this time, watch the “MAINT REQD” light on the dashboard. It should begin to blink, then eventually turn off completely.
Once the light goes out, release the trip button. The reset is now complete.
Step 4: Confirm the Reset
To make sure the reset worked, turn the ignition off and then back on. The maintenance light should no longer appear. If it does, repeat the process—sometimes it takes a second try, especially if the timing wasn’t perfect.
A quick tip: Some drivers find it helpful to count slowly to 10 while holding the button. This ensures you’re holding it long enough for the system to register the reset.
This method works reliably for most 2006–2012 RAV4s, including both gas and hybrid versions. If you’re still seeing the light after trying this, double-check that your ignition is fully in the “ON” position and that you’re holding the button long enough.
Resetting the Light on 2013–2018 Toyota RAV4 Models
The 2013–2018 Toyota RAV4 models introduced a slightly updated dashboard and a more refined reset procedure. While still simple, the steps differ slightly from earlier models, so it’s important to follow the correct sequence. These vehicles often use a combination of the trip button and the odometer display to initiate the reset.
Step 1: Access the Trip Menu
Start by turning the ignition to the “ON” position—again, no need to start the engine. Use the trip button to cycle through the displays until you see “Trip A” or “Trip B” on the screen. It doesn’t matter which one you choose, as long as you’re in trip mode.
Step 2: Initiate the Reset Sequence
With the trip display showing, press and hold the trip button. While holding it, turn the ignition off and then back to “ON.” Keep holding the button throughout this process. After a few seconds, the “MAINT REQD” light should begin to flash.
Continue holding the button until the light stops flashing and turns off completely. This usually takes about 10 to 15 seconds. Once the light is off, release the button.
Step 3: Verify the Reset
Turn the ignition off, wait a few seconds, and then turn it back on. The maintenance light should no longer appear. If it does, repeat the process, making sure you’re holding the button the entire time during the ignition cycle.
One thing to note: On some 2013–2018 RAV4s, the light may reset automatically after a successful oil change if the vehicle is equipped with an advanced maintenance tracking system. However, manually resetting ensures the reminder is cleared immediately.
This method is consistent across both the standard RAV4 and the RAV4 Hybrid from this generation. The key is patience—don’t rush the hold time, and make sure the ignition is fully cycled.
How to Reset the Maintenance Light on 2019–2024 Toyota RAV4
The latest generation of the Toyota RAV4, from 2019 to 2024, features a more modern infotainment system and digital instrument cluster. While the reset process is still do-it-yourself friendly, it involves a few extra steps due to the updated interface. These models often use a combination of the steering wheel controls and the multi-information display (MID).
Step 1: Use the Steering Wheel Controls
Start by turning the ignition to “ON.” Use the arrow buttons on the left side of your steering wheel to navigate the menu on the multi-information display. Scroll through the options until you find “Vehicle Settings” or “Maintenance.”
Step 2: Access the Maintenance Menu
Once you’ve highlighted the maintenance or vehicle settings option, press the “OK” or “Enter” button (usually in the center of the arrow keys). You should now see a list of maintenance items, such as oil life, tire pressure, and filters.
Step 3: Reset the Oil Life or Maintenance Light
Highlight the “Oil Life” or “Maintenance Reset” option and press “OK.” The system will ask you to confirm the reset. Select “Yes” or “Reset” using the arrow keys and confirm again.
After confirmation, the maintenance light should disappear from the dashboard. The oil life percentage (if displayed) will reset to 100%.
Step 4: Confirm the Reset
Turn the ignition off and then back on. Check the dashboard to ensure the “MAINT REQD” light is no longer visible. If it’s still on, repeat the process, making sure you’ve navigated to the correct menu.
A helpful tip: Some 2021–2024 RAV4s with the larger touchscreen may require you to go through the main infotainment system. In that case, tap “Apps” > “Vehicle” > “Maintenance” and follow the on-screen prompts.
This method works for both the gas-powered RAV4 and the RAV4 Hybrid, including the plug-in hybrid (RAV4 Prime). The digital interface makes it easier to track multiple service intervals, but also means you need to be comfortable navigating menus.
Troubleshooting Common Issues
Even with clear instructions, sometimes the maintenance light reset doesn’t go as planned. Don’t worry—this is common, and usually fixable with a few adjustments. Here are some of the most frequent issues and how to resolve them.
The Light Won’t Turn Off
If you’ve followed the steps correctly but the “MAINT REQD” light remains on, the most likely cause is timing. On older models, holding the trip button for too short or too long can prevent the reset. Try the process again, this time holding the button for a full 10–15 seconds while cycling the ignition.
Another possibility is that the ignition wasn’t fully in the “ON” position. Make sure all dashboard lights are illuminated before starting the reset sequence.
The Light Resets But Comes Back On
If the light disappears after resetting but returns after driving a few miles, it could mean the system didn’t register the reset properly. This sometimes happens if the vehicle’s computer hasn’t completed a full drive cycle. Try driving for 10–15 minutes at varying speeds to allow the system to recalibrate.
Alternatively, the maintenance interval may have been set incorrectly. Some RAV4s allow you to adjust the reminder interval in the settings menu. Check your owner’s manual to see if this applies to your model.
No Trip Button or Digital Interface
On very early RAV4 models (pre-2006), the reset procedure may involve a combination of dashboard buttons or even a hidden reset sequence. In these cases, consulting the owner’s manual is essential. Some older models require you to press and hold multiple buttons simultaneously while turning the ignition.
If you’re unable to find the correct method, consider visiting a Toyota service center. They can reset the light using a diagnostic tool, though this usually comes with a small fee.
Battery Disconnection Myth
Some drivers believe that disconnecting the car battery will reset the maintenance light. While this may temporarily clear some warning lights, it won’t reliably reset the maintenance reminder on modern RAV4s. In fact, disconnecting the battery can reset other systems, like radio presets and clock settings, which is unnecessary.
Stick to the manufacturer-recommended reset procedure for the best results.
When Should You Reset the Maintenance Light?
Resetting the maintenance light isn’t just about clearing a dashboard warning—it’s about maintaining your RAV4’s health. The light is designed to remind you when it’s time for routine service, so it should only be reset after that service has been completed.
After an Oil Change
The most common reason for the maintenance light to come on is an oil change. Toyota recommends changing the oil every 5,000 to 10,000 miles, depending on driving conditions. If you’ve just had your oil and filter changed—either by a mechanic or yourself—this is the perfect time to reset the light.
After Tire Rotation or Alignment
Some RAV4 models track tire wear and may trigger the maintenance light after a certain mileage. If you’ve recently rotated your tires or had an alignment, resetting the light ensures the system starts counting from zero.
After Replacing Filters
Air filters, cabin filters, and fuel filters are part of routine maintenance. If you’ve replaced any of these components, it’s a good idea to reset the light to reflect the updated service status.
After a Full Service Inspection
If you’ve taken your RAV4 in for a comprehensive inspection—including brake checks, fluid top-offs, and battery testing—resetting the maintenance light marks the completion of that service cycle.
Remember: Resetting the light without performing the required maintenance is like silencing a smoke alarm without putting out the fire. It may make you feel better temporarily, but it doesn’t solve the underlying issue.
Final Tips for RAV4 Owners
Now that you know how to reset the maintenance light on your Toyota RAV4, here are a few bonus tips to keep your SUV running smoothly for years to come.
First, keep a maintenance log. Whether it’s a notebook in the glove box or a digital app on your phone, tracking your service history helps you stay on schedule and can increase your vehicle’s resale value.
Second, use high-quality parts and fluids. Toyota recommends synthetic oil for most modern RAV4s, and using the right oil filter and air filter can extend engine life.
Third, don’t ignore other dashboard warnings. While the maintenance light is routine, lights like “Check Engine,” “ABS,” or “Tire Pressure” indicate potential issues that need immediate attention.
Finally, if you’re ever unsure about the reset process, consult your owner’s manual or visit a Toyota dealership. They can guide you through the steps or perform the reset for you.
Resetting the maintenance light is a small task, but it’s a big step toward responsible car ownership. With this guide, you’re equipped to handle it confidently—no matter which RAV4 model you drive.
Frequently Asked Questions
Can I reset the maintenance light without going to a mechanic?
Yes, you can easily reset the maintenance light on your Toyota RAV4 at home using the trip button or steering wheel controls. No special tools or dealership visit is required.
Why does the maintenance light keep coming back after I reset it?
This usually happens if the reset wasn’t completed correctly or if the vehicle hasn’t gone through a full drive cycle. Try repeating the reset process and drive for 10–15 minutes to allow the system to recalibrate.
Does the reset procedure work on all Toyota RAV4 models?
The basic method works for most models, but the exact steps vary by year. Always check your owner’s manual or use the guide above to find the correct procedure for your specific RAV4.
Will disconnecting the battery reset the maintenance light?
No, disconnecting the battery will not reliably reset the maintenance light on modern RAV4s. It may clear other systems, but the recommended method is using the trip button or menu settings.
How often should the maintenance light come on?
The light typically appears every 5,000 to 10,000 miles, depending on your driving habits and the service interval set by Toyota. It’s triggered by mileage and engine runtime.
What if my RAV4 has a push-button start?
For push-button models, press the “Start” button once without pressing the brake to turn the ignition to “ON.” Then follow the same reset steps using the trip button or steering wheel controls.