
This guide walks you through how to attach a Saris bike rack on an SUV with clear, easy-to-follow instructions. You’ll learn about compatibility, installation, safety checks, and troubleshooting to ensure a secure ride for your bikes.
Key Takeaways
- Check SUV compatibility first: Not all Saris racks fit every SUV—verify trunk, hitch, or roof compatibility before buying.
- Choose the right rack type: Hitch-mounted racks are most common for SUVs, but trunk and roof options exist depending on your vehicle and needs.
- Follow the manual closely: Saris provides detailed instructions—always refer to them for model-specific steps.
- Secure the rack properly: Use straps, locks, and support arms correctly to prevent wobbling or damage during transit.
- Test before driving: Always do a shake test and check bike stability before hitting the road.
- Maintain your rack: Regular cleaning and inspection extend the life of your Saris rack and keep it safe.
- Know weight limits: Never exceed the rack’s or your SUV’s towing capacity to avoid accidents or damage.
How to Attach a Saris Bike Rack on an SUV: A Complete Step-by-Step Guide
If you’re an outdoor enthusiast or a weekend cyclist, transporting your bike safely is essential. One of the most trusted brands in bike racks is Saris, known for their durable, user-friendly designs. Whether you’re heading to the mountains, the beach, or a local trail, knowing how to attach a Saris bike rack on an SUV ensures your bikes arrive in one piece—and your vehicle stays scratch-free.
This comprehensive guide will walk you through every step, from choosing the right rack to securing your bikes and troubleshooting common issues. By the end, you’ll feel confident installing and using your Saris rack like a pro.
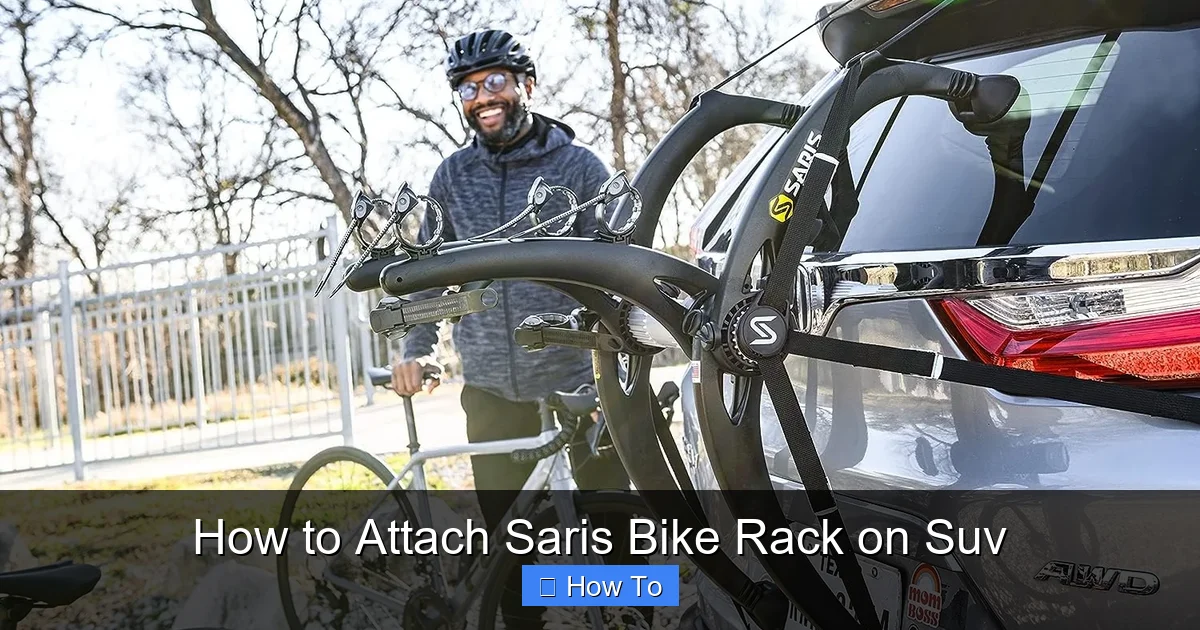
Why Choose a Saris Bike Rack for Your SUV?

Visual guide about How to Attach Saris Bike Rack on Suv
Image source: pyramydair.com
Saris has been a leader in bike transportation for over 40 years. Their racks are engineered for safety, ease of use, and compatibility with a wide range of vehicles—especially SUVs, which often have unique shapes and rear designs.
SUVs are popular among cyclists because they offer ample cargo space and ground clearance. However, their sloped trunks, rear spoilers, and large rear hatches can make rack installation tricky. Saris addresses these challenges with innovative designs like the Saris Bones trunk rack, the Saris SuperClamp EX hitch rack, and the Saris Freedom platform-style models.
These racks are built to handle the weight and size of modern SUVs while protecting both your vehicle and your bikes. Plus, many Saris models feature anti-sway cradles, locking mechanisms, and tool-free installation—making them a top choice for families, commuters, and adventure seekers alike.
Step 1: Determine Which Type of Saris Rack You Have
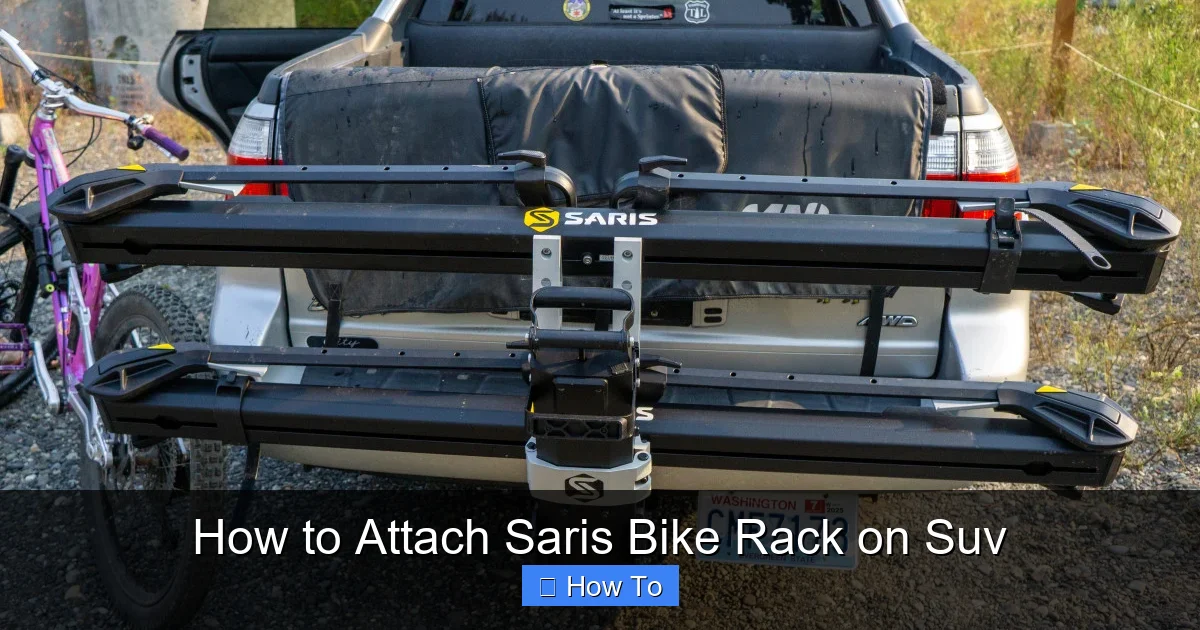
Visual guide about How to Attach Saris Bike Rack on Suv
Image source: bikemag.com
Before you begin, it’s important to know which type of Saris bike rack you own. The installation process varies significantly between models. Here are the three main types:
Trunk-Mounted Racks (e.g., Saris Bones)
These racks attach directly to the rear trunk or hatch of your SUV using straps and hooks. They’re lightweight, affordable, and don’t require a hitch. However, they may not be ideal for all SUVs due to curved trunks or rear cameras.
Hitch-Mounted Racks (e.g., Saris SuperClamp, Freedom)
These are the most popular for SUVs. They slide into a 1.25” or 2” receiver hitch and are extremely stable. They support more weight and allow easier access to the rear of the vehicle when not carrying bikes.
Roof-Mounted Racks (e.g., Saris Roof Rack Systems)
These require crossbars on your SUV’s roof and attach bikes upright or horizontally. They keep the rear of the vehicle clear but can reduce fuel efficiency and make low-clearance parking tricky.
Tip: Most SUV owners prefer hitch-mounted racks because they’re secure, easy to load, and don’t scratch the vehicle. If you’re unsure, check your SUV’s owner manual or consult Saris’s online compatibility tool.
Step 2: Gather Your Tools and Materials
You don’t need a full toolbox to install a Saris rack, but having the right items on hand makes the process smoother. Here’s what you’ll typically need:
- Your Saris bike rack (fully assembled or in parts)
- Owner’s manual (included with the rack)
- Measuring tape (to check spacing and alignment)
- Soft cloth or towel (to protect your SUV’s paint)
- Rubber mallet (optional, for adjusting tight parts)
- Bike locks (recommended for security)
- Torque wrench (for hitch-mounted racks, if specified)
Pro Tip: Lay out all parts on a clean surface before starting. This helps you confirm nothing is missing and gives you a clear view of the assembly process.
Step 3: Prepare Your SUV
Before attaching the rack, take a few minutes to prepare your vehicle. This prevents damage and ensures a secure fit.
Clean the Installation Area
Wipe down the trunk, hatch, or hitch area with a damp cloth. Remove dirt, grease, or debris that could interfere with straps or hooks. For hitch-mounted racks, inspect the receiver for rust or damage.
Check for Obstacles
Look for rearview cameras, license plate lights, or sensors near the trunk. Some Saris trunk racks come with extensions or padding to avoid blocking these features. If your SUV has a rear spoiler, ensure the rack’s arms won’t press against it.
Open the Rear Hatch (If Applicable)
For trunk-mounted racks, open the hatch to access the inside edges where straps will attach. This gives you better leverage and visibility.
Step 4: Install a Trunk-Mounted Saris Rack (e.g., Saris Bones)
If you have a trunk-mounted Saris rack, follow these steps carefully. The Saris Bones series is one of the most popular, known for its sleek design and strong grip.
Step 4.1: Position the Rack on the Trunk
Place the rack upside down on the ground behind your SUV. Flip it over and position it centered on the trunk or hatch. The top arms should rest just below the roofline, and the bottom arms should align with the lower edge of the trunk.
Step 4.2: Attach the Top Straps
Lift the top arms and hook the rubber-coated hooks over the top edge of the trunk. Make sure the hooks are secure and not twisted. Pull the straps tight, but don’t overtighten—this can warp the trunk or damage paint.
Step 4.3: Secure the Bottom Straps
Attach the bottom hooks to the lower edge of the trunk or under the bumper (depending on your SUV model). Again, ensure the hooks are seated properly and the straps are snug.
Step 4.4: Connect the Side Straps
Most Saris trunk racks have side straps that wrap around the sides of the vehicle. Thread these through the designated loops and tighten evenly. This prevents the rack from shifting side to side.
Step 4.5: Tighten All Straps
Go around the rack and tighten each strap incrementally. Use a crisscross pattern to maintain balance. The rack should feel firm but not overly stressed.
Step 4.6: Test the Fit
Gently shake the rack side to side and up and down. It should move no more than 1–2 inches. If it wobbles excessively, recheck the straps and reposition the hooks.
Tip: Place a soft towel between the rack arms and your SUV’s paint to prevent scratches, especially on curved surfaces.
Step 5: Install a Hitch-Mounted Saris Rack (e.g., Saris SuperClamp or Freedom)
Hitch-mounted racks are the gold standard for SUVs. They’re stable, easy to load, and don’t touch the vehicle’s body. Here’s how to install one properly.
Step 5.1: Insert the Rack into the Hitch
Slide the rack’s shank into your SUV’s receiver hitch. Make sure it’s fully seated. If you have a 2” hitch, use the included sleeve for a 1.25” rack (or vice versa).
Step 5.2: Secure with the Hitch Pin
Insert the hitch pin through the shank and receiver. Tighten the bolt or use a locking pin if your model includes one. For added security, use a torque wrench to tighten to the manufacturer’s specification (usually 15–20 ft-lbs).
Step 5.3: Extend the Rack Arms
Pull out the bike support arms until they lock into place. Some models have a quick-release lever; others require you to twist or slide the arms.
Step 5.4: Adjust the Tilt (If Applicable)
Many Saris hitch racks tilt away from the vehicle for trunk access. Test this feature by pulling the release handle and tilting the rack back. It should hold firmly in both upright and tilted positions.
Step 5.5: Lock the Rack (Optional)
If your rack has a built-in lock, engage it now. This prevents theft and adds peace of mind when parked.
Tip: Always check that the rack is level. A tilted rack can cause bikes to hang unevenly and increase wind resistance.
Step 6: Load Your Bikes Safely
Now that your rack is secure, it’s time to load your bikes. Proper loading prevents damage and ensures a smooth ride.
Step 6.1: Position the First Bike
Place the first bike on the rack with the frame resting in the designated cradles. For platform-style racks, position the wheels in the wheel trays.
Step 6.2: Secure the Frame and Wheels
Use the rack’s built-in straps or clamps to secure the bike frame. Tighten them firmly but avoid over-tightening, which can crack carbon frames. For wheel straps, loop them around the tire and tighten until the wheel doesn’t move.
Step 6.3: Add Additional Bikes
Repeat the process for each additional bike. Space them evenly to prevent contact. Some Saris racks have anti-sway bars or separators to keep bikes from rubbing.
Step 6.4: Double-Check All Connections
After loading, go over every strap, clamp, and lock. Make sure nothing is loose or dangling.
Tip: Use bike frame protectors or foam pads if your rack doesn’t include them. This prevents scratches and reduces vibration.
Step 7: Perform a Final Safety Check
Before driving, do a thorough inspection to ensure everything is secure.
Step 7.1: Shake Test
Grab the rack and shake it firmly. It should not move more than an inch in any direction. If it wobbles, recheck the installation.
Step 7.2: Check Bike Stability
Gently push each bike side to side. They should not shift or sway. If they do, tighten the straps or reposition the bikes.
Step 7.3: Verify Clearance
Ensure the bikes don’t block your license plate, taillights, or rearview camera. This is not only unsafe but also illegal in many areas.
Step 7.4: Test Trunk Access (If Applicable)
If your rack tilts, test opening the hatch with bikes loaded. Make sure there’s enough clearance.
Troubleshooting Common Issues
Even with careful installation, problems can arise. Here’s how to fix the most common ones.
Rack Wobbles or Shakes
This is usually due to loose straps or an improperly seated hitch pin. Recheck all connections and tighten as needed. For hitch racks, consider using a hitch tightener or anti-rattle device.
Bikes Rub Together
Add bike separators or use longer frame straps to increase spacing. Avoid overloading the rack—most Saris models support 2–4 bikes max.
Straps Slip or Loosen During Drive
Use cam-lock straps instead of buckle types, or add extra tie-downs. Check straps periodically on long trips.
Rear Camera or Sensors Are Blocked
Reposition the rack or use a model with a lower profile. Some Saris racks offer extensions to move bikes further back.
Rust or Corrosion on Hitch
Clean the hitch regularly and apply a light coat of grease to the shank. Store the rack indoors when not in use.
Maintenance Tips for Long-Term Use
To keep your Saris rack in top condition:
- Clean it after every trip, especially if exposed to salt, mud, or sand.
- Inspect straps, bolts, and locks for wear and replace as needed.
- Lubricate moving parts (like tilt mechanisms) with silicone spray.
- Store the rack in a dry place to prevent rust.
- Check compatibility if you upgrade your SUV.
Conclusion
Attaching a Saris bike rack to your SUV doesn’t have to be complicated. With the right preparation, tools, and attention to detail, you can install it safely and confidently. Whether you choose a trunk, hitch, or roof model, following the steps in this guide ensures your bikes are secure and your vehicle is protected.
Remember: how to attach a Saris bike rack on an SUV is all about compatibility, proper installation, and regular maintenance. Take your time, double-check everything, and enjoy the freedom of taking your bikes wherever the road leads.
Happy cycling!