
Resetting the maintenance light on your 2014 Toyota RAV4 is quick and simple—no mechanic needed. With just the ignition, trip button, and a few seconds, you can clear the reminder and stay on top of your vehicle’s service schedule.
If you own a 2014 Toyota RAV4, you’ve probably seen that little yellow wrench icon or “Maintenance Required” message pop up on your dashboard. It’s easy to ignore—after all, your SUV is still running fine, right? But that light isn’t there to scare you. It’s actually a helpful reminder that your vehicle is due for routine service, like an oil change, tire rotation, or filter replacement. Ignoring it won’t cause immediate damage, but skipping regular maintenance can lead to bigger—and more expensive—problems down the road.
The good news? Resetting the maintenance light on your 2014 RAV4 is surprisingly simple. You don’t need special tools, a trip to the dealership, or even a mechanic. With just a few steps using the buttons on your dashboard, you can clear the reminder and get back to driving with peace of mind. Whether you’ve just changed your oil at home or had your RAV4 serviced at a shop, knowing how to reset this light ensures your vehicle’s service schedule stays accurate and visible.
In this guide, we’ll walk you through the entire process step by step. We’ll explain what the maintenance light means, why it’s important to reset it properly, and exactly how to do it on your 2014 RAV4. We’ll also cover common mistakes, troubleshooting tips, and how to keep your SUV in top shape between services. By the end, you’ll feel confident handling this task yourself—and maybe even impress your friends with your car-savvy skills.
Key Takeaways
- Know the difference between maintenance and check engine lights: The maintenance light (also called the “Maintenance Required” light) is a routine service reminder, not an indicator of a serious problem.
- Reset only after completing service: Always perform the recommended maintenance—like oil changes or tire rotations—before resetting the light to avoid skipping important care.
- Use the trip meter button: The reset process relies on the trip button on your instrument cluster, not the dashboard or infotainment system.
- Turn the ignition to “ON” but don’t start the engine: This powers the electronics without engaging the engine, which is essential for the reset sequence.
- Follow the exact sequence: Missing a step or going too fast can prevent the reset from working—patience is key.
- Test the reset: After completing the steps, turn the car off and back on to confirm the light is off.
- Keep a service log: Documenting when you reset the light helps track future maintenance and supports resale value.
📑 Table of Contents
Understanding the Maintenance Light on Your 2014 Toyota RAV4
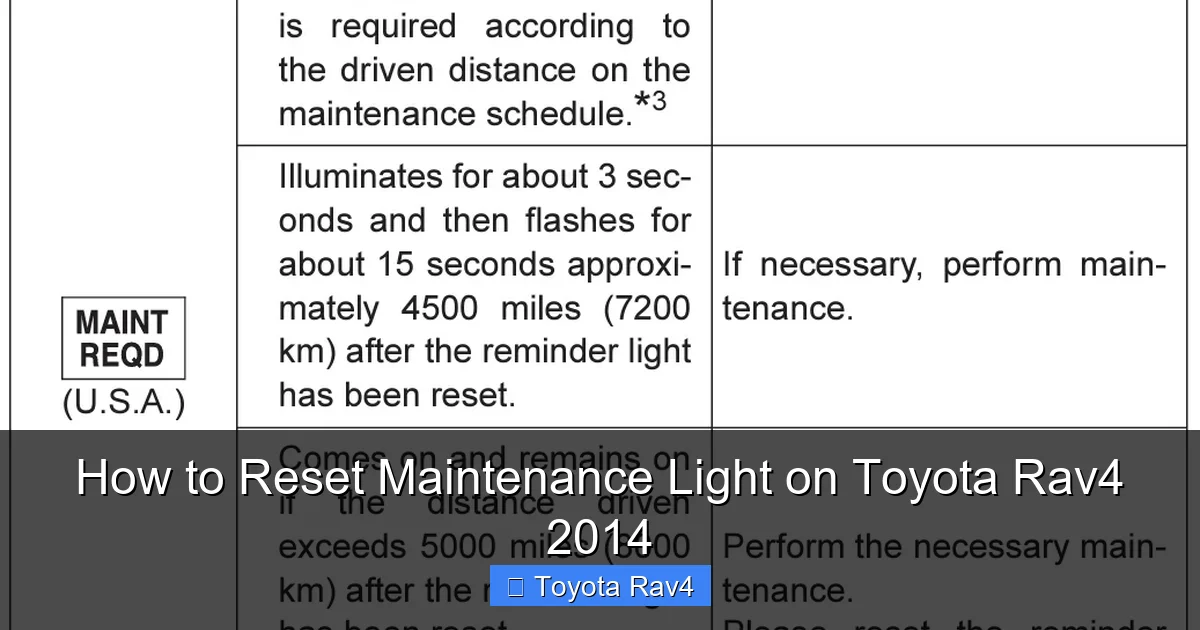
Before diving into the reset process, it’s important to understand what that little light actually means. On the 2014 Toyota RAV4, the maintenance light—often displayed as a yellow wrench icon or the words “Maintenance Required”—is part of Toyota’s Maintenance Reminder System. This system is designed to alert you when your vehicle is due for routine service based on mileage or time intervals.
Unlike the check engine light, which signals a potential mechanical issue, the maintenance light is purely a reminder. It doesn’t mean something is wrong with your RAV4. Instead, it’s Toyota’s way of saying, “Hey, it’s time for your scheduled service!” This could include tasks like changing the engine oil, replacing the oil filter, rotating the tires, checking brake pads, or inspecting fluid levels.
The system typically triggers the light every 5,000 to 10,000 miles, depending on your driving habits and the type of oil used. If you use conventional oil, the interval is usually shorter—around 5,000 miles. With synthetic oil, Toyota often recommends service every 10,000 miles. However, the vehicle’s computer calculates the reminder based on a combination of mileage, engine runtime, and driving conditions, so it’s not always exactly at those intervals.
It’s also worth noting that the maintenance light will reset itself after a certain number of miles if you don’t manually reset it—but that’s not ideal. If you’ve already completed the service, you want the light to reflect that. Otherwise, you might forget when your last oil change was, leading to overdue maintenance. That’s why knowing how to reset the maintenance light on your Toyota RAV4 2014 is such a valuable skill.
Why the Maintenance Light Matters
You might be thinking, “It’s just a light—why does it matter if it’s on or off?” While it’s true that the light won’t affect your RAV4’s performance, keeping it accurate helps you stay on top of your vehicle’s health. Regular maintenance is one of the best ways to extend the life of your SUV, improve fuel efficiency, and avoid costly repairs.
For example, changing your oil on time prevents engine wear, sludge buildup, and overheating. Rotating your tires ensures even tread wear, which improves handling and extends tire life. Checking brake fluid and coolant levels helps prevent overheating and brake failure. When you reset the maintenance light after each service, you create a clear record of when these tasks were last done.
This is especially helpful if you’re the type of driver who likes to keep a service log or if you plan to sell your RAV4 in the future. A well-documented maintenance history can increase your vehicle’s resale value and give buyers confidence in its condition.
Common Misconceptions About the Maintenance Light
There are a few myths floating around about the maintenance light that can lead to confusion. One of the biggest is that the light indicates a problem with the engine. As we mentioned earlier, that’s not true. The check engine light is the one to watch for mechanical issues. The maintenance light is purely a service reminder.
Another misconception is that you need a professional to reset it. While some mechanics or dealerships will do it for you during service, it’s completely unnecessary. The process is designed to be user-friendly and can be done in under a minute with no tools required.
Some drivers also believe that disconnecting the battery will reset the light. While this might work temporarily, it’s not reliable and can reset other systems in your vehicle, like your radio presets or climate control settings. Plus, the light will likely come back on after a few miles if the system doesn’t detect a proper reset.
The best and most accurate way to reset the maintenance light on your Toyota RAV4 2014 is by following the correct button sequence—which we’ll cover in detail next.
Tools and Preparation: What You Need to Reset the Light

Visual guide about How to Reset Maintenance Light on Toyota Rav4 2014
Image source: rav4hub.com
One of the best things about resetting the maintenance light on your 2014 RAV4 is that you don’t need any special tools or equipment. Everything you need is already built into your vehicle. However, there are a few things to keep in mind before you begin to ensure the process goes smoothly.
First, make sure your RAV4 is parked on a flat surface and the engine is off. You’ll be turning the ignition to the “ON” position, but you don’t want the engine running during the reset. This is important because the system needs to be in a specific state to recognize the reset command.
Next, locate the trip meter button on your instrument cluster. This is usually a small button near the speedometer, often labeled “TRIP” or “ODO/TRIP.” It’s used to switch between trip odometer readings (Trip A and Trip B) and the main odometer. You’ll be using this button to cycle through the display and initiate the reset.
It’s also a good idea to have your owner’s manual handy, just in case. While the steps are straightforward, having the manual nearby can help if you run into any issues or want to double-check the process. If you don’t have a physical copy, you can usually find a digital version on Toyota’s official website by searching for your vehicle’s model and year.
When to Reset the Maintenance Light
Timing is important when it comes to resetting the maintenance light. You should only reset it after you’ve completed the recommended service. For example, if the light came on because you’re due for an oil change, make sure you’ve actually changed the oil and filter before resetting the light. Resetting it prematurely can cause you to forget when your last service was, leading to overdue maintenance.
If you’ve had your RAV4 serviced at a dealership or repair shop, they may reset the light for you. However, it’s always a good idea to check the dashboard after the service to confirm. If the light is still on, you can reset it yourself using the steps below.
If you’re doing the service yourself—like changing the oil at home—reset the light as soon as you’re done. This keeps your maintenance schedule accurate and helps you stay organized.
Safety Tips Before Starting
While resetting the maintenance light is a simple process, it’s still important to follow basic safety precautions. Make sure your vehicle is in park (for automatic transmissions) or in neutral with the parking brake engaged (for manual transmissions). This prevents the car from moving accidentally while you’re working on the dashboard.
Also, avoid touching any electrical components or fuses unless you’re experienced. The reset process only involves the ignition and trip button, so there’s no need to open any panels or disconnect anything.
Finally, if you’re unsure about any step, don’t force it. Take your time, follow the instructions carefully, and if something doesn’t seem right, consult your owner’s manual or reach out to a Toyota service center for guidance.
Step-by-Step Guide to Reset the Maintenance Light
Now that you’re prepared, let’s walk through the exact steps to reset the maintenance light on your 2014 Toyota RAV4. This process takes less than two minutes and can be done by anyone, regardless of mechanical experience.
Step 1: Turn the Ignition to “ON”
Start by getting into your RAV4 and closing the door. Insert the key into the ignition and turn it to the “ON” position. This is the position where all the dashboard lights come on, but the engine does not start. You’ll hear a few clicks and see the gauges light up—this means the vehicle’s electronics are powered on.
Do not start the engine. If you accidentally start it, turn it off and wait a few seconds before turning the ignition back to “ON.” The reset process only works when the engine is off.
Step 2: Locate the Trip Button
Look at your instrument cluster, just below the speedometer. You should see a small button labeled “TRIP” or “ODO/TRIP.” This button allows you to switch between the main odometer and the trip odometer readings (Trip A and Trip B).
Press this button once to make sure it’s working. You should see the display change from the main odometer to Trip A or Trip B. This confirms the button is functional and ready for the reset sequence.
Step 3: Turn the Ignition Off
After confirming the trip button works, turn the ignition back to the “OFF” position. Wait about 10 seconds to allow the system to reset. This brief pause ensures the vehicle’s computer is ready for the next step.
Step 4: Press and Hold the Trip Button
Now, press and hold the trip button. While holding it down, turn the ignition back to the “ON” position. Keep holding the trip button—don’t let go yet.
You’ll notice the odometer display start to change. It may show dashes, flash, or begin counting down. This is normal and indicates the system is preparing to reset.
Step 5: Watch for the Reset Confirmation
Continue holding the trip button until the odometer display shows “000000” or begins to flash. This usually takes about 10 to 15 seconds. Once you see this, release the trip button.
At this point, the maintenance light should turn off. If it doesn’t, don’t panic—sometimes it takes a moment. Turn the ignition off and then back on to check.
Step 6: Verify the Reset
Start your RAV4 and let it run for a few seconds. Check the dashboard to confirm the maintenance light is off. If it’s still on, repeat the process, making sure to follow each step carefully.
It’s also a good idea to drive the vehicle for a short distance—about 10 to 20 miles—to ensure the system fully recognizes the reset. In rare cases, the light may come back on if the system doesn’t detect a complete reset.
Troubleshooting Common Issues
Even with clear instructions, sometimes the reset doesn’t work the first time. Here are some common issues and how to fix them.
The Light Won’t Turn Off
If the maintenance light remains on after following the steps, double-check that you completed the service. If you haven’t changed the oil or performed the required maintenance, the system may not allow a reset.
Also, make sure you’re turning the ignition to “ON” and not starting the engine. Starting the engine can interrupt the reset sequence.
If the light still won’t turn off, try the process again, but this time hold the trip button for a full 20 seconds. Sometimes the system needs a bit more time to register the reset.
The Odometer Doesn’t Show “000000”
If the odometer doesn’t flash or show all zeros, you may have released the trip button too soon. Go back to Step 4 and hold the button longer. The display should eventually reset.
If it still doesn’t work, check that your battery is fully charged. A weak battery can cause electrical issues that interfere with the reset process.
The Light Comes Back On After a Few Miles
This can happen if the system doesn’t fully recognize the reset. It’s usually harmless, but it means you may need to repeat the process. Make sure to drive the vehicle for at least 10 miles after resetting to allow the system to update.
In rare cases, a faulty sensor or software glitch could be the cause. If the light keeps coming back on despite repeated resets, consider visiting a Toyota service center for a diagnostic check.
Maintaining Your 2014 RAV4 Between Services
Resetting the maintenance light is just one part of keeping your RAV4 in great shape. To get the most out of your SUV, it’s important to follow a regular maintenance schedule and perform routine checks between services.
Monthly Checks
Take a few minutes each month to inspect your vehicle. Check the tire pressure using a gauge—proper inflation improves fuel efficiency and tire life. Look for any signs of wear or damage on the tires, such as cracks, bulges, or uneven tread.
Also, check the fluid levels under the hood. This includes engine oil, coolant, brake fluid, and windshield washer fluid. Top off any low fluids as needed, but be careful not to overfill.
Every 3,000 to 5,000 Miles
Even if the maintenance light hasn’t come on, consider performing basic maintenance every few thousand miles. This includes checking the air filter, inspecting the brakes, and rotating the tires if you haven’t done so recently.
If you drive in harsh conditions—like extreme heat, cold, or dusty environments—you may need to service your RAV4 more frequently. Toyota recommends adjusting the maintenance schedule based on your driving habits.
Seasonal Maintenance
Before winter, make sure your battery is in good condition and your tires have adequate tread. Consider switching to winter tires if you live in a cold climate.
In the summer, check the air conditioning system and ensure the coolant level is correct to prevent overheating.
Conclusion
Resetting the maintenance light on your 2014 Toyota RAV4 is a simple but important task that helps you stay on top of your vehicle’s service schedule. With just a few steps using the trip button and ignition, you can clear the reminder and keep your SUV running smoothly.
Remember, the maintenance light is a helpful tool—not a warning. By resetting it after each service, you create a clear record of when your RAV4 was last maintained, which supports long-term reliability and resale value.
Whether you’re a DIY enthusiast or just want to save a trip to the mechanic, knowing how to reset the maintenance light gives you more control over your vehicle’s care. So the next time that little wrench icon appears, don’t ignore it—reset it with confidence and keep driving with peace of mind.
Frequently Asked Questions
How often should I reset the maintenance light on my 2014 RAV4?
You should reset the maintenance light every time you complete a scheduled service, such as an oil change or tire rotation. This typically happens every 5,000 to 10,000 miles, depending on your driving habits and oil type.
Can I reset the maintenance light without changing the oil?
Technically, yes—but it’s not recommended. The light is a reminder to perform maintenance, so resetting it without servicing your vehicle can lead to overdue care and potential engine damage.
Will disconnecting the battery reset the maintenance light?
Disconnecting the battery may temporarily turn off the light, but it’s not a reliable method. The light will likely return, and you risk resetting other systems like your radio or climate settings.
What if the maintenance light won’t turn off after resetting?
Double-check that you followed the steps correctly and that the service was completed. If the light persists, try the reset process again or consult a Toyota service center for assistance.
Does the maintenance light affect my RAV4’s performance?
No, the maintenance light is only a reminder and does not impact how your vehicle runs. However, ignoring it can lead to missed services that may affect performance over time.
Can I reset the maintenance light if my RAV4 has a push-button start?
Yes, the process is the same. Press the “Start” button twice without pressing the brake to turn the ignition to “ON,” then follow the same trip button steps to reset the light.